How to set up a VPN connection in Windows 8
Setting up a Virtual Private Network (VPN) connection in Windows 8 allows you to establish a secure and encrypted connection to a remote network or server over the internet. Whether you’re accessing sensitive information from a remote location, bypassing geo-restrictions, or enhancing your online privacy, setting up a VPN connection in Windows 8 is a straightforward process. In this comprehensive guide, we’ll explore everything you need to know about setting up a VPN connection in Windows 8, from accessing VPN settings to configuring connection parameters and troubleshooting common issues.
Understanding VPN Connections:
A VPN connection establishes a secure tunnel between your computer and a remote server or network, encrypting data traffic and protecting it from interception by third parties. VPNs are commonly used to access resources on a corporate network, mask your IP address, and bypass internet censorship or restrictions.
Accessing VPN Settings:
To set up a VPN connection in Windows 8, you’ll need to access the VPN settings, where you can configure connection parameters and authentication details. Here’s how to do it:
- From the Desktop: Click or tap on the network icon in the taskbar notification area, then select “Open Network and Sharing Center.” From there, click or tap on “Set up a new connection or network,” and then choose “Connect to a workplace.”
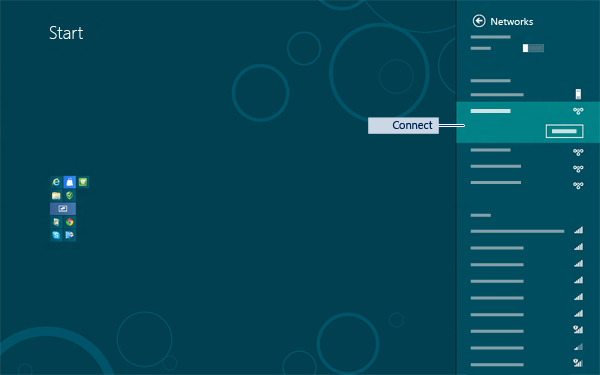
- From PC Settings: Open PC Settings by swiping in from the right edge of the screen, tapping “Settings,” and then selecting “Change PC settings.” From there, click or tap on “Network” > “Connections,” and then choose “Add a VPN connection.”
Configuring VPN Connection Settings:
Once you’ve accessed the VPN settings, you can configure the connection parameters using the following options:
- VPN Provider: Select the type of VPN connection you want to set up, such as “Windows (built-in)” or a third-party VPN service provider.
- Connection Name: Enter a name for the VPN connection to help you identify it later.
- Server Address: Enter the IP address or domain name of the VPN server you want to connect to.
- VPN Type: Choose the type of VPN protocol used by the server, such as PPTP, L2TP/IPsec, SSTP, or IKEv2.
- User Authentication: Enter your username and password for authenticating with the VPN server. You can also configure additional authentication methods if required.
- Optional Settings: Depending on the VPN protocol and server configuration, you may need to specify additional settings such as encryption type, authentication certificate, or DNS server addresses.
Connecting to the VPN:
Once you’ve configured the VPN connection settings, you can connect to the VPN using the following steps:
- From the Desktop: Click or tap on the network icon in the taskbar notification area, then select the VPN connection you configured from the list of available networks. Enter your username and password if prompted, then click or tap on “Connect.”
- From PC Settings: Open PC Settings, navigate to “Network” > “Connections,” and then click or tap on the VPN connection you configured. Enter your username and password if prompted, then click or tap on “Connect.”
Managing VPN Connections:
After setting up a VPN connection in Windows 8, you can manage and modify connection settings as needed:
- Disconnecting: To disconnect from the VPN, click or tap on the network icon in the taskbar notification area, then select the VPN connection and click or tap on “Disconnect.”
- Editing Connection Settings: To modify the settings of an existing VPN connection, open the Network and Sharing Center or PC Settings, navigate to the VPN connection, and click or tap on “Edit settings.”
- Deleting Connection: To remove a VPN connection from your system, open the Network and Sharing Center or PC Settings, navigate to the VPN connection, and click or tap on “Delete.”
Troubleshooting VPN Connections:
If you encounter issues while setting up or using a VPN connection in Windows 8, you can troubleshoot the problem using the following methods:
- Check Connection Settings: Ensure that the VPN server address, VPN type, and authentication details are entered correctly in the VPN connection settings.
- Restart VPN Service: Open the Services app, locate the “IKE and AuthIP IPsec Keying Modules” service, and restart it to refresh the VPN connection.
- Update Network Drivers: Ensure that your network drivers are up to date by visiting the manufacturer’s website and downloading the latest drivers for your network adapter.
- Check Firewall and Antivirus Settings: Verify that your firewall and antivirus software are not blocking the VPN connection or interfering with network traffic.
Conclusion:
Setting up a VPN connection in Windows 8 is a straightforward process that allows you to establish a secure and encrypted connection to a remote network or server. By accessing VPN settings, configuring connection parameters, and connecting to the VPN, you can enhance your online privacy, bypass internet restrictions, and access resources on a remote network with ease. Whether you’re connecting to a corporate network, accessing geo-blocked content, or securing your internet connection while traveling, Windows 8 provides the tools and features you need to set up and manage VPN connections effectively.