How to Correct Moiré Patterns in Scanned Fabric and Print Textures Using Photoshop Fast Fourier Transform Filters
How to Correct Moiré Patterns in Scanned Fabric and Print Textures Using Photoshop Fast Fourier Transform Filters
Moiré patterns are a well-known difficulty in scanning printed materials, woven fabrics, halftone pictures, and other surfaces with repeated textures. Such undesirable patterns emerge as waves, ripples, colored interference, or other geometric distortions not present in the original material. They happen when the repetitive pattern of the object being scanned interacts with the sampling grid of the scanner, causing interference patterns that degrade the image clarity. Severe moiré artifacts may require more than ordinary sharpening, blurring, or noise reduction in Photoshop. A frequency-domain method based on Fast Fourier Transform techniques is proposed to detect and remove recurrent interference while keeping crucial image information. While not all versions of Photoshop provide a native, specialized Fast Fourier Transform filter, the correction in the frequency domain can be performed with third-party plugins or other image-processing software. Understanding how these approaches function allows designers, photographers and specialists in textiles and print production to correct textures scanned more accurately. A well managed procedure can help you minimize undesired interference while preserving the original fabric weave, printed details, tonal transitions and overall image quality.
Moiré Patterns in Scanned Textures: What’s Happening?
Moiré patterns are formed when two repeating structures contact, creating a new visible interference pattern. One structure may be the physical texture of a cloth or the halftone dots of a printed picture. The other structure is caused by the sampling action of the scanner. The artifact produced can be in the form of curved bands, diagonal waves, concentric ripples, or surprising color variations. Fine woven fabrics are especially vulnerable as their threads create regular patterns that may coincide with the pixel grid of the scanner. Printed photographs and magazines can also have moire, as the halftone screens can interfere with the quality of the scanner. The intensity of the artifact relies on the spacing, direction and frequency of the original texture, together with the scanning settings. Moiré needs to be separated from regular noise, dust, scratches and real fabric patterns as the treatment method varies from problem to problem. Over-smoothing might disguise the interference, but might also remove useful texture information. Understanding the origin and structure of the moiré can assist identify whether the best repair is achieved via frequency domain filtering, resampling, selective blurring, or a mix of techniques.
How the Fast Fourier Transform Filter Works
The Fast Fourier translate (FFT) is a computational method to translate picture information from the spatial domain to the frequency domain. In the spatial realm, one can think of an image as a set of pixels laid out with width and height. In the frequency domain, its information is distributed according to the rates of change of brightness, color and texture across the image. Large smooth areas contribute more strongly to lower spatial frequencies . Fine details and repeating patterns contribute to higher frequencies . The recognized frequency peaks, which are commonly generated by regular moiré interference, can be separated and suppressed by using appropriately constructed filters. Unwanted frequency components are muted and an inverse transform used to rebuild the image in the spatial domain. This is different from normal blur, which does not distinguish between frequency information, but treats all nearby pixels the same. Frequency filtering, however, is not inherently discriminating enough to discriminate between all undesired artifacts and real texture. Fabric threads, printed dots and moaré interference may be in overlapping frequency bands. So effective repair involves thorough detection of interference frequencies and a conservative filtering of the data that preserves useful structural information.
Preparing the Scan for Frequency Correction
A clean high quality source scan is the best starting point for moire correction, not an already compressed or substantially modified image. If feasible, scan the original material at an appropriate optical resolution and save the image in a lossless format, such as TIFF. Avoid saving the working file as JPEG frequently, as the compression artifacts make frequency analysis more difficult, and add more undesirable patterns. Open the scan in Photoshop and duplicate the original layer or transform it into a Smart Object before making any damaging modifications. This keeps the repair process reversible and makes the comparison easy. Look at the image at different zoom settings and see if the interference is all over the image or only in some areas. The basic structure of printed halftones, woven cloth and textured paper is quite diverse and thus may need distinct treatments. If you have a picture with big smooth areas and intricate textures you should identify the sections that need correction before applying a global filter. Think about isolating problem areas into their own layers or selections so that you may limit frequency-based modifications to only the information that needs it. This type of preparation minimizes superfluous processing and maintains quality in unaffected places.
Photoshop and FFT-Compatible Tools
There is no universal FFT moiré removal filter incorporated into Photoshop’s basic filter collection, therefore the procedure depends on the tools available in the installed environment. Compatible third-party plugins and other image-processing apps can conduct forward and inverse Fourier transformations or frequency-domain filtering controls. Make sure that the tool you are about to use supports the operating system, Photoshop version, color mode, and bit depth that you are using in the project. Some frequency domain operations require grayscale input while some may use a single color channel or a full color image. When you use an external application, maintain the original size and avoid unwanted color profile conversions when the image passes between programs. Do not save over the original scan, work on a duplicate layer or exported copy. If you want to filter directly by frequency, find buttons that let you set the frequency, the amount of attenuation, and a mask. Begin with conservative settings and review the output before pushing the adjustment. A tool that provides FFT processing should also provide a valid inverse-transform step or a documented mechanism to reconstruct the rectified image. The process reversibility is useful to compare outcomes and tune the setting without collecting damage.
Detecting interference frequencies in the frequency spectrum
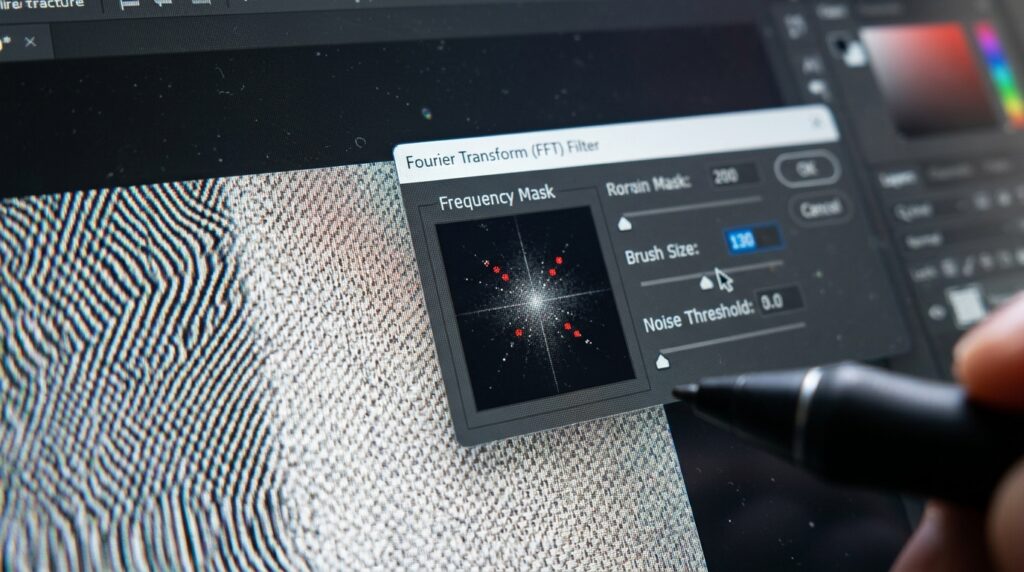
The frequency spectrum shows repetitive features which are not easily diagnosed by looking at the scanned image . In many FFT visualizations the low spatial frequencies are near the center and the more away from the center the higher the frequency. Depending on the shape of the source material, the repeated patterns can appear as bright spots, paired peaks, rings or directed structures. Regular interference patterns often produce distinct peaks outward from the center . The placements of the peaks can reveal the spatial frequency and direction of the pattern . For example, a diagonal cloth weave can create directional elements that differ from those created by a horizontal halftone screen. However, not every brilliant feature is an unpleasant moiré. Real texture , edges , and repeating details may also provide high frequency components . Before you take a peak ask yourself if it is a meaningful part of the original source. In some workflows, viewing the spectrum with alternative channel or gray scale settings can make the interference easier to see. Where possible, use narrow, focused selections or frequency masks instead of suppressing large portions of the spectrum. Proper identification reduces the artifact while limiting the loss of fabric threads, fine print and other vital features.
Moiré Reduction via Selective Frequency Filtering
After the interference frequencies are detected, use a selective filter to lessen their effect without overly attenuating adjacent information. This may be done by notching around isolated peaks in the spectrum, applying a small frequency mask, or reducing a certain range of repeating components. The specific approach varies between programs. Notch filtering is beneficial when the undesired pattern creates distinct peaks, since it filters out only certain frequencies rather than attenuating the entire high frequency range. If the interference is spread over a broader range, broad filtering may be essential. However, there is a risk of weakening actual texture. Begin with a low attenuation strength and progressively raise it. Observe the rebuilt image. If the software displays a preview, check the moiré reduction and the retention of fine details. A good filter should reduce the undesirable waves without producing obvious halos, ringing or unnatural smooth patches. If the artifact changes across the image, better to process discrete sections with varied settings than to force one fix over the whole scan. Do the inverse transform and send the restored image back to Photoshop. Do a careful examination and any other localized tweaks.
Retained Fabric Weave and Printed Halftone Details
One of the most challenging components of moiré cancelation is to separate undesired interference from the true recurring structures that visually identify a substance. Fabric weave is constructed from real threads placed in a regular pattern while printed pictures have halftone dots that can encode tonal data. These structures may lie within the same frequency bands as the undesired aberrations, rendering strong filtering ineffective. If too much high-frequency information is removed by the correction then the fabric may seem as a smooth or synthetic surface and printed photographs may lose delicate tonal character. To get over this problem, compare the filtered result to the original at both normal view size and magnified scale. Save a copy of the image before you apply the correction so you can selectively restore texture if necessary. In Photoshop you can use layer masks to limit the correction to where it is needed and reduced layer opacity to blend the corrected version back in with the original. If you’re using a frequency domain plugin, retain any intermediary layers or masks that allow you to change the filter the next time. For more fragile textures employ the heavy repair only where the interference is most obvious, and treat the rest more softly. It is a balanced method, with a focus on artifact reduction and natural appearance of the scanned content.
Fixing Color Moire and Channel Artifacts
Color moiré can be more difficult to fix than monochrome interference since the artifact might affect the red, green and blue channels differently. Although the basic luminance detail of a scanned printed image may seem rather well preserved, it can have colored waves, false hues, or odd color bands. The artifacts can be caused by the interaction of the printed screen, the scanner sample and the sampling arrangement of the color sensor. If the chosen frequency-processing tool offers the prospect of channel-specific correction, check whether the interference is limited to one channel or is spread across multiple channels. Filtering only the impacted channel can keep more detail than filtering the whole image the same way. However, separation of channels should be done with care as large variations between corrected and uncorrected channels might result in color fringes or unusual hue shifts. When you are done, restore the image to its original color mode and verify its embedded profile and document settings. Then use Photoshop’s adjustment layers or targeted color fixes if you are still seeing any slight color artifacts. Don’t try to get rid of all visible color variation by desaturating broadly, this can lose the original color information. The aim is to eliminate interference but preserve the accurate colors of the material and the believability of the tonal transitions.
Export Corrected Image and Final Quality Checks
Do frequency based correction and check the image at different magnifications before exporting the final file. Make that the repeating waves and bogus patterns are still visible at regular viewing size. Fabric threads, printed dots, text, tiny edges, and the transition zones between corrected areas and uncorrected areas are examined at higher magnification. Look for secondary problems including ringing, soft halos, color fringes, over-smoothing, uneven texture. If the correction seems too harsh, lower the filter’s intensity or blend the modified version with the original using a layer mask. The layered Photoshop file should stay as the original, editable master so that you may make future tweaks without having to redo the entire operation. If you want to print the image, check the production criteria for size, effective resolution, color profile and file format. Lossless TIFF is frequently appropriate for conserving image quality, whereas PSD is useful for retaining editable layers. If you need a flattened delivery file, check the produced output. Don’t just rely on the Photoshop canvas preview. A systematic quality-control procedure helps assure that the frequency-domain correction will generate a clearer image without compromising the authentic texture and detail of the original scan.