Mastering the Art of Creating Dripping Effect in Photoshop: A Comprehensive Guide
Introduction:
In the realm of digital design and visual artistry, the dripping effect stands as a captivating technique that adds drama, fluidity, and a touch of surrealism to images and compositions. Inspired by the organic flow of liquid and the dynamic interplay of light and shadow, this effect transforms ordinary images into mesmerizing works of art that evoke a sense of movement, texture, and depth. Whether used in digital art, photo manipulation, or graphic design, mastering the creation of the dripping effect in Adobe Photoshop offers designers and artists a versatile tool for unleashing their creativity and pushing the boundaries of visual expression. In this comprehensive guide, we will embark on a journey through step-by-step techniques, expert tips, and creative strategies to master the art of creating the dripping effect in Photoshop.
Understanding the Dripping Effect:
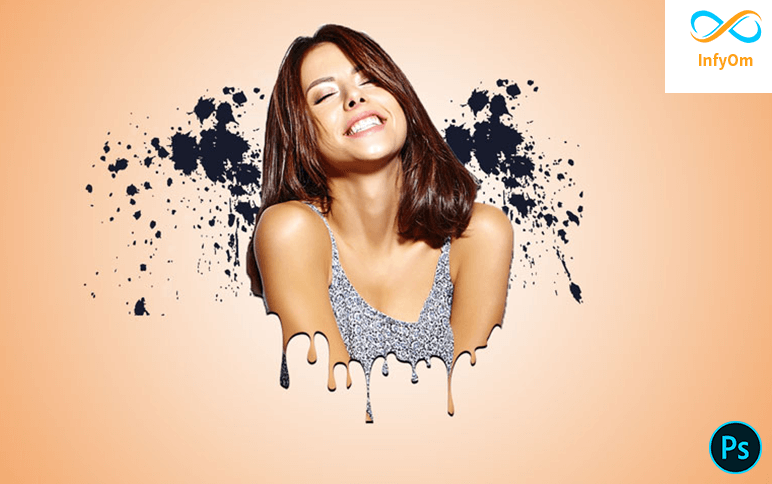
The dripping effect is characterized by the replication of the appearance of liquid droplets or streams flowing down surfaces. This effect can range from subtle drips to cascading torrents, depending on the desired aesthetic and intent of the design. By leveraging techniques such as layer styles, brush tools, and layer blending modes, designers can achieve stunning results that captivate viewers and add dynamic energy to their compositions.
Now, let’s delve into the step-by-step process of creating the dripping effect in Adobe Photoshop:
Step 1: Setting Up the Document:
Begin by opening Adobe Photoshop and creating a new document with dimensions suitable for your design project. Choose a resolution and color mode appropriate for your intended output, such as print or digital display.
Step 2: Selecting the Base Image:
Import the base image onto which you want to apply the dripping effect. This could be a photograph, digital artwork, or any other image that will serve as the foundation for the effect.
Step 3: Creating a New Layer:
Create a new layer above the base image layer by clicking on the “New Layer” icon at the bottom of the Layers panel. This new layer will serve as the canvas for painting the drips.
Step 4: Selecting the Brush Tool:
Select the Brush tool (B) from the toolbar and choose a soft, round brush with a size appropriate for the desired drip effect. Set the foreground color to the color of the liquid you want to simulate, such as water, paint, or blood.
Step 5: Painting the Drips:
With the new layer selected, use the brush tool to paint drips onto the canvas. Start by clicking at the top of the area where you want the drip to begin, then drag the brush downwards to create the elongated shape of the drip. Experiment with different brush sizes and pressures to vary the thickness and opacity of the drips.
Step 6: Adding Variation:
To create a more realistic and organic look, vary the size, shape, and direction of the drips. Avoid painting drips that are perfectly uniform or symmetrical, as this can appear artificial. Instead, aim for irregular shapes and random patterns to mimic the natural flow of liquid.
Step 7: Adding Highlights and Shadows:
To enhance the realism and depth of the dripping effect, add highlights and shadows to the drips. Use techniques such as painting with lighter and darker shades of the liquid color to simulate reflections and shading. Pay attention to the direction of light in the scene and add highlights and shadows accordingly.
Step 8: Blending with the Background:
To seamlessly blend the dripping effect with the background image, experiment with layer blending modes and opacity adjustments. Overlay, Soft Light, and Screen blending modes often work well for blending the drips with the underlying layers while preserving the luminosity and texture of the effect.
Step 9: Adding Texture and Detail:
For added visual interest and realism, consider adding texture and detail to the drips. Experiment with brushes, filters, and layer styles to add texture overlays, splatters, or streaks to the drips, mimicking the appearance of liquid on different surfaces.
Step 10: Final Touches and Exporting:
Once you’re satisfied with the dripping effect and overall composition, take the time to make any final adjustments or refinements to the design. Fine-tune the colors, contrast, and overall atmosphere to ensure that the effect enhances the mood and aesthetic of the artwork. When you’re happy with the final result, save your work and export the design in a high-quality format suitable for your intended use.
Advanced Techniques and Tips:
In addition to the basic steps outlined above, consider exploring advanced techniques and tips to further enhance the dripping effect:
- Layer Masking: Use layer masking to selectively reveal or conceal parts of the dripping effect, allowing for precise control over the appearance and blending of the drips with the background or other elements. This technique can be particularly useful for creating subtle transitions and adding depth to the design.
- Texture Overlays: Experiment with incorporating texture overlays or pattern fills to add depth and visual interest to the drips. Textures such as watercolor paper, concrete, or marble can enhance the realism and texture of the liquid, adding to the overall impact of the effect.
- Custom Brushes: Create custom brushes to add unique and personalized elements to the dripping effect. Experiment with brushes that mimic splashes, drops, or streaks to add authenticity and detail to the drips.
- Animation Effects: For multimedia projects or digital artworks, consider adding animation effects to the dripping effect to create dynamic and interactive visuals. Use keyframes and animation tools in Photoshop or export the design to a video editing software for further customization.
Conclusion:
In conclusion, mastering the creation of the dripping effect in Adobe Photoshop offers designers and artists a powerful and versatile tool for adding drama, fluidity, and visual interest to their compositions. By following the step-by-step techniques outlined in this guide and exploring advanced techniques and tips, you can unleash your creativity and produce stunning artworks that captivate viewers and evoke emotions. Whether used in digital art, photo manipulation, or graphic design, the dripping effect offers endless possibilities for expression and experimentation. Embrace the fluidity of form and the dynamic energy of liquid, and let your imagination soar as you create mesmerizing designs that drip with creativity and visual impact.


