Mastering Motion: A Comprehensive Guide to Harnessing Keyframes in Adobe After Effects
Introduction:
Keyframes are the building blocks of animation in Adobe After Effects, allowing users to define the starting and ending points of animation parameters over time. By strategically placing keyframes and adjusting their properties, motion graphic designers and animators can create dynamic movement, transitions, and visual effects that bring their creations to life. In this extensive guide, we’ll explore the intricacies of using keyframes in Adobe After Effects, covering everything from basic keyframing principles to advanced animation techniques, to help you master the art of motion graphics and animation.
Understanding Keyframes in Adobe After Effects:
Keyframes are markers that define the values of animation properties at specific points in time, serving as the foundation of animation in Adobe After Effects. Each keyframe represents a snapshot of the animation state at a particular moment, with properties such as position, scale, rotation, opacity, and effects parameters being controlled by keyframes. By setting keyframes at different points in time and adjusting their properties, users can create smooth, fluid motion that brings their designs to life with dynamic movement and visual interest.
Key Elements of Keyframes in Adobe After Effects:
Using keyframes effectively in Adobe After Effects involves understanding several key elements, including:
- Property Animation: Property animation refers to the process of animating individual properties of layers using keyframes. Properties such as position, scale, rotation, opacity, and effects parameters can be animated by setting keyframes for their values at different points in time and allowing After Effects to interpolate the values between keyframes to create smooth motion transitions.
- Keyframe Types: After Effects supports several types of keyframes, including linear keyframes, bezier keyframes, hold keyframes, and roving keyframes. Linear keyframes create uniform motion between keyframes, bezier keyframes enable users to create custom motion curves for smoother animation, hold keyframes maintain constant values until the next keyframe, and roving keyframes move along the timeline with the layer they are applied to.
- Keyframe Interpolation: Keyframe interpolation determines the behavior of animation between keyframes, influencing factors such as speed, acceleration, and easing. After Effects provides various interpolation methods, including linear, bezier, ease in, ease out, and custom easing curves, which allow users to control the timing and motion curves of keyframe animations to achieve desired motion effects.
- Temporal and Spatial Interpolation: Temporal interpolation affects the timing and pacing of animation over time, while spatial interpolation determines the trajectory and path of motion in space. By adjusting temporal and spatial interpolation settings for keyframes, users can control the speed, direction, and style of animation to create dynamic movement and visual effects.
- Graph Editor: The Graph Editor is a powerful tool in After Effects that allows users to visualize and edit the motion curves of keyframe animations. By accessing the Graph Editor, users can manipulate bezier handles, adjust keyframe velocities, and fine-tune animation curves to achieve precise control over motion dynamics and timing.
Step-by-Step Guide to Using Keyframes in Adobe After Effects:
Follow these step-by-step instructions to use keyframes in Adobe After Effects:
- Select Your Layer: Begin by selecting the layer you want to animate in the Composition panel. This could be a text layer, shape layer, image layer, or any other type of layer that supports animation properties.
- Choose the Property to Animate: Identify the property you want to animate on the selected layer, such as position, scale, rotation, opacity, or effects parameters. Click on the property name to reveal its keyframe properties in the Timeline panel.
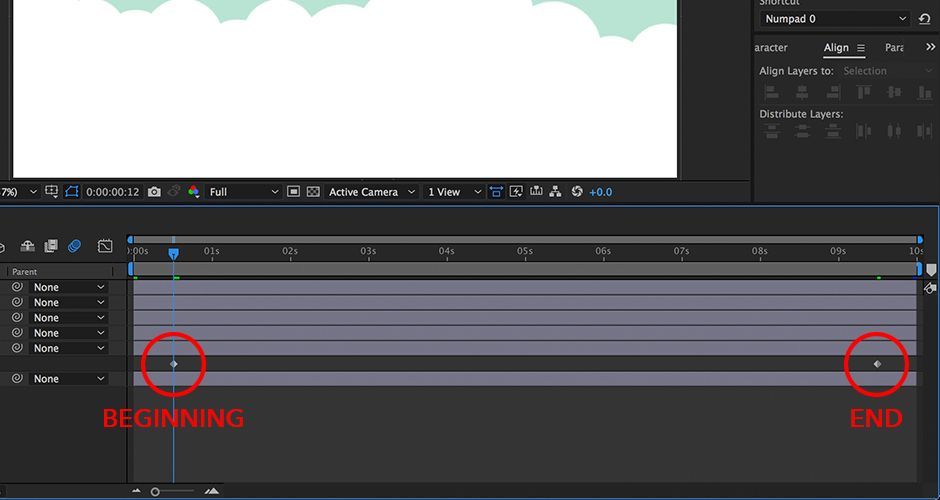
- Set Keyframes: Move the playhead to the desired start time for the animation by dragging it along the timeline. Then, click the stopwatch icon next to the property name to set the first keyframe for the property at its current value.
- Adjust Property Values: Move the playhead to the desired end time for the animation, and adjust the property values of the selected property to define the ending state of the animation. After Effects will automatically create a second keyframe at the current time with the adjusted property values.
- Preview Animation: Preview the animation by playing the composition in real-time or scrubbing the playhead along the timeline. Observe how the property values change over time between keyframes, creating smooth motion transitions between the starting and ending states of the animation.
- Refine Animation: Fine-tune the animation by adjusting the properties of the keyframes, such as their positions, values, and interpolation settings. Use the Graph Editor to visualize and edit the motion curves of keyframe animations, and experiment with different interpolation methods and easing curves to achieve the desired motion effect.
- Add Additional Keyframes: To create more complex animations, add additional keyframes at intermediate points along the timeline to define additional animation states and transitions. Repeat the process of setting keyframes, adjusting property values, and refining animation dynamics until you achieve the desired motion effect.
- Apply Effects and Enhancements: Enhance your animation by applying effects, transitions, and motion graphics elements to the animated layer. Experiment with effects presets, such as blurs, glows, distortions, or color corrections, to add visual interest and style to your animation, and use motion graphics elements, such as text, shapes, or particles, to complement the animation and reinforce key messages or themes.
- Preview and Render: Preview the final animation by playing the composition in real-time, and make any additional adjustments or refinements as needed. Once you’re satisfied with the animation, render and export the composition as a video file by selecting “Composition” > “Add to Render Queue” from the menu and configuring the render settings, including output format, resolution, and codec options.
Best Practices for Using Keyframes in Adobe After Effects:
To maximize the effectiveness of keyframes in Adobe After Effects, consider the following best practices:
- Plan Your Animation: Before animating, plan out the desired motion and timing for your animation, and storyboard key poses and movements to guide your animation process. Consider factors such as the message, mood, and audience of your animation, and visualize the animation in your mind’s eye before setting keyframes.
- Start Simple: Begin by experimenting with basic keyframe animations and simple motion transitions to familiarize yourself with the keyframe properties and controls in After Effects. Focus on mastering the fundamentals of keyframing, such as setting keyframes, adjusting values, and interpolating motion curves, before tackling more complex animation challenges.
- Use Bezier Curves: Take advantage of bezier keyframes and custom easing curves to create smooth, natural-looking motion transitions between keyframes. Use the Graph Editor to visualize and edit motion curves, and manipulate bezier handles to control the acceleration and deceleration of animation, creating dynamic and expressive movement that adds polish and professionalism to your animation.
- Keep it Consistent: Maintain consistency in your animation by ensuring that keyframes are spaced evenly and property values change smoothly and predictably over time. Avoid abrupt changes in motion or pacing that may disrupt the flow of the animation, and strive for coherence and continuity in your animation design.
- Experiment and Iterate: Don’t be afraid to experiment with different keyframe setups, animation techniques, and effects combinations to discover new creative possibilities. Iterate on your animation designs and sequences, and be open to exploring unconventional approaches and solutions to achieve the desired motion effect and visual impact.
Conclusion:
In conclusion, keyframes are a fundamental tool in Adobe After Effects that empower motion graphic designers and animators to create dynamic, expressive animations with precision and control. By understanding the principles of keyframing, mastering the tools and techniques of After Effects, and following best practices for animation design, you can produce animations that captivate, inform, and inspire audiences. So, dive into the world of keyframe animation, experiment with different animation styles and effects, and unleash your creativity to create compelling and memorable animations that leave a lasting impression.


