Mastering Finesse: A Comprehensive Guide to Controlling Curve Smoothness in CorelDRAW
Introduction:
CorelDRAW, a powerhouse in the realm of vector graphics editing, stands as a canvas for artists, designers, and illustrators seeking precision and control in their digital creations. Among the multitude of tools, the ability to control curve smoothness holds paramount importance. In this extensive guide, we will delve into the intricacies of manipulating curve smoothness in CorelDRAW, exploring various techniques, customization options, and advanced tips. Whether you’re refining freehand sketches, perfecting intricate illustrations, or sculpting smooth shapes, mastering the art of controlling curve smoothness elevates your creative possibilities within the dynamic world of CorelDRAW.
Understanding Curve Smoothness in CorelDRAW:
Curve smoothness refers to the fluidity and continuity of a curve, influencing the transition between its nodes and control handles. In CorelDRAW, curves can be created with different levels of smoothness, allowing designers to achieve varied effects and styles. Whether you’re working with the Freehand tool, Bézier tool, or shaping operations, CorelDRAW provides a range of tools and settings to control the smoothness of your curves.
Basic Techniques for Controlling Curve Smoothness:
- Freehand Tool: When using the Freehand tool, the smoothness of your strokes is influenced by the speed and fluidity of your hand movements. To control smoothness, experiment with different drawing speeds. Slower movements generally result in smoother curves, while faster strokes create more dynamic and angular lines.
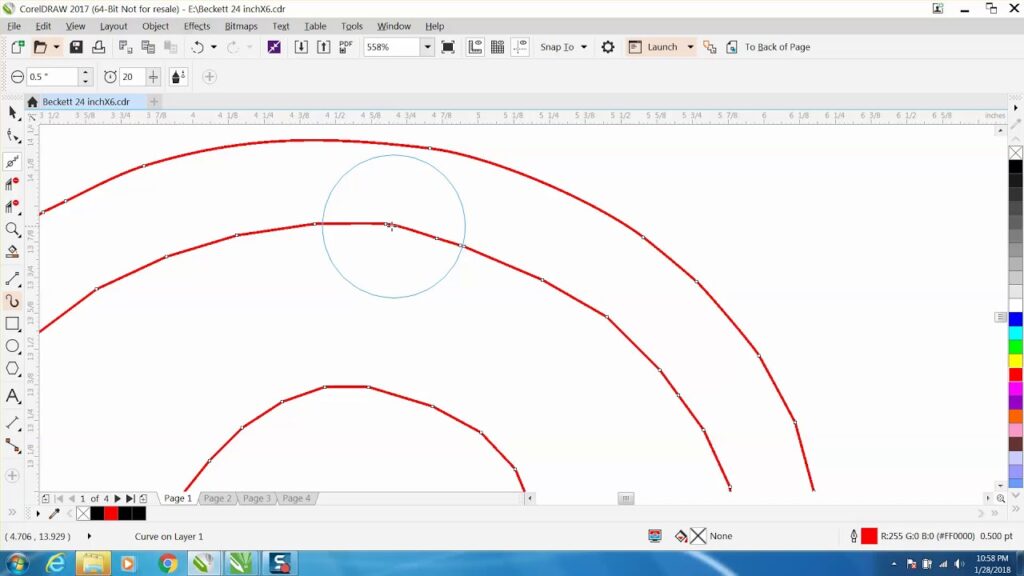
- Bézier Tool: The Bézier tool allows for precise control over curve smoothness. Click to create nodes, and drag out control handles to define the curvature of the curve. The length and angle of these handles determine the smoothness of the curve segment between two nodes.
- Shaping Operations: When using shaping operations like the ‘Smooth’ tool, the degree of smoothing is influenced by the tool settings. Adjust the tool’s properties in the Property Bar to control the amount of smoothing applied to the selected curves.
- Shape Recognition: CorelDRAW’s ‘Shape Recognition’ feature can be used to automatically smooth or simplify complex shapes. Access the ‘Object’ menu, choose ‘Shaping,’ and then select ‘Shape Recognition.’ Experiment with different settings to achieve the desired level of smoothness.
Advanced Techniques for Fine-Tuning Curve Smoothness:
- Node Editing: The Node Edit tool provides granular control over curve smoothness. Select individual nodes, and manipulate the position of control handles to refine the curvature. Right-click on nodes to access additional options, such as converting nodes to smooth or symmetrical.
- Pressure-Sensitive Tablets: If you’re using a pressure-sensitive tablet, leverage its capabilities to control curve smoothness. Adjust the pressure settings in CorelDRAW to influence the thickness and smoothness of your strokes. This is particularly useful when working with tools like the Artistic Media tool.
- Customizing Brush Strokes: For users employing brush tools or the Artistic Media tool, customize brush strokes to control smoothness. Adjust the brush properties in the Property Bar, such as the size, density, and angle, to achieve the desired level of smoothness in your brush strokes.
Customization Options for Precision:
- Adjusting Line Properties: Tailor the appearance of your curves by adjusting line properties. Access the ‘Outline’ or ‘Pen’ settings in the ‘Object Properties’ docker to modify line thickness, color, and style for the entire curve.
- Fine-Tuning with the Shape Tool: After controlling curve smoothness, use the Shape tool to fine-tune individual nodes and segments. Click and drag nodes or segments to achieve pixel-perfect adjustments, enhancing precision in your design.
- Snapping Options for Alignment: Utilize snapping options to ensure accurate alignment of curves. Enable ‘Snap to Grid,’ ‘Snap to Guidelines,’ or ‘Snap to Objects’ to facilitate precise placement and maintain consistency.
Troubleshooting and Optimization Strategies:
- Balancing Speed and Precision: Experiment with different drawing speeds and input devices to find the balance between speed and precision that suits your workflow. Adjust the sensitivity of input devices and explore tablet settings for optimal control.
- Undo and Redo: If the result doesn’t align with your vision, utilize the ‘Undo’ command (Ctrl + Z) to revert the action. Conversely, use ‘Redo’ (Ctrl + Y) to reapply changes that were undone.
- Saving Iterations and Versions: Save iterations and versions of your design after adjusting curve smoothness. This allows you to revisit and build upon different stages of your project, fostering a non-linear and exploratory approach to design.
Conclusion:
Controlling curve smoothness in CorelDRAW is a nuanced skill that empowers designers to achieve precision and finesse in their digital creations. By exploring the various techniques, customization options, and advanced tips presented in this comprehensive guide, you’ll gain the confidence to sculpt curves with ease and precision. Whether you’re sketching, illustrating, or designing intricate details, CorelDRAW provides a versatile platform to control the smoothness of your curves within the dynamic world of vector graphics. Embrace the fluidity and control afforded by curve smoothness settings, and let your creativity flourish on the digital canvas with the comprehensive tools CorelDRAW provides.