Chromatic Mastery: A Comprehensive Guide to Changing Line and Outline Colors in CorelDRAW
Introduction:
CorelDRAW, a premier vector graphics editor, empowers designers to create vibrant and captivating visual compositions. Among its myriad features, the ability to change the color of lines or outlines stands as a fundamental skill in the digital artist’s toolkit. In this extensive guide, we will delve into the intricacies of altering line and outline colors in CorelDRAW, exploring various techniques, customization options, and advanced tips. Whether you’re enhancing the visual impact of illustrations, refining typography, or creating intricate designs, mastering the art of changing line and outline colors elevates your creative possibilities within the dynamic realm of CorelDRAW.
Understanding Line and Outline Colors in CorelDRAW:
Lines and outlines are crucial elements in vector graphics, providing definition, structure, and visual impact to designs. Changing their color allows designers to establish hierarchy, convey mood, and enhance overall aesthetics. CorelDRAW offers a range of tools and methods to manipulate the color of lines and outlines, enabling users to create dynamic and visually compelling artwork.
Basic Techniques for Changing Line and Outline Colors:
- Selecting the Object: Begin by selecting the object containing the line or outline whose color you want to change. Use the Pick tool to click on the desired object, ensuring it is highlighted.
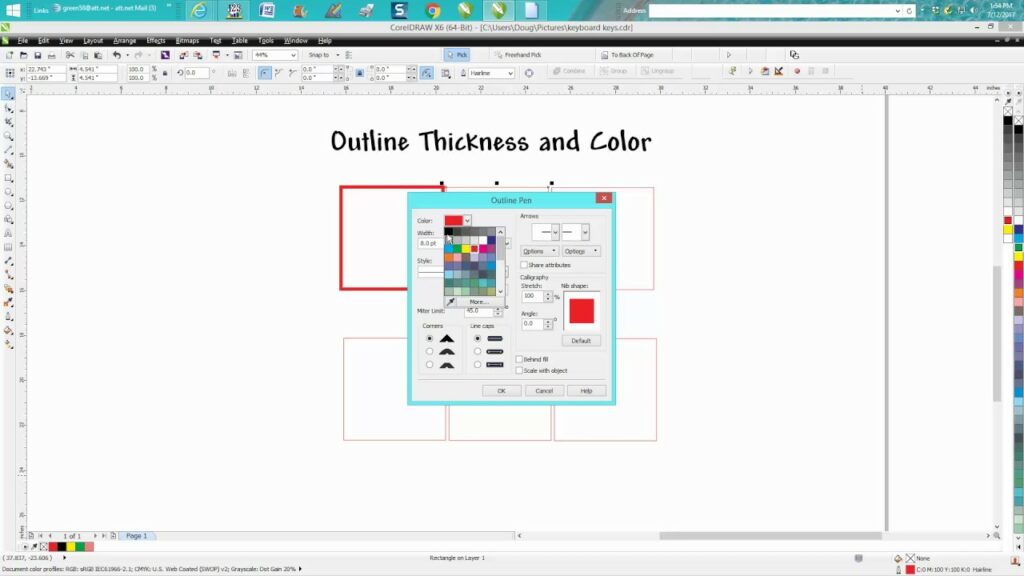
- Accessing Color Options: Locate the ‘Outline’ or ‘Pen’ settings in the ‘Object Properties’ docker. Depending on your version of CorelDRAW, these settings may also be available in the Property Bar or the color palette.
- Choosing a New Color: Click on the color swatch associated with the outline or pen settings. This action opens the color picker, providing a spectrum of colors to choose from. Select a new color by clicking on it.
- Applying the Color: Once you’ve chosen the new color, click ‘OK’ to apply the changes. The outline or line of the selected object will now reflect the chosen color.
Advanced Techniques for Fine-Tuning Line and Outline Colors:
- Applying Gradients and Patterns: CorelDRAW allows for more sophisticated coloring options beyond a single solid color. Experiment with gradients and patterns by accessing the ‘Fill’ settings in the ‘Object Properties’ docker. Apply gradient fills or choose pattern fills to add depth and complexity to your lines or outlines.
- Using the Color Styles Docker: Leverage the Color Styles docker for efficient color management. Create and save color styles to maintain consistency across your design. This is particularly useful when working on projects with specific color schemes.
- Color Harmonies and Palettes: Explore color harmonies and palettes to enhance your color selection process. CorelDRAW provides tools to create and explore color schemes, ensuring your line and outline colors harmonize with the overall design.
Customization Options for Precision:
- Adjusting Line Thickness: Tailor the appearance of your lines by adjusting line thickness. Access the ‘Outline’ or ‘Pen’ settings in the ‘Object Properties’ docker to modify line thickness, ensuring your design maintains visual balance and coherence.
- Fine-Tuning with the Shape Tool: After changing line or outline colors, use the Shape tool to fine-tune individual nodes and segments. Click and drag nodes or segments to achieve pixel-perfect adjustments, enhancing precision in your design.
- Snapping Options for Alignment: Utilize snapping options to ensure accurate alignment of objects and lines. Enable ‘Snap to Grid,’ ‘Snap to Guidelines,’ or ‘Snap to Objects’ to facilitate precise placement and maintain consistency.
Troubleshooting and Optimization Strategies:
- Global vs. Local Changes: Consider whether you want to make a global or local color change. Global changes apply the color adjustment to all instances of the selected object throughout the document, while local changes affect only the selected instance.
- Spot Colors and CMYK/RGB Mode: Be mindful of color modes, especially when working on print projects. Ensure that your color choices are in the appropriate mode, whether it’s CMYK for print or RGB for digital. Explore the use of spot colors for specific printing requirements.
- Saving Color Styles: To streamline your workflow, save color styles for commonly used color combinations. This ensures consistency in your design and allows for quick application of predefined color schemes.
Conclusion:
Changing line and outline colors in CorelDRAW is a fundamental skill that empowers designers to infuse vibrancy and character into their digital creations. By exploring the various techniques, customization options, and advanced tips presented in this comprehensive guide, you’ll gain the confidence to manipulate line and outline colors with ease and precision. Whether you’re working on illustrations, typography, or intricate designs, CorelDRAW provides a versatile platform to unleash your creativity within the dynamic world of vector graphics. Embrace the chromatic possibilities that changing line and outline colors offer, and let your designs flourish on the digital canvas with the comprehensive tools CorelDRAW provides.