Mastering Visibility: A Comprehensive Guide to Showing or Hiding a Preview of the Resulting Curve in CorelDRAW
James February 2, 2024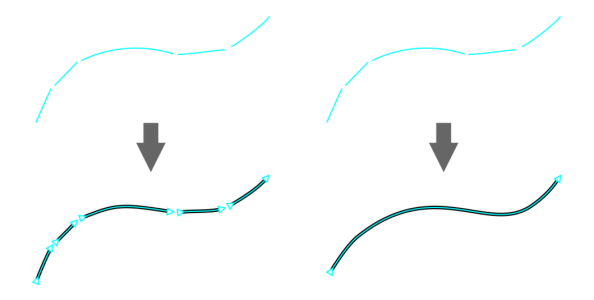
Introduction:
CorelDRAW, a leading vector graphics editor, offers a rich set of tools and features that empower artists, designers, and illustrators. Among the myriad functionalities, the ability to show or hide a preview of the resulting curve stands out as a nuanced tool for achieving precision and control in digital design. In this comprehensive guide, we will explore the intricacies of displaying or concealing a preview of the resulting curve in CorelDRAW, delving into various techniques, customization options, and advanced tips. Whether you’re fine-tuning complex illustrations, experimenting with different design iterations, or seeking a non-destructive approach to curve creation, mastering the art of preview visibility enhances your creative workflow within the dynamic realm of CorelDRAW.
Understanding Preview Visibility in CorelDRAW:
Preview visibility refers to the real-time display or concealment of the result as you work with certain tools or operations. This feature is particularly valuable when creating and modifying curves, providing immediate feedback on the changes you make. CorelDRAW allows users to toggle the visibility of the preview, empowering them to assess the impact of adjustments and refine designs with precision.
Basic Techniques for Preview Visibility:
- Accessing Preview Options: Begin by selecting the tool or operation that involves curve creation or modification. For example, when using the Freehand tool, Bézier tool, or shaping operations, explore the options available in the Property Bar or associated docker to find the “Preview” checkbox.
- Toggle Preview On/Off: With the tool or operation selected, locate the “Preview” checkbox and toggle it on or off based on your preference. When activated, the preview will be visible, allowing you to see the result in real-time as you make adjustments. Conversely, turning off the preview temporarily hides the result.
- Observing Real-Time Changes: Experiment with the selected tool or operation while keeping the preview active. As you draw, modify, or reshape curves, observe how the preview dynamically reflects the changes. This real-time feedback facilitates a more intuitive and responsive design process.
Advanced Techniques for Preview Visibility:
- Customizing Preview Options: Some tools and operations offer additional customization options for the preview. For example, when using the Shape tool, explore the Property Bar for options like “Show Nodes” or “Show Outlines” to tailor the preview to your specific needs.
- Previewing Specific Components: In certain scenarios, you may want to preview specific components of a design. Utilize the “Outline” or “Wireframe” view modes to focus on the structure of curves without the distraction of fills or effects. Access these view modes through the View menu or the View toolbar.
- Layer Management for Non-Destructive Edits: Employ a strategic approach to layer management for non-destructive editing. Place different elements or iterations of your design on separate layers. By toggling the visibility of layers, you can preview different versions or components of your design without affecting the overall composition.
Customization Options for Precision:
- Fine-Tuning with the Shape Tool: After previewing the result, use the Shape tool to fine-tune individual nodes and segments. Click and drag nodes or segments to achieve pixel-perfect adjustments, enhancing precision in your design.
- Adjusting Line Properties: Tailor the appearance of the curves by adjusting line properties. Access the ‘Outline’ or ‘Pen’ settings in the ‘Object Properties’ docker to modify line thickness, color, and style for the entire curve.
- Snapping Options for Alignment: Utilize snapping options to ensure accurate alignment of curves. Enable ‘Snap to Grid,’ ‘Snap to Guidelines,’ or ‘Snap to Objects’ to facilitate precise placement and maintain consistency.
Troubleshooting and Optimization Strategies:
- Performance Considerations: If you experience lag or performance issues while working with the preview active, consider adjusting the display quality settings. Access the ‘View’ menu, choose ‘Display Quality,’ and select an option that balances quality with performance.
- Saving Iterations and Versions: Save iterations and versions of your design as you work with different preview options. This allows you to revisit and build upon different stages of your project, fostering a non-linear and exploratory approach to design.
- Undo and Redo: If the previewed changes do not align with your vision, utilize the ‘Undo’ command (Ctrl + Z) to revert the action. Conversely, use ‘Redo’ (Ctrl + Y) to reapply changes that were undone.
Conclusion:
Mastering the visibility of a preview in CorelDRAW is a fundamental skill that enhances precision and control in digital design. By exploring the various techniques, customization options, and advanced tips presented in this comprehensive guide, you’ll gain the confidence to toggle preview visibility with ease and precision. Whether you’re crafting intricate illustrations, experimenting with different design iterations, or seeking a dynamic and responsive design process, CorelDRAW empowers you to create with unparalleled flexibility within the dynamic world of vector graphics. Embrace the versatility of preview visibility, and let your creativity flourish on the digital canvas within the comprehensive toolset that CorelDRAW provides.