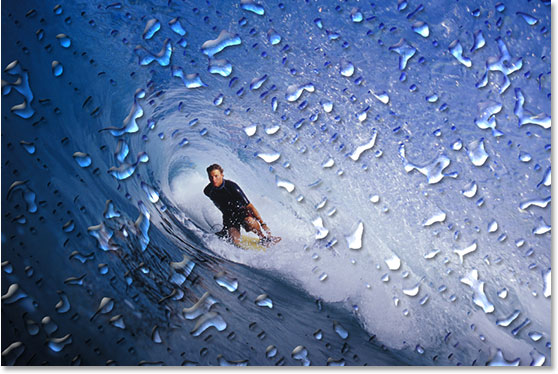
Crafting Photorealism: A Comprehensive Guide to Adding Realistic Water Drops to a Photo with Photoshop
Introduction:
In the realm of digital image manipulation, Adobe Photoshop stands as a powerhouse, offering an array of tools that allow artists and designers to breathe life into their creations. One intriguing and visually captivating technique is the addition of realistic water drops to photographs, a process that elevates the visual appeal and storytelling potential of an image. This comprehensive guide explores the meticulous steps, creative considerations, and advanced techniques involved in seamlessly integrating lifelike water droplets into a photograph using Adobe Photoshop.
I. Understanding the Art of Realistic Water Drops:
- Purpose and Impact: The addition of water drops to a photo serves various purposes, from enhancing the realism of a rainy scene to evoking a sense of freshness or drama. Understanding the intended impact informs the approach to the creation of realistic water drops.
- Photorealism as a Goal: Striving for photorealism is key to the success of this technique. Attention to detail, understanding light and shadow, and mimicking the physics of water drops contribute to achieving a convincing and immersive result.
II. Selection of Appropriate Images:
- Choosing Suitable Photographs: Selecting the right base image is crucial. Consider the context, lighting conditions, and overall theme of the photograph. Images with smooth surfaces, reflective elements, or natural water sources are particularly conducive to realistic water drop additions.
- High-Resolution Considerations: Ensure that both the base photograph and the water drop images are of high resolution. This guarantees precision in detailing and provides flexibility for adjustments during the editing process.
III. Capturing or Sourcing Water Drop Images:
- Photographing Real Water Drops: For those aiming for authenticity, capturing actual water drops on a glass surface or photographing water droplets in various conditions can provide realistic source material.
- Sourcing Stock Images: Alternatively, high-quality stock images of water drops are available on various platforms. Choose images that align with the lighting and perspective of the base photo to maintain visual cohesion.
IV. Preparing the Base Photograph:
- Adjusting Color and Tone: Before introducing water drops, fine-tune the color and tone of the base photograph. This involves adjusting saturation, brightness, and contrast to create a harmonious canvas for the upcoming water drop additions.
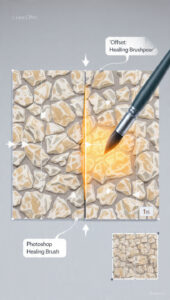
- Cleaning the Surface: If the base photo contains imperfections or distractions, use Photoshop’s retouching tools to clean the surface. This ensures that the focus remains on the realism of the water drops.
V. Isolating Water Drop Images:
- Precise Selection Techniques: Use selection tools, such as the Pen Tool or Magic Wand, to precisely isolate water drop images from their backgrounds. Achieving clean selections is vital for seamless integration into the base photograph.
- Refining Edges: Apply the Refine Edge tool to refine the edges of the water drop selections. Feathering and smoothing can be adjusted to match the soft and natural appearance of real water droplets.
VI. Placing Water Drops onto the Base Photo:
- Layering Technique: Open the selected water drop images in Photoshop and place them as new layers onto the base photograph. Align the water drops with the surface or elements of the base photo where water droplets would naturally accumulate.
- Scaling and Rotating: Adjust the size and rotation of each water drop layer individually to simulate the natural variations in droplet size and orientation. This step contributes to the overall authenticity of the composition.
VII. Mimicking Reflections and Highlights:
- Understanding Light Sources: Analyze the existing light sources in the base photo, such as sunlight or artificial lighting. Mimic these light sources when adding reflections and highlights to the water drops for consistency.
- Adding Reflections: Use a soft brush and low opacity settings to paint subtle reflections on the lower portions of the water drops. This simulates the interaction of light with the reflective surfaces of the droplets.
VIII. Adjusting Transparency and Blending Modes:
- Opacity for Realism: Adjust the opacity of each water drop layer to mimic the transparency of real water droplets. Vary the opacity based on the droplet’s size, location, and the intensity of light falling on it.
- Experimenting with Blending Modes: Experiment with blending modes, such as Screen or Overlay, to integrate the water drops seamlessly into the base photograph. Blending modes enhance the interaction between the droplets and the underlying surface.
IX. Creating Shadows and Depth:
- Drop Shadow Effects: Apply subtle drop shadows beneath each water drop to simulate the cast shadows they would naturally create. Adjust shadow settings to align with the direction of light in the base photo.
- Depth Through Layer Order: Consider the layer order of the water drop images. Place smaller droplets on top of larger ones, contributing to a sense of depth and realism within the composition.
X. Fine-Tuning with Layer Styles and Filters:
- Layer Styles for Refinement: Explore layer styles such as Inner Shadow or Outer Glow to refine the appearance of water drops. These effects add subtle highlights and shadows, enhancing the three-dimensional quality of the droplets.
- Gaussian Blur for Depth: Apply a slight Gaussian Blur to some water drop layers to introduce a sense of depth and simulate the natural blurring effect that occurs with objects in the foreground.
XI. Attention to Details:
- Micro-Details with Brushes: Utilize brushes to add micro-details such as tiny water splashes or ripples around the base of each water drop. These details contribute to the overall realism and dynamic quality of the composition.
- Color Matching: Ensure that the color of each water drop aligns with the surrounding environment. Use the Eyedropper tool to sample colors from the base photo and apply them to the water drop layers for seamless integration.
XII. Final Review and Adjustments:
- Zooming In for Precision: Zoom in for a close inspection of the entire composition. Pay attention to details, edges, and the overall cohesion of the water drops within the photograph.
- Iterative Refinement: The process of adding realistic water drops may involve several iterations of refinement. Make incremental adjustments, seeking a balance between realism and visual impact.
XIII. Saving and Exporting:
- Preserving Layers: Save the Photoshop project file with layers intact to preserve the flexibility for future adjustments or edits. This is particularly useful when fine-tuning specific elements.
- Exporting for Different Platforms: When satisfied with the composition, export the final image in the desired format. Consider the platform where the image will be showcased – whether for print, web, or social media – and adjust the resolution accordingly.
XIV. Exploring Artistic Variations:
- Dynamic Water Drop Patterns: Experiment with dynamic patterns and arrangements of water drops to create visually striking effects. Consider clustering drops, forming trails, or even simulating a rainfall effect for added drama.
- Combining with Other Elements: Integrate water drops with other Photoshop techniques or elements, such as mist, reflections, or lens flares, to craft a comprehensive and visually engaging scene.
XV. Troubleshooting Common Challenges:
- Realism Discrepancies: If certain water drops appear less realistic, revisit their placement, transparency, or reflections. Minor adjustments can often enhance the overall realism of the composition.
- Consistency in Lighting: Ensure consistency in the lighting direction and intensity throughout the image. Inconsistencies can disrupt the illusion of natural cohesion between the water drops and the base photograph.
XVI. Inspiration and Learning Resources:
- Studying Photorealistic Artwork: Explore the work of digital artists renowned for their photorealistic compositions. Analyze their techniques and approaches to gain inspiration for refining your own skills in creating realistic water drops.
- Online Tutorials and Workshops: Participate in online tutorials and workshops dedicated to advanced Photoshop techniques. Continuous learning and exposure to diverse styles contribute to the evolution of your artistic capabilities.
XVII. Conclusion: Mastering the Art of Realistic Water Drops in Photoshop
In conclusion, adding realistic water drops to a photo in Adobe Photoshop is a meticulous yet rewarding process that elevates digital artistry to new heights. Through a combination of precise selection, thoughtful placement, and nuanced adjustments, digital artists can transform ordinary photographs into captivating scenes that resonate with realism. Armed with the comprehensive guide provided here, aspiring creators can embark on a journey of mastery, exploring the nuances of water drop artistry and leaving an indelible mark on the canvas of digital creativity.