Unveiling Artistry: A Comprehensive Guide to Tearing a Photo to Reveal Another in Photoshop
Introduction:
Adobe Photoshop stands as a pinnacle in the realm of digital image manipulation, offering a myriad of tools that empower creative minds to transform photographs into captivating works of art. One intriguing technique within the realm of Photoshop wizardry is the art of tearing a photo to reveal another beneath its surface. This comprehensive guide explores the intricate steps, creative possibilities, and artistic considerations involved in this captivating process.
I. Setting the Stage for Torn Photo Artistry:
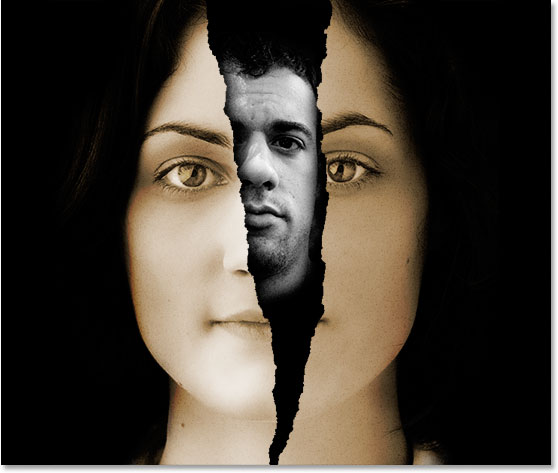
- Understanding the Concept: Tearing a photo in Photoshop involves creating a visual illusion where one image appears to be torn or ripped to reveal another beneath it. This technique adds depth, drama, and narrative to an image, making it a powerful tool for digital artists and graphic designers.
- Required Tools and Skills: Before embarking on this creative journey, familiarize yourself with essential tools in Photoshop, including the Layers panel, Selection tools, and Masking techniques. Basic proficiency in Photoshop is recommended to make the most of this intricate process.
II. Selecting Suitable Images:
- Choosing Base and Revealed Images: Start by selecting two images that complement each other thematically or visually. The base image will serve as the starting point, while the revealed image will be the hidden gem beneath the torn surface. Ensure both images have sufficient resolution for detailed editing.
- Consider Composition and Storytelling: Think about the narrative you want to convey through the torn photo effect. The composition of both images should contribute to a cohesive story or evoke a specific emotion when the torn effect is applied.
III. Creating a New Document:
- Setting Document Parameters: Open Photoshop and create a new document with dimensions that accommodate both images. The resolution should be suitable for high-quality printing or digital display, depending on the intended use.
- Importing Base Image: Place the chosen base image onto the new document as the bottom layer. This image will serve as the starting point for the torn photo effect.
IV. Tearing the Photo Effect:
- Using Selection Tools: Employ selection tools such as the Lasso or Marquee tools to create irregular shapes resembling torn edges. Experiment with different shapes and sizes to achieve a natural and organic appearance.
- Refining Selection Edges: To enhance realism, refine the edges of the torn selection. Use the Refine Edge tool to smooth out the edges, add feathering, and create a seamless transition between the torn and intact areas.
V. Revealing the Second Image:
- Adding the Revealed Image Layer: Introduce the revealed image by placing it as a layer above the base image. Position it in a way that aligns with the torn areas, giving the illusion that it is peeking through.
- Clipping Mask Technique: Create a clipping mask to restrict the revealed image to the torn areas. This ensures that the second image only shows through the torn portions of the base image, maintaining the torn photo effect.
VI. Enhancing Realism with Layer Styles:
- Layer Styles for Texture: Apply layer styles such as Inner Shadow or Bevel and Emboss to the torn edges. Adjust settings to simulate texture, shadows, and lighting that mimic the physical tearing of paper.
- Overlay Effects: Experiment with blending modes and overlay effects to seamlessly integrate the torn and revealed images. This step enhances the realism and cohesion of the composite.
VII. Adding Depth and Detail:
- Drop Shadows for Dimension: Introduce drop shadows strategically to add depth to the torn areas. Adjust opacity, distance, and size to simulate natural lighting and create a three-dimensional effect.
- Fine-Tuning with Brushes: Utilize Photoshop brushes to add subtle details, such as creases, folds, or torn paper fibers. This meticulous step contributes to the overall authenticity of the torn photo effect.
VIII. Adjusting Colors and Tones:
- Color Matching: Ensure that the colors and tones of both images harmonize. Use adjustment layers like Hue/Saturation and Color Balance to tweak the revealed image’s colors, ensuring a seamless blend.
- Global and Local Adjustments: Apply global adjustments to the entire composition and local adjustments specific to each image. This meticulous process enhances the overall visual coherence and impact of the torn photo effect.
IX. Incorporating Additional Elements:
- Text and Graphics: Consider adding text or graphic elements that complement the torn photo narrative. This can enhance storytelling or convey additional information within the visual composition.
- Textures and Overlays: Experiment with textures or overlays to add complexity and visual interest to the torn photo effect. This step allows for creative exploration and the incorporation of unique artistic elements.
X. Finalizing and Saving:
- Reviewing and Refining: Take a step back to review the composition as a whole. Refine any elements that may require adjustments to achieve a polished and visually impactful result.
- Saving in High Resolution: When satisfied with the composition, save the final artwork in a high-resolution format suitable for its intended use. Consider saving a layered version to preserve flexibility for future edits.
XI. Creative Applications and Variations:
- Exploring Themes: Experiment with different themes for torn photo effects. Whether conveying a sense of nostalgia, revealing hidden emotions, or creating a surreal atmosphere, explore diverse creative possibilities.
- Combining Techniques: Combine torn photo effects with other Photoshop techniques, such as blending modes, filters, or compositing, to push the boundaries of artistic expression. The versatility of Photoshop allows for limitless combinations.
XII. Troubleshooting Common Challenges:
- Seamless Integration: Ensure that the torn photo effect seamlessly integrates the base and revealed images. Address any discrepancies in color, lighting, or perspective to maintain realism.
- Balancing Complexity: Strive for a balanced composition. Avoid overwhelming the viewer with too many torn areas or intricate details. Keep the focus on the storytelling aspect and the impact of the torn photo effect.
XIII. Inspiration and Further Learning:
- Study Artistic Examples: Seek inspiration from artistic examples of torn photo effects created by other designers. Analyze their techniques, compositions, and storytelling approaches to refine your own skills.
- Tutorials and Courses: Explore Photoshop tutorials and online courses dedicated to advanced compositing and photo manipulation. Continuous learning enhances proficiency and unlocks new avenues for creative expression.
XIV. Conclusion: Mastering the Art of Torn Photo Effects
In conclusion, tearing a photo to reveal another in Photoshop is a captivating and versatile technique that invites digital artists to push the boundaries of visual storytelling. Through meticulous selection, creative layering, and thoughtful adjustments, this process transforms digital images into compelling narratives that captivate viewers. Armed with the tools and techniques outlined in this comprehensive guide, digital artists can embark on a journey of artistic exploration, mastering the art of torn photo effects and leaving an indelible mark on the canvas of digital creativity.