Cinematic Mastery: A Comprehensive Guide to Blending Photos Like a Hollywood Movie Poster with Photoshop
Introduction:
The art of blending photos, especially in the style of Hollywood movie posters, adds a touch of cinematic magic to digital compositions. Adobe Photoshop, a premier tool for image manipulation, provides a vast array of features to seamlessly merge multiple images into a cohesive and visually stunning montage. This comprehensive guide will take you through the intricate steps, creative considerations, and advanced techniques required to master the art of blending photos like a Hollywood movie poster, transforming ordinary images into cinematic masterpieces.
I. Understanding the Cinematic Aesthetic:
- Purpose and Impact: Blending photos in the style of Hollywood movie posters serves the purpose of creating visually compelling narratives. Understanding the intended impact helps in selecting images, arranging elements, and employing techniques that evoke the cinematic aesthetic.
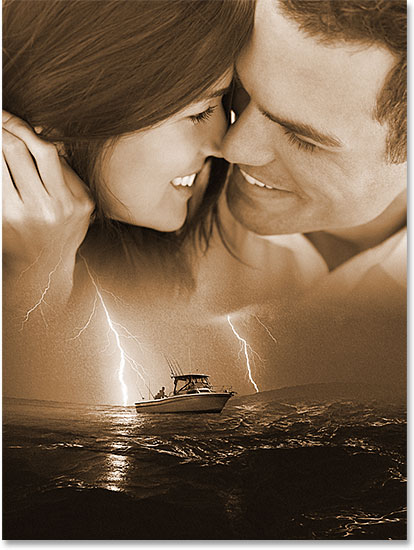
- Elements of Cinematic Style: Analyze Hollywood movie posters to identify common elements such as dynamic compositions, intense lighting, dramatic contrasts, and thematic coherence. Incorporating these elements into your blended photos adds an authentic cinematic touch.
II. Selection of Appropriate Images:
- Choosing a Main Image: Start by selecting a main image that forms the focal point of your composition. This image often features a central character or key element that sets the tone for the entire blend.
- Secondary Image Selection: Choose secondary images that complement the main image and contribute to the overall narrative. These may include supporting characters, relevant objects, or thematic elements that enhance the cinematic feel.
III. Preparing the Base Photo:
- Color Grading and Tone Adjustments: Begin by color grading the base photo to establish the desired mood. Adjust the tones, contrasts, and hues to create a cinematic atmosphere that aligns with the theme of your composition.
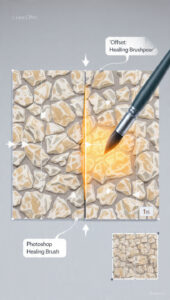
- Enhancing Visual Impact: Use retouching tools to enhance the visual impact of the base photo. Remove distractions, sharpen details, and refine the overall aesthetics to ensure a polished foundation for the blend.
IV. Isolating Elements for Blending:
- Precise Selection Techniques: Use selection tools like the Pen Tool or Lasso to precisely isolate elements from the secondary images. Clean selections are essential for a seamless integration that mimics the professional quality of movie posters.
- Refining Edges: Apply the Refine Edge tool to fine-tune the edges of the selected elements. Feathering and smoothing adjustments contribute to a natural and realistic blending with the base photo.
V. Placing Elements onto the Base Photo:
- Layering Technique: Open the selected elements as new layers in Photoshop and position them on the base photo. Experiment with the arrangement to establish a visually captivating composition that aligns with cinematic storytelling.
- Scale and Perspective: Adjust the size and perspective of each element to ensure they blend seamlessly into the base photo. Consistency in scale and perspective contributes to the illusion of a cohesive scene.
VI. Mimicking Lighting and Shadows:
- Analyzing Light Sources: Understand the direction and intensity of the existing light sources in the base photo. Mimic these sources when adding shadows and highlights to the inserted elements for a realistic integration.
- Adding Ambient Light: Introduce ambient light effects to create a sense of cohesion between the elements. Soft brushes and low-opacity settings can be used to paint subtle light spills and reflections.
VII. Adjusting Transparency and Blending Modes:
- Opacity for Realism: Adjust the opacity of each element layer to control their transparency. Vary the opacity based on the distance, scale, and lighting conditions to achieve a natural blend within the composition.
- Experimenting with Blending Modes: Explore blending modes such as Overlay, Screen, or Multiply to enhance the interaction between the inserted elements and the base photo. Blending modes add depth and cinematic richness to the final composition.
VIII. Creating Atmosphere and Depth:
- Foreground and Background Elements: Consider the placement of elements in relation to the foreground and background of the base photo. This step enhances the depth of the composition, adding a cinematic three-dimensional quality.
- Depth of Field Effects: Apply depth of field effects to mimic the focus and blurring seen in cinematic photography. This technique draws attention to the main subject while subtly blurring background or foreground elements.
IX. Fine-Tuning with Layer Styles and Filters:
- Layer Styles for Cinematic Flair: Explore layer styles such as Outer Glow, Inner Shadow, or Satin to add cinematic flair to the inserted elements. These effects contribute to the overall polished and stylized look of movie posters.
- Applying Cinematic Filters: Experiment with cinematic filters or color grading techniques to enhance the atmosphere of the composition. Consider sepia tones, vintage effects, or high-contrast adjustments for a cinematic visual impact.
X. Attention to Details:
- Micro-Details with Brushes: Utilize brushes to add micro-details such as subtle textures, reflections, or atmospheric elements. Attention to these small details contributes to the overall realism and cinematic quality of the blend.
- Color Matching and Harmonization: Ensure that the colors of the inserted elements harmonize with the overall color scheme of the base photo. Use the Eyedropper tool to sample colors and apply them for a cohesive and unified look.
XI. Final Review and Adjustments:
- Zooming In for Precision: Zoom in for a detailed review of the entire composition. Pay close attention to edges, lighting, and the overall coherence of the blend. Make iterative adjustments to achieve perfection.
- Iterative Refinement: The process of blending photos in a cinematic style may involve several rounds of refinement. Iterate through adjustments, seeking a balance between cinematic drama and visual impact.
XII. Saving and Exporting:
- Preserving Layers: Save the Photoshop project file with layers intact to retain flexibility for future adjustments. This is particularly useful when fine-tuning specific elements or creating variations.
- Exporting for Different Platforms: When satisfied with the composition, export the final image in the desired format. Consider the platform where the image will be showcased – whether for print, web, or promotional materials – and adjust the resolution accordingly.
XIII. Exploring Artistic Variations:
- Genre-Specific Adaptations: Experiment with blending photos to create cinematic compositions in different genres. Whether it’s a sci-fi epic, romantic drama, or action-packed thriller, adapt your techniques to suit the thematic requirements.
- Iconic Movie Poster Homage: Pay homage to iconic movie posters by incorporating elements reminiscent of classic films. This approach adds a nostalgic touch and showcases your ability to capture the essence of cinematic history.
XIV. Troubleshooting Common Challenges:
- Consistency in Lighting: Ensure consistency in lighting throughout the composition. Address any discrepancies that may disrupt the cinematic illusion, maintaining a cohesive visual narrative.
- Refining Transitions: Pay special attention to the transitions between the base photo and the inserted elements. Use soft brushes and gradual opacity adjustments to refine these areas for seamless blending.
XV. Inspiration and Learning Resources:
- Study Movie Poster Design: Explore a variety of movie posters across different genres. Analyze the composition, color grading, and visual storytelling techniques employed by professional graphic designers in the industry.
- Online Courses and Tutorials: Engage in online courses and tutorials dedicated to advanced Photoshop techniques. Continuous learning and exposure to diverse styles contribute to the evolution of your skills in cinematic photo blending.
XVI. Conclusion: Mastering the Art of Blending Photos Like a Hollywood Movie Poster
In conclusion, blending photos in the style of a Hollywood movie poster is a captivating process that allows digital artists to infuse their compositions with cinematic drama and flair. Through a combination of precise selection, thoughtful arrangement, and meticulous detailing, ordinary images can be transformed into visual masterpieces that tell compelling stories. Armed with the comprehensive guide provided here, aspiring creators can embark on a journey of mastery, exploring the intricacies of cinematic photo blending and leaving an indelible mark on the canvas of digital creativity.