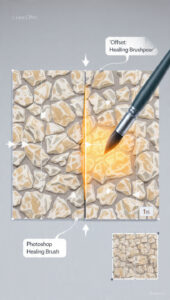
Using Photoshop’s Pen Tool to Perfectly Extract Clear PC Cases from Busy Backgrounds
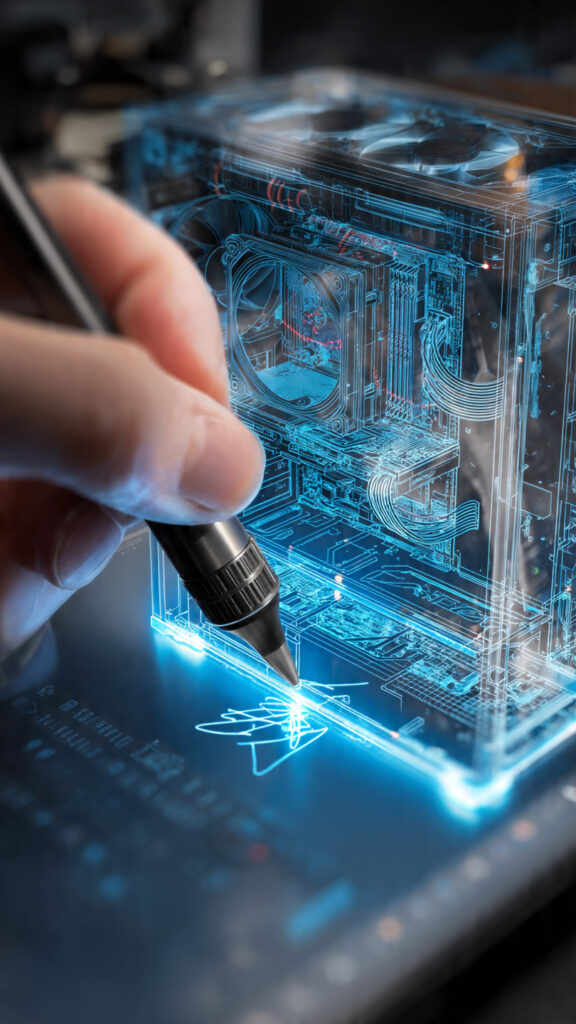
Using Photoshop’s Pen Tool to Perfectly Extract Clear PC Cases from Busy Backgrounds
Within the realm of product picture editing, one of the most difficult jobs is the extraction of clean PC cases from backdrops that are complicated and congested. It is challenging for automated selection techniques to generate clean results when they are confronted with transparent surfaces, reflections, and internal components for example. When it comes to making professional thumbnails, banners, and product demonstrations, it is crucial for designers, bloggers, and critics of technology to get a perfect cutout using the appropriate tools. When it comes to achieving this level of accuracy, the Pen Tool in Photoshop continues to be the most dependable option, since it provides total control over both edges and curves. It is possible to manually create pathways that properly follow sophisticated forms, in contrast to the automated tools that are available. In situations when glass panels, RGB lighting, and the visibility of internal circuitry are involved, this becomes an extremely essential consideration. Being able to master this approach guarantees clean extractions that are free of jagged edges and artifacts that are not desired. In spite of the fact that it calls for perseverance and practice, the outcomes are much more favorable. When it comes to high-volume projects, having a workflow that is organized helps make the process more efficient and repeatable.
Recognizing the Obstacles That Must Be Confronted When Extracting Transparent PC Cases
With their semi-transparent materials and reflecting surfaces, clear PC cases have their own set of issues that are not found in other cases. In contrast to solid objects, the borders of these things are often non-descript and blend in with the backdrop. Fans, wires, and illumination are examples of internal components that add complexity to the system, making it more difficult to differentiate between different borders. The selection tools may get even more confused as a result of reflections on glass panels, which can result in improper cuts. The difficultness of the situation is increased by background clutter, which may be desks, walls, or other gear. Due to the fact that they are dependent on contrast and color separation, automatic selection systems often fail in various instances like these. Gaining an understanding of these problems brings to light the need of using a manual technique. A clean extraction may be accomplished with the help of the Pen Tool, which offers the accuracy that is required to negotiate these complications.
Setting up your workspace in preparation for the creation of precise paths
It is essential to clean up your environment in order to get the highest possible level of precision before utilizing the Pen Tool. When you zoom in to a high level, you will be able to view the small features that are located around the borders of the computer case. It is possible to retain alignment and symmetry by adjusting the parameters for the grid and the guide. When tracing, it is important to choose an image with a high quality so that the edges are not obscured. There is also the benefit of adjusting the brightness and contrast of the screen in order to better differentiate between faint edges. By locking the background layer and organizing the layers, you may prevent inadvertent alterations from occurring. A workstation that is immaculate and well-organized helps to cut down on mistakes and boosts productivity. A correct setup creates the groundwork for the design of routes that are accurate.
Understanding the Pen Tool in Order to Perform Accurate Edge Tracing
Your ability to sketch the shape of an item with pinpoint accuracy is made possible by the Pen Tool, which operates by generating anchor points that are linked by routes. Matching the contour of the PC case may be accomplished by clicking for the placement of points along straight lines and dragging for the creation of curves. When opposed to an excessive number of anchor points, shorter, more strategically placed points provide smoother routes. Controlling curves with a finer degree of precision is needed for rounded edges and glass panels, and adjusting handles provides this capability. Being thorough and working slowly is the best way to assure correctness, particularly in areas that are difficult. It is essential to adhere to the edge that is visible from the outside in order to preserve a natural appearance. You will need to practice in order to become proficient with the Pen Tool, but it offers unparalleled control for extracting specific information.
Taking Care of Reflections and Maintaining Internal Consistency
When it comes to removing transparent PC cases, dealing with reflections and visible interior components is one of the most difficult elements to deal with. Because the case is not completely opaque, you will need to make a decision on which components will be included in the final cutout. It is common practice to give priority to the outside construction, while the selection process ensures that the inside nuances are retained. By carefully drawing the real edge rather than the reflected light, it is possible to reduce the amount of reflections that occur. The true border may be shown in some circumstances by making small modifications to the brightness or contrast of the image. In order to strike a balance between clarity and reality, this phase demands careful judgment. Handling transparency in the appropriate manner guarantees that the final picture will have a natural and professional appearance.
The process of transforming paths into fresh selections and masks
Following the completion of the route, it is possible to transform it into a selection and then into a layer mask thereafter. At the same time as edge detail is preserved, this procedure separates the computer case from the backdrop. The use of feathering should be kept to a minimum in order to prevent soft or fuzzy edges. By using a brush to refine the mask, you are able to repair any defects that may be present. Making use of non-destructive masking guarantees that improvements may be made at a later time, should they be required. Following this phase, your exact route will be transformed into a cutout that may be used for further design work. Using clean masking is very necessary in order to integrate the extracted item into new backdrops in a seamless manner.
Smoothing Out the Edges to Achieve a Professional Finish
The process of polishing the edges of the mask after it has been created is essential in order to get a professional appearance. When inspecting the margins, zooming in helps find any irregularities or rough regions that may may be present. Smooth transitions and the elimination of undesired artifacts may be achieved by applying a gentle brush to the mask. It is possible to improve clarity by making little modifications to the contrast or edge sharpness. It is essential to strike a balance between the sharpness of look and the natural appearance of the product. Overediting may give the appearance of artificial edges, while underediting might result in defects that are evident to the naked eye. The extraction is made to seem clean and lifelike via the process of careful refining. After completing this step, the image’s overall quality will be improved.
Extraction of the Personal Computer Case and Integration into New Backgrounds
Following the extraction of the PC case, it is possible to position it in a variety of backdrops for the purpose of creating thumbnails or promotional graphics. To get a realistic effect, it is necessary to ensure that the subject and the backdrop have the same lighting and color tones. Including shadows and reflections in the scene helps to establish the object’s position inside the new setting. It is possible to achieve a smooth mix of the elements by using adjustment layers. In addition, the composition could be improved by the effects of depth of field. When integration is done correctly, it assures that the extracted case does not seem out of place anymore. In this stage, a straightforward cutout is transformed into an element of design that is visually appealing.
Increasing Productivity via the Application of Reusable Methods and Practice
Despite the fact that the Pen Tool needs human labor, considerable improvements in efficiency may be achieved via repeated use. A reduction in the amount of time spent on each project may be achieved by developing a consistent method to tracing and masking. The ability to save paths and masks enables reuse in photos that are identical, which is particularly useful when dealing with the same PC case type. By developing a process that is organized, one can guarantee that each phase is carried out in a methodical manner. This procedure gets more efficient and easier to understand as time goes on. Learning how to use the Pen Tool effectively is an investment that pays off in the form of higher-quality products and enhanced productivity. Having a procedure that is repeatable guarantees that even the most complicated extractions may be successfully managed with confidence and accuracy.