Unveiling the Visual Alchemy: A Deep Dive into JPEG Compression in Photoshop
Introduction:
In the realm of digital imaging, where pixels dance on screens and visual storytelling is paramount, understanding the intricacies of file compression becomes an essential skill for photographers, designers, and digital artists. At the heart of this discussion lies JPEG compression, a transformative process that balances image quality with file size efficiency. In this extensive guide, we embark on a journey to uncover the nuances of JPEG compression in Adobe Photoshop, exploring its impact on image quality, the science behind the process, and strategies for optimizing visual output.
Section 1: Unraveling the Basics of JPEG Compression
Before we dive into the visual journey, let’s establish a foundation by unraveling the basics of JPEG compression:
- What is JPEG Compression?
- JPEG (Joint Photographic Experts Group) compression is a method used to reduce the file size of digital images by compressing and discarding some image information. This process aims to strike a balance between maintaining acceptable image quality and minimizing file size.
- Lossy Compression vs. Lossless Compression:
- JPEG compression is inherently lossy, meaning it achieves file size reduction by discarding some image data. This distinguishes it from lossless compression methods, such as PNG or TIFF, which preserve all original data.
- The Impact on Image Quality:
- The degree of JPEG compression directly influences image quality. Higher compression levels result in smaller file sizes but may introduce noticeable artifacts and a reduction in detail, especially in areas with fine textures or gradients.
Section 2: The Science Behind JPEG Compression
Understanding the science behind JPEG compression is pivotal to grasping its impact on image quality and visual perception:
- DCT (Discrete Cosine Transform):
- JPEG compression employs the Discrete Cosine Transform to convert image data into frequency components. This mathematical transformation helps represent image details in a way that facilitates efficient compression.
- Quantization:
- After DCT, quantization is applied, where the frequency components are scaled and rounded. This step introduces the loss of information, as some details are discarded to achieve compression.
- Chroma Subsampling:
- Chroma subsampling is a technique used to reduce the amount of color information in an image. This process exploits the human eye’s lower sensitivity to color changes, resulting in smaller file sizes with minimal perceptual loss.
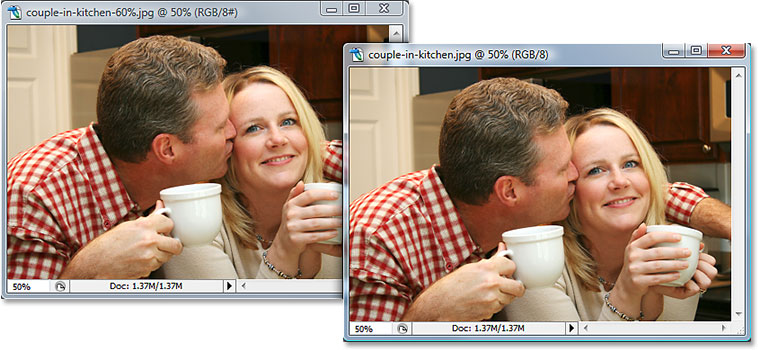
Section 3: Visual Impact: Comparing JPEG Compression Levels
Now, let’s embark on a visual exploration to witness the difference in image quality at various JPEG compression levels:
- High-Quality Compression (Low Compression):
- At low compression levels (high quality), images retain a significant amount of detail and exhibit minimal artifacts. This setting is ideal for situations where image quality is paramount, such as professional photography or printing.
- Moderate Compression:
- Moderate compression strikes a balance between file size and image quality. While noticeable artifacts may appear upon close inspection, the overall visual impact remains satisfactory. This level is often suitable for web usage and general purposes.
- High Compression (High File Size Reduction):
- High compression levels result in substantial file size reduction but come at the cost of visible image degradation. Artifacts become more pronounced, particularly in areas with fine details or subtle color gradients. This compression level is suitable for scenarios where file size is a critical consideration, such as web optimization.
Section 4: Strategies for Optimizing JPEG Compression in Photoshop
Armed with an understanding of the visual impact of JPEG compression, let’s explore strategies for optimizing this process in Adobe Photoshop:
- Adjusting Compression Settings:
- When saving a JPEG in Photoshop, the “Save As” dialog allows you to adjust the compression level. Experiment with different settings to find the optimal balance between file size and image quality for your specific needs.
- Using “Save for Web & Devices”:
- Photoshop provides the “Save for Web & Devices” feature, offering real-time previews of the image at different compression levels. This feature allows you to fine-tune settings for optimal results, especially when preparing images for online use.
- Considering Image Content:
- The impact of compression varies based on the content of the image. Photographs with complex details may exhibit more noticeable artifacts than simpler graphics. Consider the nature of your image when determining acceptable compression levels.
- Avoiding Excessive Resaving:
- Repeatedly saving a JPEG image can lead to cumulative loss of quality. To minimize this effect, work with high-quality versions during editing and only apply compression when finalizing and exporting.
- Leveraging “Progressive” vs. “Baseline” Encoding:
- Progressive encoding, available in Photoshop’s save options, allows the image to be displayed gradually as it loads. This can enhance user experience on the web, especially for larger images. Baseline encoding is more straightforward but loads from top to bottom.
- Understanding Color Space:
- Consider the color space of your image, as it can influence the perceived quality after compression. sRGB is a standard color space for web images, while Adobe RGB is often preferred for print.
Section 5: Addressing Common Artifacts in JPEG Compression
As we navigate the realm of JPEG compression, it’s crucial to be aware of common artifacts that may arise:
- Blocking Artifacts:
- Recognized as visible blocks or chunks in areas with subtle gradients, blocking artifacts occur when compression is too aggressive. Adjusting the compression level can mitigate this issue.
- Chroma Subsampling Artifacts:
- Chroma subsampling can lead to color bleeding or smudging, particularly in highly saturated areas. If color accuracy is crucial, consider using lower subsampling ratios or opting for a lossless format.
- Ringing Artifacts:
- Ringing artifacts manifest as halos around high-contrast edges. These can be exacerbated at higher compression levels. Fine-tune compression settings or explore alternative formats for images with critical details.
Conclusion: Navigating the Visual Tapestry of JPEG Compression
In conclusion, the journey through JPEG compression in Adobe Photoshop unveils a visual tapestry where file size and image quality dance in delicate balance. This comprehensive guide has delved into the basics of JPEG compression, the science behind its transformative process, and strategies for optimizing visual output. Armed with this knowledge, photographers, designers, and digital artists can navigate the nuances of compression levels, make informed decisions based on their specific needs, and wield the power of Photoshop to craft visual narratives with precision and impact. As technology advances and creative endeavors continue to evolve, the ability to harness the visual alchemy of JPEG compression remains a vital skill in the dynamic landscape of digital imaging.