Unveiling the Art of Contouring: A Comprehensive Guide to Contouring Objects in CorelDRAW

Introduction:
CorelDRAW, a frontrunner in the world of graphic design, presents designers with a multitude of tools to unleash their creative potential. Among these, the ability to contour objects stands out as a powerful feature, enabling artists to add depth, dimension, and visual impact to their designs. This comprehensive guide delves into the intricacies of contouring objects in CorelDRAW, exploring the various techniques, creative possibilities, and practical applications that elevate designs to new levels of sophistication.
I. Defining Contouring in CorelDRAW:
- Concept and Purpose:
- Contouring involves creating an outline or border around an object, adding emphasis, depth, and visual interest.
- CorelDRAW’s contouring capabilities go beyond simple outlines, providing designers with versatile tools to enhance their artistic expressions.
- Visual Impact:
- Contouring objects in CorelDRAW enhances their visibility, separates them from the background, and contributes to the overall composition.
- This technique is widely used to create dynamic effects, emphasize focal points, and add a sense of realism to designs.
II. Types of Contour Effects in CorelDRAW:
- Inner Contour:
- Applying an inner contour creates an outline inside the boundary of the selected object.
- Inner contours are often used to add depth or simulate recessed areas within the object.
- Outer Contour:
- Outer contours, on the other hand, create an outline outside the boundary of the object.
- This effect is commonly used to highlight the edges of an object and make it stand out from the background.
- Offset Contour:
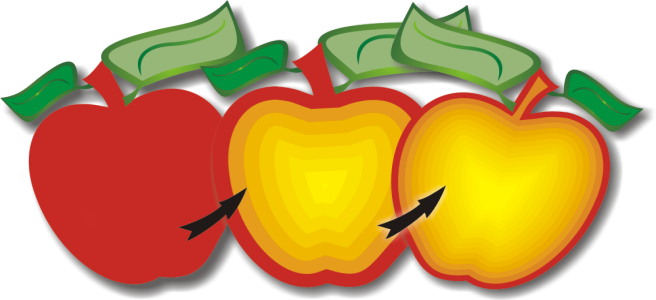
- Offset contours allow designers to create multiple concentric outlines around the object.
- This versatile effect adds complexity and richness to the design, especially when adjusting the offset distances.
- Hairline Contour:
- Hairline contours generate a very thin outline around the object, resembling a hairline stroke.
- This subtle contour is ideal for delicate designs where a bold outline might be overpowering.
III. Applying Contour Effects to Objects:
- Selecting Objects:
- Contour effects can be applied to any object in CorelDRAW, including shapes, text, and imported graphics.
- Begin by selecting the object you want to contour using the selection tools in CorelDRAW.
- Accessing the Contour Docker:
- The Contour Docker in CorelDRAW serves as the central hub for managing and customizing contour effects.
- Access the Contour Docker through the “Window” menu, and explore the various options available.
- Configuring Contour Properties:
- Once the Contour Docker is open, designers can configure the properties of the contour effect.
- This includes adjusting the contour type, offset distance, color, and other parameters depending on the desired outcome.
- Applying Inner and Outer Contours:
- Choose between inner and outer contours based on the effect you want to achieve.
- Adjust the offset distance to control the width of the contour, tailoring it to the specific requirements of the design.
- Exploring Offset Contours:
- Offset contours allow for the creation of multiple outlines, adding complexity to the design.
- Experiment with different offset distances and colors to achieve unique and visually striking effects.
- Fine-Tuning with Hairline Contours:
- Hairline contours are particularly effective for subtle enhancements.
- Fine-tune the width, color, and other properties to achieve a delicate outline that complements the object without overpowering it.
IV. Creative Possibilities with Contouring:
- Dimensional Embellishments:
- Contouring objects in CorelDRAW adds a three-dimensional aspect to designs, making them visually engaging.
- Use inner and outer contours strategically to create the illusion of depth and dimension.
- Emphasizing Focal Points:
- Contour effects are powerful tools for directing attention to specific areas of a design.
- Applying a bold outer contour to a focal point can draw the viewer’s eye and highlight important elements.
- Realistic Effects:
- Offset contours are instrumental in achieving realistic effects, such as simulating the appearance of engraved or embossed details.
- This technique is often used in logo design and illustration to enhance realism.
- Artistic Flourishes:
- Hairline contours offer a delicate touch, perfect for adding artistic flourishes to typography, illustrations, or intricate designs.
- This subtle contouring technique can elevate the overall aesthetic without overwhelming the composition.
V. Best Practices for Contouring:
- Experimentation:
- Contouring is a creative process, and designers are encouraged to experiment with different contour types, colors, and offset distances.
- The Contour Docker provides a real-time preview, allowing designers to see the impact of changes immediately.
- Layer Organization:
- Maintain a well-organized layer structure within your CorelDRAW document when working with contour effects.
- Clear layer organization facilitates efficient editing and management of design elements.
VI. Troubleshooting and Tips:
- Preview Mode:
- CorelDRAW’s Preview Mode allows designers to see the impact of contour effects without applying them permanently.
- Use this mode to assess the visual impact and make adjustments before finalizing the contour.
- Undo and Redo:
- Utilize the undo and redo functions in CorelDRAW to backtrack and experiment with different contour settings.
- This ensures a flexible and iterative approach to contouring.
VII. Continuous Learning and Mastery:
- Explore Advanced Features:
- CorelDRAW offers advanced features for contouring, including contour transparency, which allows for nuanced effects.
- Delve into these advanced features to enhance your mastery of contouring techniques.
- Community Engagement:
- Join design communities, forums, and social media groups to connect with other CorelDRAW users.
- Sharing insights, techniques, and experiences with contouring contributes to continuous learning and improvement.
VIII. Conclusion:
In conclusion, contouring objects in CorelDRAW stands as a transformative technique that empowers designers to add depth, emphasis, and artistic flair to their creations. Whether enhancing realism, directing attention, or exploring subtle flourishes, contour effects open up a world of creative possibilities. By mastering the art of contouring, designers harness the full potential of CorelDRAW, turning their visions into visually stunning and dynamic compositions. As a cornerstone in the graphic design process, contouring exemplifies the versatility and innovation that CorelDRAW brings to the forefront of visual communication.


