Reflections of Symmetry: A Comprehensive Guide to Mirroring Images in Photoshop
Introduction:
In the expansive world of digital design, the ability to manipulate and enhance images is a cornerstone skill. One such fundamental technique is mirroring—an artful process that transforms an image by creating a symmetrical reflection. Adobe Photoshop, a powerhouse in the realm of graphic design, offers a multitude of tools and features to seamlessly mirror images. This comprehensive guide will walk you through the step-by-step process of mirroring an image in Photoshop, exploring various methods and techniques to achieve striking visual effects and enhance your creative endeavors.
I. Choosing the Right Image:
1.1 Image Selection:
- Begin by selecting an image that is well-suited for mirroring.
- Consider images with strong visual elements, distinctive shapes, or subjects that could benefit from symmetrical reflection.
1.2 High-Quality Image:
- Opt for a high-resolution image to maintain detail and clarity in the mirrored result.
- A higher resolution provides a solid foundation for creating a polished and professional-looking mirrored image.
II. Launching Adobe Photoshop and Opening the Image:
2.1 Opening Photoshop:
- Launch Adobe Photoshop on your computer to initiate the creative process.
- Create a new document or open an existing one where you want to apply the mirroring effect.
2.2 Importing the Image:
- Import the chosen image into Photoshop as a new layer.
- Ensure the image layer is positioned at the bottom of the layer stack, serving as the foundation for the mirrored elements.
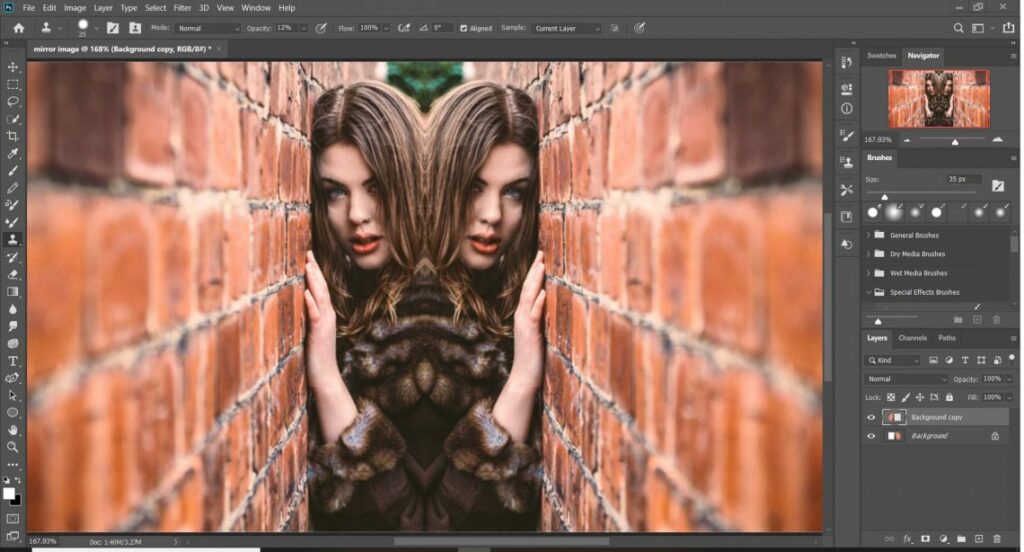
III. Basic Horizontal Mirror:
3.1 Duplicate the Image Layer:
- Select the image layer in the Layers panel.
- Right-click on the layer and choose “Duplicate Layer” to create an identical copy.
3.2 Flip the Duplicate Layer:
- With the duplicated layer selected, go to Edit > Transform > Flip Horizontal.
- Alternatively, use the shortcut Ctrl+T (Windows) or Command+T (Mac) to access the Transform options, right-click, and choose “Flip Horizontal.”
IV. Vertical Mirror:
4.1 Duplicate and Flip Vertically:
- Once again, duplicate the original image layer by right-clicking and selecting “Duplicate Layer.”
- This time, go to Edit > Transform > Flip Vertical or use the Transform shortcut to flip the duplicate layer vertically.
V. Diagonal Mirroring:
5.1 Diagonal Flip:
- For a more dynamic effect, explore diagonal mirroring.
- Duplicate the original layer, go to Edit > Transform > Skew, and adjust the angle to create a diagonal mirror.
5.2 Perspective Adjustment:
- Fine-tune the perspective of the diagonal mirror by using the Edit > Transform > Perspective option.
- This step adds an extra layer of creativity to the mirrored composition.
VI. Creating a Seamless Blend:
6.1 Layer Mask for Smooth Transitions:
- Use layer masks to blend the mirrored elements seamlessly with the original image.
- Apply a layer mask to each mirrored layer and use a soft brush to mask areas for a smooth transition.
6.2 Feathering Edges:
- Enhance the realism of the mirrored effect by feathering the edges.
- Apply a feathered edge to the mirrored layers, creating a gradual transition between the mirrored and original portions.
VII. Advanced Mirror Effects:
7.1 Adding Reflections:
- Elevate the mirroring effect by adding reflections, especially for water or reflective surfaces.
- Duplicate the mirrored layers, flip them vertically, and adjust opacity for a reflective appearance.
7.2 Opacity and Blending Modes:
- Experiment with layer opacities and blending modes to achieve diverse and artistic mirrored effects.
- Overlay, Screen, or Multiply modes can produce unique results, adding depth and dimension to the mirrored composition.
VIII. Layer Styles and Effects:
8.1 Drop Shadows for Depth:
- Introduce depth to the mirrored composition by adding subtle drop shadows to the mirrored layers.
- Adjust shadow settings to create a realistic sense of distance between the mirrored and original elements.
8.2 Outer Glow for Emphasis:
- Emphasize the mirrored elements by applying a soft outer glow.
- Experiment with glow settings to enhance the visual impact of the mirrored portions.
IX. Reviewing and Refining:
9.1 Iterative Review:
- Step back and review the entire composition, considering the balance and visual impact of the mirrored elements.
- Make iterative adjustments to blending modes, opacities, and additional effects for a refined and polished result.
9.2 Saving Iterative Versions:
- Save iterative versions of your project to preserve different stages of the creative process.
- This practice allows for experimentation and easy backtracking if desired.
X. Exporting the Mirrored Image:
10.1 Saving in Appropriate Formats: – Save the final mirrored image in the desired format, resolution, and color space. – Consider the intended use, whether for digital display, print, or further digital manipulation.
10.2 Sharing and Showcasing: – Share your mirrored masterpiece on social media platforms or within digital art communities. – Engage with fellow designers, gather feedback, and celebrate the symmetrical beauty of your mirrored image.
XI. Conclusion:
The process of mirroring an image in Adobe Photoshop is a journey into the realm of symmetry, where creativity meets technical finesse. By skillfully applying duplications, flips, and blending techniques, artists can transform ordinary images into captivating visual compositions. As you embark on your journey of mirroring, let your imagination guide you, experiment with different methods, and witness the transformative power of Photoshop in creating symmetrical reflections that captivate the eye and spark creative inspiration.