Maximizing Disk Space Efficiency: A Comprehensive Guide to Using Disk Cleanup in Windows XP
James April 8, 2024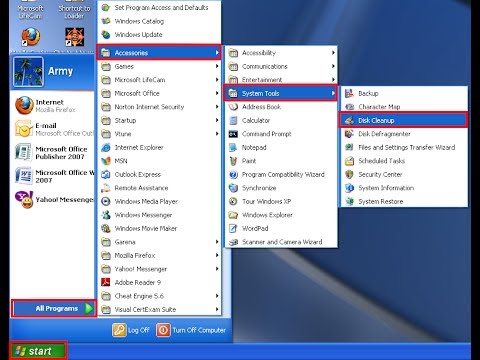
In the ever-expanding digital world, managing disk space efficiently is crucial for maintaining system performance, ensuring smooth operation, and optimizing storage resources. Windows XP provides users with a powerful built-in tool called Disk Cleanup, designed to help users reclaim valuable disk space by removing unnecessary files, temporary data, and other clutter from their systems. Whether you’re a casual user looking to free up disk space for smoother performance or a power user seeking to optimize storage utilization, knowing how to use Disk Cleanup in Windows XP is essential. In this exhaustive guide, we’ll delve deep into the intricacies of Disk Cleanup, empowering users to declutter their systems with confidence and precision.
Understanding Disk Cleanup in Windows XP:
Before we explore the methods for using Disk Cleanup, let’s understand the significance of this utility within the Windows XP operating system. Disk Cleanup is a system tool designed to scan the hard drive for unnecessary files, temporary data, system files, and other types of clutter that accumulate over time. By identifying and removing these unnecessary files, Disk Cleanup helps users reclaim disk space, improve system performance, and optimize storage utilization. Disk Cleanup targets various categories of files, including temporary Internet files, system cache, temporary files, and more, making it a versatile tool for disk space management.
Step-by-Step Guide to Using Disk Cleanup:
Now, let’s explore a systematic approach to using Disk Cleanup in Windows XP:
Step 1: Accessing Disk Cleanup:
- Click on the “Start” button located at the bottom-left corner of the screen.
- Navigate to “All Programs,” then “Accessories,” then “System Tools,” and finally, click on “Disk Cleanup” to launch the utility.
Step 2: Selecting Disk Cleanup Options:
- In the Disk Cleanup window, the utility will prompt you to select the drive you want to clean up. Choose the drive containing the files you want to clean up (usually the C: drive).
- Click “OK” to proceed.
Step 3: Scanning for Files:
- Disk Cleanup will begin scanning the selected drive for unnecessary files and clutter.
- This process may take some time depending on the size of the drive and the amount of data stored on it. Be patient and wait for the scan to complete.
Step 4: Reviewing Cleanup Options:
- Once the scan is complete, Disk Cleanup will present you with a list of file categories that can be cleaned up.
- Review the list carefully and check the boxes next to the file categories you want to remove.
- Disk Cleanup categorizes files into different groups, such as Temporary Internet Files, Temporary Files, Recycle Bin, and more.
Step 5: Initiating Cleanup Process:
- After selecting the desired cleanup options, click on the “OK” button to initiate the cleanup process.
- Disk Cleanup will prompt you to confirm the cleanup operation. Click “Yes” to proceed.
Step 6: Monitoring Cleanup Progress:
- Disk Cleanup will begin removing the selected files and clutter from the disk.
- You can monitor the progress of the cleanup operation in the Disk Cleanup window.
- Depending on the amount of data to be cleaned up, this process may take some time. Allow Disk Cleanup to complete the operation.
Step 7: Completing Cleanup Process:
- Once Disk Cleanup has finished removing unnecessary files, it will display a summary of the cleanup operation.
- Click “OK” to close the Disk Cleanup window.
Advanced Cleanup Options (Optional):
For users seeking more advanced cleanup options and customization, Disk Cleanup offers additional features:
- Cleaning Up System Files: Disk Cleanup includes an option to clean up system files, including Windows Update files, system restore points, and more. Click on the “More Options” tab in the Disk Cleanup window to access this feature.
- Customizing Cleanup Settings: Users can customize Disk Cleanup settings and preferences, including file deletion criteria, compression options, and more. Explore the “Settings” tab in the Disk Cleanup window to configure these options according to your preferences.
Conclusion:
In conclusion, using Disk Cleanup in Windows XP offers users a powerful way to reclaim disk space, improve system performance, and optimize storage utilization. By following the step-by-step guide outlined in this article and exploring advanced cleanup options, users can declutter their systems effectively and maintain peak performance. Whether removing temporary files, clearing cache data, or cleaning up system files, mastering the use of Disk Cleanup empowers users to manage disk space with confidence and precision. So take control of disk space management today and unlock the full potential of your Windows XP system!


