Mastering Precision: A Comprehensive Guide on How to Edit Smart Filters in Photoshop CS3
Introduction:
Adobe Photoshop CS3, a groundbreaking version in the evolution of digital image editing, introduced the revolutionary concept of Smart Filters. This feature brought unparalleled flexibility and precision to the editing process, allowing users to apply filters non-destructively and make adjustments at any stage of their workflow. In this extensive guide, we will unravel the intricacies of editing Smart Filters in Photoshop CS3, exploring the multitude of options and techniques that empower users to refine their images with unmatched precision.
Section 1: Understanding the Foundations of Smart Filters in CS3
Smart Filters in Photoshop CS3 represent a paradigm shift in image editing, offering a non-destructive and flexible approach to applying filters. When a layer is converted to a Smart Object, any filters applied become Smart Filters, and adjustments can be made without affecting the original pixel data. This foundation forms the basis for understanding how to edit Smart Filters with precision.
Section 2: Applying Smart Filters to a Layer
To begin the process of editing Smart Filters in Photoshop CS3, start by applying a filter to a layer. Convert the desired layer into a Smart Object by right-clicking on the layer and selecting “Convert to Smart Object.” Once the layer is a Smart Object, any filters applied to it will be considered Smart Filters.
Section 3: Accessing and Editing Smart Filters
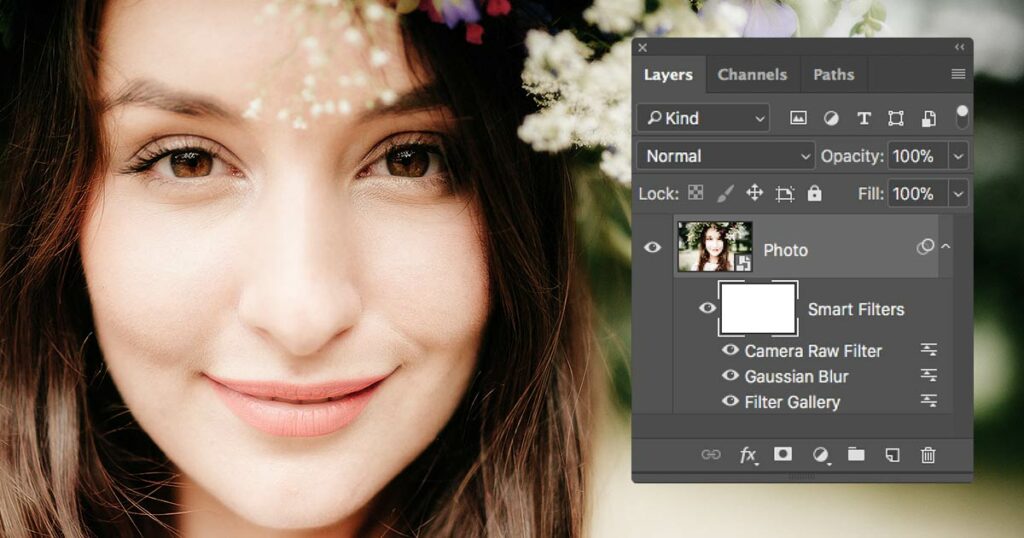
To access and edit Smart Filters, double-click on the filter name in the Layers panel. This action opens the Filter Gallery, where you can make adjustments to the filter settings. Alternatively, you can find the Smart Filters listed under the Smart Object layer in the Layers panel. Right-click on the filter name to reveal a context menu with options for editing the filter settings or applying additional filters.
Section 4: Changing Filter Settings
One of the key advantages of Smart Filters in Photoshop CS3 is the ability to change filter settings at any point in the editing process. Double-clicking on the filter name in the Layers panel opens the Filter Gallery, where you can modify the filter’s parameters. Experiment with different settings to achieve the desired effect, and observe the real-time changes previewed on the image.
Section 5: Reordering and Deleting Smart Filters
Smart Filters are applied in a specific order, affecting the image sequentially. To reorder filters, simply click and drag them within the Layers panel under the Smart Object layer. This flexibility allows for creative experimentation and fine-tuning of the overall effect. Additionally, you can delete a Smart Filter by selecting it in the Layers panel and pressing the Delete key.
Section 6: Applying Multiple Smart Filters
Photoshop CS3 empowers users to apply multiple Smart Filters to a single Smart Object layer. This layering of filters allows for the creation of intricate and nuanced effects. To apply additional filters, right-click on the Smart Object layer in the Layers panel, choose “Convert for Smart Filters,” and then apply the desired filter from the Filter menu.
Section 7: Masking Smart Filters
The versatility of Smart Filters extends to masking, providing users with the ability to selectively apply filters to specific areas of an image. Add a mask to the Smart Object layer by clicking on the mask icon in the Layers panel. Use a black brush to paint over areas of the mask, concealing the filter effect in those regions. This technique enhances precision and control in editing Smart Filters.
Section 8: Using Smart Filters for Non-Destructive Sharpening
One of the powerful applications of Smart Filters in Photoshop CS3 is non-destructive sharpening. Apply the Sharpen filter as a Smart Filter to the Smart Object layer, allowing for continuous adjustments to the sharpening intensity. This approach preserves the original image quality while enhancing specific details as needed.
Section 9: Creating Artistic Effects with Smart Filters
Smart Filters open the door to artistic experimentation, enabling users to apply a myriad of filters and combine them for unique effects. Use filters like Gaussian Blur, Liquify, or Artistic filters to create painterly or surreal effects. Adjust filter settings, experiment with blend modes, and leverage opacity controls for precise control over the final artistic outcome.
Section 10: Mastering Workflow Efficiency with Smart Filters
Photoshop CS3’s Smart Filters significantly contribute to an efficient and non-destructive workflow. By allowing users to toggle filters on or off, edit settings, and reorder filters seamlessly, Smart Filters enhance productivity and creative exploration. This flexibility ensures that photographers and designers can refine their images with precision throughout the entire editing process.
Conclusion:
Editing Smart Filters in Photoshop CS3 represents a pinnacle in non-destructive image editing, providing photographers and designers with unparalleled precision and creative control. By understanding the foundational principles, accessing and modifying filter settings, experimenting with multiple filters, and leveraging masking techniques, users can unlock the full potential of Smart Filters. This comprehensive guide serves as a roadmap for navigating the intricacies of editing Smart Filters in Photoshop CS3, encouraging users to embrace a non-destructive and precise approach to image enhancement.