Mastering Image Optimization: A Comprehensive Guide to Optimizing Images for the Web in Adobe Dreamweaver

Introduction: Optimizing images for the web is a critical aspect of web development, as it significantly impacts website performance, user experience, and search engine rankings. Adobe Dreamweaver, a powerful web design and development tool, offers a range of features and tools to help developers optimize images for the web efficiently and effectively. In this extensive guide, we’ll explore the process of optimizing images for the web in Adobe Dreamweaver, covering various techniques, best practices, and optimization strategies to help you enhance your website’s speed, accessibility, and visual appeal.
Understanding the Importance of Image Optimization: Image optimization is essential for several reasons:
- Improved Page Load Times: Optimized images reduce file sizes, resulting in faster page load times and improved website performance. Faster loading pages enhance user experience and reduce bounce rates.
- Bandwidth Conservation: Optimized images consume less bandwidth, making it easier for users to access your website, especially on slower internet connections or mobile devices with limited data plans.
- Enhanced SEO Performance: Optimized images contribute to better search engine optimization (SEO) by improving website speed and user engagement. Search engines prioritize fast-loading websites in search results, leading to higher rankings and increased visibility.
- Accessibility and Inclusivity: Optimized images ensure that all users, including those with disabilities or slower internet connections, can access and interact with your website content seamlessly. Optimizing images improves accessibility and inclusivity, aligning with web accessibility standards and guidelines.
Step 1: Choosing the Right Image Format Selecting the appropriate image format is the first step in optimizing images for the web. Consider the following image formats and their characteristics:
- JPEG (Joint Photographic Experts Group): Ideal for photographs and images with complex color gradients. JPEG compression reduces file sizes while maintaining image quality. Adjust the compression level to balance image quality and file size.
- PNG (Portable Network Graphics): Suitable for images with transparency or sharp edges, such as logos, icons, and graphics. PNG offers lossless compression, preserving image quality without sacrificing transparency or detail.
- GIF (Graphics Interchange Format): Best suited for simple animations, icons, and graphics with limited colors. GIF supports animation and transparency but is less efficient for photographs or images with complex gradients due to limited color depth.
- SVG (Scalable Vector Graphics): Recommended for vector-based graphics, logos, and illustrations. SVG files are resolution-independent and scalable without loss of quality, making them ideal for responsive web design and high-density displays.
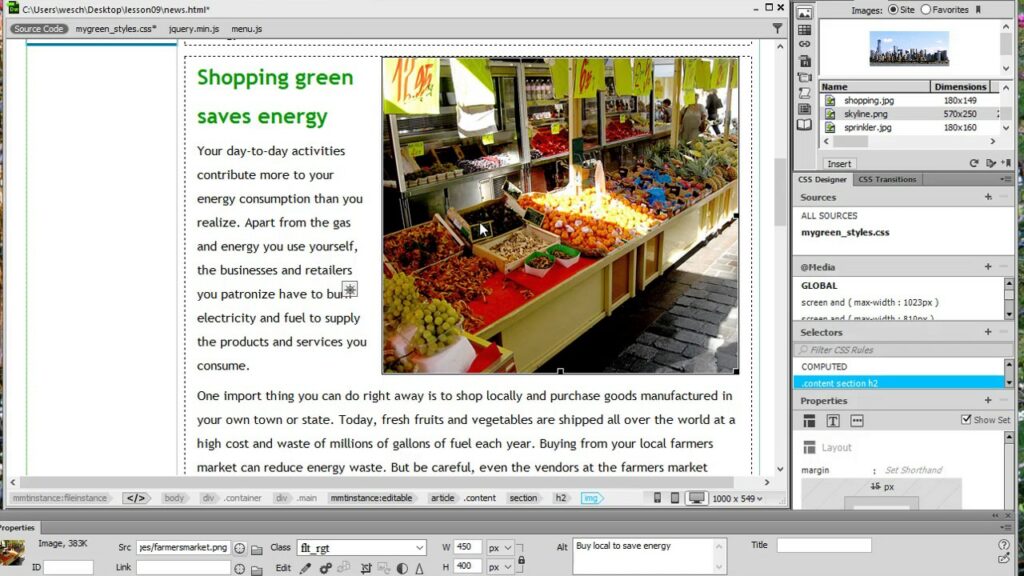
Step 2: Resizing and Cropping Images Resize and crop images to optimize their dimensions and aspect ratios for specific web design layouts and display requirements. Adobe Dreamweaver provides built-in tools for resizing and cropping images directly within the application. Follow these steps to resize and crop images in Dreamweaver:
- Open the image file in Dreamweaver’s design view or files panel.
- Select the image and click on the “Properties” inspector to view image properties.
- Adjust the width and height dimensions to resize the image proportionally or enter specific pixel values to set custom dimensions.
- Use the crop tool to select a specific area of the image for cropping. Drag the crop handles to define the cropping area and click “Apply” to crop the image.
Step 3: Optimizing Image Compression Optimize image compression settings to reduce file sizes without compromising image quality. Adobe Dreamweaver offers various compression options and optimization techniques to minimize image file sizes effectively. Consider the following optimization strategies:
- Adjust Compression Levels: Experiment with different compression levels for JPEG images to find the optimal balance between image quality and file size. Lower compression levels result in higher image quality but larger file sizes, while higher compression levels reduce file sizes but may degrade image quality.
- Use Lossless Compression: When optimizing PNG images, use lossless compression techniques to preserve image quality and transparency. Avoid unnecessary metadata and color profiles to minimize file sizes without sacrificing image fidelity.
- Convert to WebP Format: Consider converting images to the WebP format, a modern image format developed by Google that offers superior compression efficiency compared to JPEG and PNG. WebP images typically have smaller file sizes while maintaining high image quality.
- Minimize Color Depth: Reduce the color depth of GIF images to the lowest acceptable level to minimize file sizes. Limit the number of colors used in GIF images to optimize compression and improve loading times.
- Optimize SVG Files: Optimize SVG files by removing unnecessary code, reducing redundant elements, and simplifying complex paths. Minimize SVG file sizes by hand-editing the XML code or using optimization tools and plugins.
Step 4: Implementing Lazy Loading and Responsive Images Implement lazy loading and responsive image techniques to further optimize image loading and display on web pages. Lazy loading defers the loading of offscreen images until they are needed, reducing initial page load times and conserving bandwidth. Responsive images adapt to different screen sizes and resolutions, delivering optimal image quality and performance across devices. Adobe Dreamweaver supports the implementation of lazy loading and responsive images using HTML attributes and CSS techniques. Follow these best practices for implementing lazy loading and responsive images in Dreamweaver:
- Lazy Loading: Use the “loading” attribute with the value “lazy” to enable lazy loading for images in HTML markup. Add the “loading=lazy” attribute to <img> tags to instruct browsers to defer image loading until they enter the viewport.
- Responsive Images: Use CSS media queries and responsive design techniques to deliver different image sizes and resolutions based on device characteristics and screen dimensions. Define multiple image sources using the <picture> element or srcset attribute to serve appropriate image assets for different viewport sizes.
- Adaptive Image Loading: Combine lazy loading and responsive image techniques to achieve adaptive image loading for enhanced performance and user experience. Serve smaller, optimized image assets to mobile devices and larger, high-resolution images to desktops and tablets based on screen size and device capabilities.
Step 5: Testing and Optimization After optimizing images for the web in Adobe Dreamweaver, it’s essential to test their performance and visual quality across different browsers, devices, and screen resolutions. Conduct comprehensive testing to ensure that optimized images load quickly, display correctly, and maintain image quality on various platforms. Monitor page load times, network requests, and image rendering performance using browser developer tools and online testing tools. Optimize images further based on testing results and user feedback to achieve optimal performance and user experience.
Step 6: Deploying Optimized Images Once you’ve optimized images for the web in Adobe Dreamweaver, deploy them to your live website or web application to make them accessible to users. Use Dreamweaver’s built-in file transfer features or FTP/SFTP integration to upload optimized image files to the remote server. Ensure that optimized images are correctly linked and referenced in HTML markup and CSS stylesheets to replace existing images with their optimized counterparts. Monitor website performance and user engagement metrics to assess the impact of image optimization on website speed, accessibility, and user satisfaction.
Conclusion: Optimizing images for the web in Adobe Dreamweaver is essential for enhancing website performance, user experience, and search engine visibility. By following the steps outlined in this guide and leveraging Dreamweaver’s features and tools for image optimization, you can reduce image file sizes, improve page load times, and deliver visually compelling web content that engages users and drives conversions. Whether you’re a beginner or experienced web developer, mastering the art of image optimization in Dreamweaver enables you to create high-quality web experiences that captivate audiences and achieve your business objectives with confidence and efficiency.


