Mastering File Transfer: A Comprehensive Guide to Using FTP/SFTP in Adobe Dreamweaver
Introduction: File Transfer Protocol (FTP) and Secure File Transfer Protocol (SFTP) are essential protocols for transferring files between a local computer and a remote server. Adobe Dreamweaver, a leading web design and development tool, provides robust support for FTP/SFTP integration, allowing developers to manage website files, upload content, and synchronize changes with remote servers seamlessly. In this extensive guide, we’ll explore the process of using FTP/SFTP in Adobe Dreamweaver, covering various techniques, best practices, and troubleshooting strategies to help you streamline your file transfer workflow and maintain effective collaboration with remote servers.
Understanding the Importance of FTP/SFTP Integration: FTP/SFTP integration offers several advantages for web developers, including:
- Remote File Management: FTP/SFTP integration allows developers to manage website files and directories on remote servers directly from their local development environment, enabling efficient file organization and maintenance.
- Content Deployment: FTP/SFTP enables developers to upload website content, such as HTML files, CSS stylesheets, JavaScript scripts, and media assets, to remote servers for deployment to live environments, staging servers, or development environments.
- Collaboration: FTP/SFTP facilitates collaboration among team members by providing a centralized repository for sharing and exchanging project files, source code, and assets across distributed locations and team members.
- Version Control: FTP/SFTP integration supports version control workflows by allowing developers to synchronize changes, track file revisions, and manage conflicts between local and remote file versions, ensuring consistency and integrity in collaborative development projects.
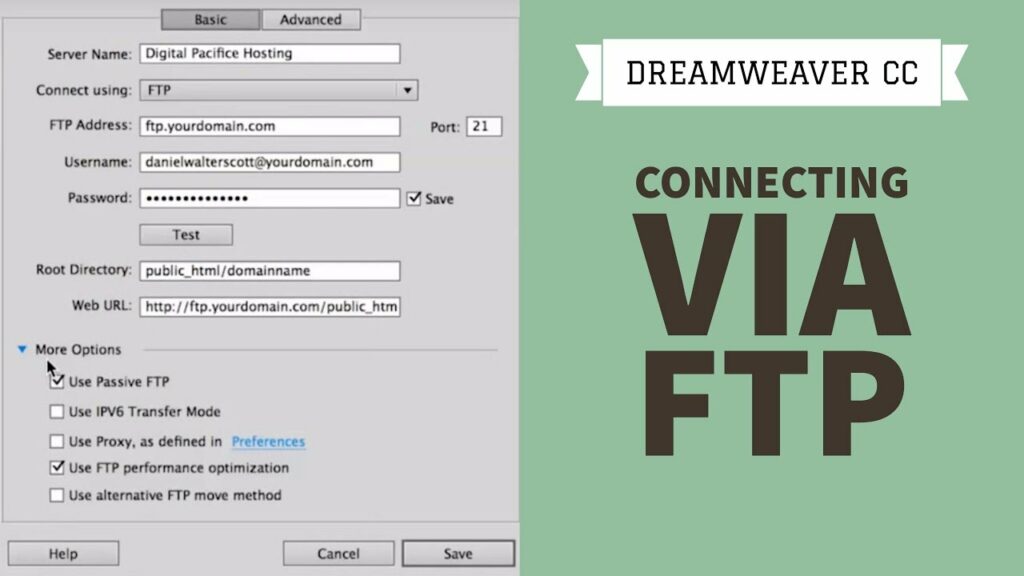
Step 1: Configuring FTP/SFTP Settings in Dreamweaver Before using FTP/SFTP in Adobe Dreamweaver, it’s essential to configure connection settings for remote servers. Follow these steps to configure FTP/SFTP settings in Dreamweaver:
- Open Adobe Dreamweaver and navigate to the “Site” menu.
- Select “Manage Sites” to open the Site Setup dialog box.
- Click on the “New Site” button to create a new site configuration or select an existing site from the list.
- In the Site Setup dialog box, navigate to the “Servers” category.
- Click on the “+” icon to add a new server configuration or edit an existing server configuration.
- Enter the following FTP/SFTP connection details:
- Server Name: Provide a descriptive name for the server configuration.
- FTP Address: Enter the hostname or IP address of the remote server.
- FTP Username/Password: Provide the FTP username and password for authenticating access to the remote server.
- SFTP Settings (Optional): If using SFTP, select the “SFTP” option and specify additional connection settings such as SSH port number, private key file, and passphrase.
- Click “Test” to verify the connection to the remote server and ensure that the settings are correct.
- Once the connection test is successful, click “Save” to save the server configuration.
Step 2: Managing Files with FTP/SFTP in Dreamweaver After configuring FTP/SFTP settings in Adobe Dreamweaver, you can use built-in file management features to interact with remote servers and transfer files between local and remote environments. Explore the following file management tasks in Dreamweaver:
- Uploading Files: Use Dreamweaver’s “Put” command to upload files from your local computer to the remote server. Select the files or directories you want to upload in the Files panel, right-click, and choose “Put” to transfer them to the remote server.
- Downloading Files: Use Dreamweaver’s “Get” command to download files from the remote server to your local computer. Select the files or directories you want to download in the Files panel, right-click, and choose “Get” to transfer them from the remote server to your local computer.
- Synchronizing Files: Use Dreamweaver’s “Synchronize” command to compare local and remote file versions and synchronize changes between them. Select the files or directories you want to synchronize in the Files panel, right-click, and choose “Synchronize” to detect and apply changes between local and remote environments.
- Renaming and Deleting Files: Use Dreamweaver’s file management commands to rename, move, or delete files on the remote server. Right-click on the file or directory in the Files panel and choose the appropriate command (e.g., Rename, Move, Delete) to perform the desired action.
- Remote File Editing: Use Dreamweaver’s built-in code editor to edit files directly on the remote server. Double-click on the file in the Files panel to open it for editing, make changes, and save the file to update it on the remote server automatically.
Step 3: Troubleshooting FTP/SFTP Connection Issues Sometimes, you may encounter connection issues or errors when using FTP/SFTP in Adobe Dreamweaver. Follow these troubleshooting steps to diagnose and resolve common FTP/SFTP connection issues:
- Check Connection Settings: Verify that the FTP/SFTP connection settings in Dreamweaver match the server configuration provided by your hosting provider. Ensure that the hostname, username, password, and port number are correct and properly configured.
- Test Connection: Use Dreamweaver’s “Test” button in the Site Setup dialog box to verify the connection to the remote server. If the connection test fails, double-check the connection settings and ensure that the remote server is accessible and responsive.
- Firewall and Security Settings: Check firewall and security settings on your local computer and network to ensure that they allow outgoing FTP/SFTP connections. Configure firewall rules and network permissions to permit FTP/SFTP traffic and prevent connection issues.
- Passive FTP Mode: If you’re experiencing connection timeouts or issues with data transfers, try switching to passive FTP mode in Dreamweaver’s FTP/SFTP settings. Passive mode can help resolve connectivity issues caused by firewall restrictions and network configurations.
- Server Compatibility: Ensure that the remote server supports the FTP/SFTP protocol and is configured to accept incoming connections from Dreamweaver. Consult your hosting provider or system administrator to confirm server compatibility and troubleshoot server-side issues if necessary.
Step 4: Optimizing FTP/SFTP Performance in Dreamweaver To optimize FTP/SFTP performance in Adobe Dreamweaver and improve file transfer efficiency, consider the following tips and best practices:
- File Compression: Compress large files or directories before uploading them to the remote server to reduce transfer times and bandwidth usage. Use file compression tools or utilities to compress files into ZIP or GZIP archives before transferring them via FTP/SFTP.
- Batch Transfers: Consolidate multiple file transfers into batch operations to minimize connection overhead and maximize transfer throughput. Upload or download files in batches rather than individually to optimize FTP/SFTP performance and efficiency.
- Bandwidth Limiting: Configure bandwidth throttling or limiting settings in Dreamweaver’s FTP/SFTP preferences to control the maximum upload and download speeds. Adjust bandwidth limits based on network conditions, available bandwidth, and server capabilities to prevent network congestion and ensure reliable file transfers.
- Connection Retries: Configure Dreamweaver’s FTP/SFTP settings to automatically retry failed connection attempts and transfer operations. Adjust retry settings and timeout thresholds to optimize connection reliability and resilience against network interruptions or server downtime.
- Passive Mode: Consider using passive FTP mode in Dreamweaver’s FTP/SFTP settings to improve connectivity and data transfer reliability, especially when connecting to servers behind firewalls or NAT devices. Passive mode can help resolve connectivity issues caused by network configurations and security restrictions.
Step 5: Deploying Website Changes with FTP/SFTP Once you’ve completed your website updates and modifications locally, it’s time to deploy the changes to the live server using FTP/SFTP in Adobe Dreamweaver. Follow these steps to deploy website changes with FTP/SFTP:
- Make Local Changes: Update and modify website files, content, and assets in your local Dreamweaver project as needed.
- Test Changes Locally: Preview and test your website changes locally using Dreamweaver’s Live View or integrated browser preview to ensure that they function correctly and appear as intended.
- Connect to Remote Server: Use Dreamweaver’s FTP/SFTP connection to connect to the remote server where your website is hosted. Open the Site Setup dialog box, select the appropriate server configuration, and click “Connect” to establish a connection.
- Upload Changes: Select the files or directories that you want to deploy to the live server in the Files panel, right-click, and choose “Put” to upload them to the remote server. Monitor the upload progress and verify that all files are transferred successfully.
- Verify Changes: After uploading the files to the remote server, use a web browser or online testing tools to verify that the changes are visible and functional on the live website. Test website functionality, navigation, and responsiveness to ensure that the deployed changes meet your requirements.
- Backup and Version Control: Maintain backups of your website files and use version control systems or repositories to track and manage changes systematically. Create backups before deploying changes to the live server to safeguard against data loss or unintended modifications.
Conclusion: Using FTP/SFTP in Adobe Dreamweaver empowers web developers to manage website files, upload content, and synchronize changes with remote servers efficiently and securely. By following the steps outlined in this guide and leveraging Dreamweaver’s built-in FTP/SFTP features and tools, you can streamline your file transfer workflow, maintain effective collaboration with remote servers, and ensure the integrity and reliability of your web projects. Whether you’re a beginner or experienced developer, mastering the art of using FTP/SFTP in Dreamweaver enables you to deploy website changes with confidence and efficiency, delivering seamless user experiences and achieving your development goals with ease.


