Mastering Formatting: A Comprehensive Guide to Creating Hanging Indents in Microsoft Word
In the expansive landscape of document formatting, precision and consistency are paramount to presenting information in a clear, organized, and visually appealing manner. One formatting feature that plays a crucial role in enhancing readability and structure is the hanging indent. Used predominantly in academic papers, bibliographies, and reference lists, a hanging indent creates a professional and polished look by aligning the second and subsequent lines of a paragraph or list item while leaving the first line flush with the margin. In this extensive guide, we’ll explore the intricacies of creating hanging indents in Microsoft Word, empowering you to master this essential formatting technique with precision and ease.
Understanding the Significance of Hanging Indents:
Before delving into the practical aspects of creating hanging indents, it’s crucial to grasp the significance of this formatting feature in document design. Hanging indents serve multiple purposes, including:
- Enhancing readability: By aligning subsequent lines of text or list items, hanging indents improve readability and comprehension, making it easier for readers to scan and navigate through the content.
- Creating visual hierarchy: Hanging indents help establish a clear visual hierarchy within the document, distinguishing between main text and secondary information, such as citations, references, or list items.
- Conveying professionalism: A well-formatted document with consistent hanging indents conveys professionalism and attention to detail, enhancing the overall impression of the document’s quality and credibility.
By incorporating hanging indents into your document formatting toolkit, you can create documents that are not only well-structured and organized but also visually appealing and professional.
Basic Hanging Indent Creation:
Creating a hanging indent in Microsoft Word is a straightforward process that can be accomplished using built-in tools and features. Here’s how to do it:
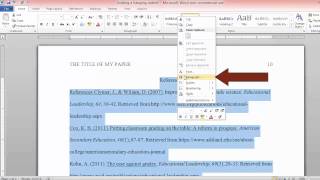
- Select Text:
- Open Microsoft Word and navigate to the paragraph or list item where you want to apply the hanging indent.
- Select the text by clicking and dragging over the paragraph or list item to highlight it.
- Access the Paragraph Dialog Box:
- Right-click on the selected text to open the context menu, then choose “Paragraph” from the dropdown menu. Alternatively, you can access the “Paragraph” dialog box from the “Home” tab by clicking on the small arrow in the “Paragraph” group.
- Set Indentation Options:
- In the “Paragraph” dialog box, navigate to the “Indentation” section.
- Under “Special,” select “Hanging” from the dropdown menu. This will set the first line indent to 0.5 inches by default and the hanging indent to the desired value.
- Apply Changes:
- Once you’ve set the hanging indent options, click “OK” to apply the changes to the selected text. The second and subsequent lines of the paragraph or list item will now be indented, while the first line remains flush with the margin.
Advanced Hanging Indent Options:
While basic hanging indent creation suffices for most scenarios, Microsoft Word offers advanced features and customization options to further enhance the appearance and functionality of hanging indents. Here are some additional features you may explore:
- Adjusting Indentation Measurements:
- Word allows users to adjust the indentation measurements for hanging indents to suit specific formatting requirements. In the “Paragraph” dialog box, you can manually enter the desired values for the first line indent and hanging indent.
- Applying Hanging Indents to Styles:
- For consistency and efficiency, Word enables users to apply hanging indents to paragraph styles. By modifying the style settings, you can ensure that all paragraphs with a specific style automatically have the desired hanging indent.
- Customizing Line Spacing:
- In addition to indentation, Word offers options for customizing line spacing within paragraphs or list items. Experiment with line spacing options to achieve the desired balance between readability and document length.
Best Practices for Hanging Indent Usage:
While hanging indents offer versatility and readability enhancements in document formatting, it’s essential to use them judiciously and in accordance with best practices. Here are some tips to consider:
- Maintain Consistency:
- Use consistent hanging indent formatting throughout the document to ensure visual coherence and professionalism. Consistent formatting enhances readability and document aesthetics.
- Balance Indentation Levels:
- When using hanging indents in lists or bibliographies, strive to maintain a consistent indentation level for each list item to ensure visual harmony and readability.
- Test Across Devices:
- Before finalizing your document, test the appearance and functionality of hanging indents across different devices and display settings to ensure that they render correctly and maintain their visual integrity.
Conclusion:
Creating hanging indents in Microsoft Word is a fundamental skill for enhancing document readability and structure. By mastering the basic creation process, exploring advanced options, and adhering to best practices for usage, you can create documents that are not only well-organized and informative but also visually appealing and professional. Whether you’re writing academic papers, bibliographies, or reference lists, hanging indents offer a versatile and powerful means of improving readability, establishing visual hierarchy, and conveying professionalism with precision and ease. So, the next time you embark on a document creation journey in Word, remember to leverage the power of hanging indents to enhance your document’s visual appeal, readability, and professionalism, and make a lasting impression on your audience.


