Mastering Dual Monitor Setup in Windows XP: A Comprehensive Guide

In the realm of productivity and multitasking, the ability to set up dual monitors in Windows XP opens up a world of possibilities for users seeking to enhance their workflow, increase screen real estate, and improve multitasking capabilities. Whether you’re a professional requiring multiple displays for efficient workspaces or a creative individual looking to expand your digital canvas, knowing how to set up dual monitors in Windows XP is essential. In this exhaustive guide, we’ll delve deep into the intricacies of dual monitor setup, empowering users to configure their dual monitor system with confidence and precision.
Understanding Dual Monitor Setup in Windows XP:
Before we explore the methods for setting up dual monitors, let’s understand the significance of dual monitor configuration within the Windows XP operating system. Dual monitor setup allows users to connect two monitors to a single computer, effectively extending the desktop across both displays. This configuration offers several benefits, including increased productivity, enhanced multitasking, and improved visual workspace for tasks such as video editing, graphic design, programming, and more.
Step-by-Step Guide to Setting Up Dual Monitors:
Now, let’s explore a systematic approach to setting up dual monitors in Windows XP:
Step 1: Check Hardware Compatibility:
- Before proceeding with dual monitor setup, ensure that your computer’s hardware supports multiple monitors.
- Check for available video outputs on your computer, such as VGA, DVI, HDMI, or DisplayPort.
Step 2: Connect Monitors to Your Computer:
- Connect one end of the video cable (VGA, DVI, HDMI, etc.) to the video output port on your computer.
- Connect the other end of the video cable to the corresponding input port on the monitor.
- Repeat the process for the second monitor, if applicable.
Step 3: Access Display Properties:
- Right-click on the desktop of your Windows XP computer.
- Select “Properties” from the context menu to open the Display Properties window.
Step 4: Configure Display Settings:
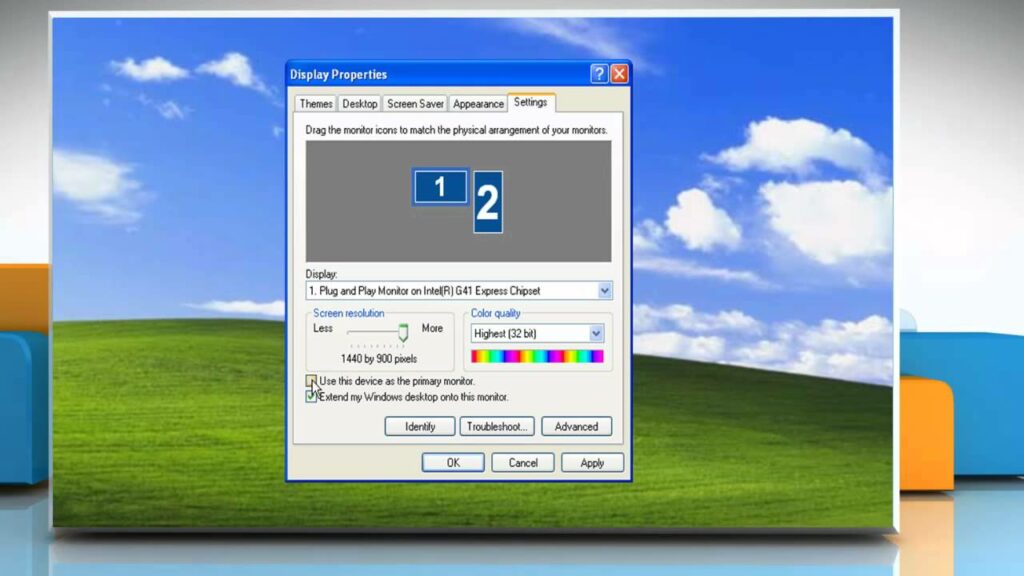
- In the Display Properties window, navigate to the “Settings” tab.
- You should see representations of both monitors labeled as “1” and “2.”
- Click on the monitor labeled “2” to select it.
- Check the box next to “Extend my Windows desktop onto this monitor.”
- Click “Apply” to apply the changes.
Step 5: Adjust Monitor Arrangement and Resolution:
- To adjust the arrangement of your monitors, click and drag the monitor icons in the Display Properties window to the desired positions.
- To adjust the resolution of each monitor, click on the corresponding monitor in the Display Properties window and adjust the screen resolution using the slider.
- Click “Apply” to apply the changes.
Step 6: Customize Display Settings (Optional):
- Explore additional display settings such as color depth, refresh rate, and orientation by clicking on the “Advanced” button in the Display Properties window.
- Make any desired customizations and click “OK” to save the changes.
Step 7: Test Dual Monitor Setup:
- Once you’ve configured your dual monitor setup, click “OK” to exit the Display Properties window.
- Test your dual monitor setup by dragging windows and applications across both displays.
- Ensure that both monitors are functioning correctly and displaying content as expected.
Conclusion:
In conclusion, setting up dual monitors in Windows XP offers users a powerful way to expand their workspace, increase productivity, and enhance multitasking capabilities. By following the step-by-step guide outlined in this article and exploring display settings, users can configure their dual monitor system to meet their specific needs and preferences effectively. Whether working on complex projects, managing multiple applications simultaneously, or simply enjoying a larger digital canvas, mastering the setup of dual monitors empowers users to optimize their computing experience with confidence and precision. So take advantage of dual monitor setup today and unlock the full potential of your Windows XP system!


