Mastering Color Grading: A Comprehensive Guide to Using the Color Grading Tools in Final Cut Pro
Introduction: Color grading is a fundamental aspect of post-production that allows filmmakers and video editors to enhance the visual aesthetics, mood, and storytelling of their videos. Final Cut Pro, a professional video editing software developed by Apple, offers a comprehensive suite of color grading tools and features to empower editors to achieve stunning color grades and cinematic looks. In this comprehensive guide, we’ll delve into the intricacies of using the color grading tools in Final Cut Pro, exploring techniques, workflows, and expert tips to help you master the art of color grading and elevate the visual quality of your projects.
Understanding Color Grading in Final Cut Pro: Color grading involves adjusting the color, contrast, exposure, and tone of a video to achieve a desired look or aesthetic. In Final Cut Pro, color grading is performed using a combination of color correction tools, color wheels, scopes, masks, and presets. Whether you’re correcting color imbalances, creating stylized looks, or matching footage from different sources, Final Cut Pro provides the flexibility and precision needed to achieve professional-grade color grades.
Step-by-Step Guide to Using the Color Grading Tools in Final Cut Pro:
- Import Your Footage: Start by importing your footage into Final Cut Pro. You can do this by navigating to the Import Media tab, selecting the video files from your computer, and importing them into your project library.
- Create a New Project: Once your footage is imported, create a new project in Final Cut Pro by selecting File > New > Project. Choose the appropriate project settings, including resolution, frame rate, and aspect ratio, based on the specifications of your footage.
- Add Footage to the Timeline: Drag and drop the desired footage from the project library into the timeline in Final Cut Pro. Arrange the clips in the desired order and sequence to begin editing and color grading.
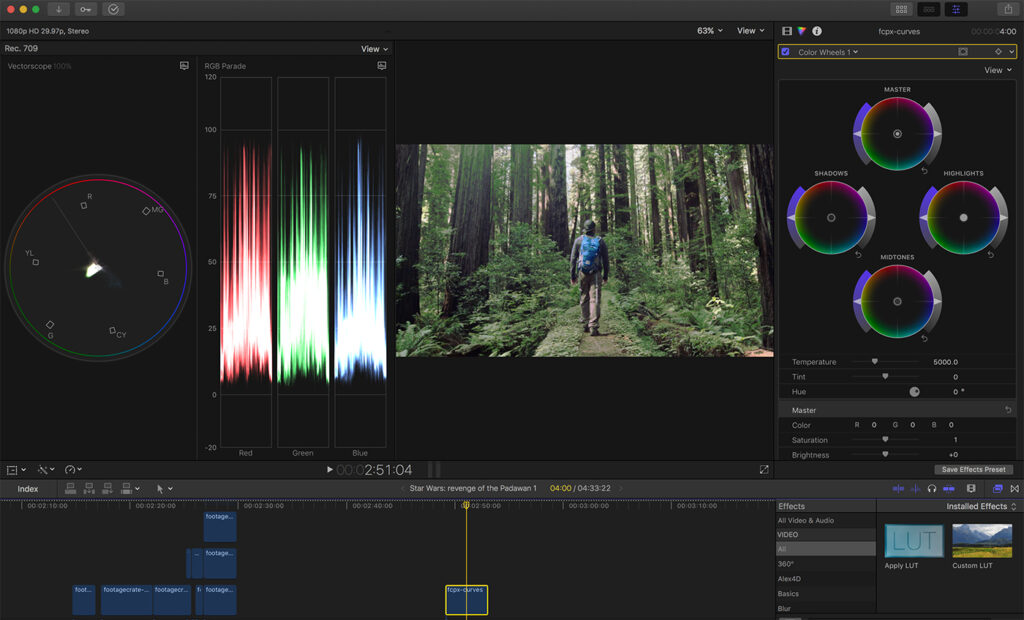
- Accessing the Color Grading Tools: To access the color grading tools in Final Cut Pro, navigate to the Color tab at the top of the interface. This opens the color grading workspace, where you’ll find a range of color correction and grading tools.
- Using Color Wheels: The primary color grading tools in Final Cut Pro are the color wheels, which allow you to adjust the color balance, exposure, and contrast of your footage. There are three color wheels: Shadows, Midtones, and Highlights. Use these wheels to adjust the color temperature, tint, brightness, and saturation of the shadows, midtones, and highlights in your footage.
- Adjusting Exposure and Contrast: In addition to color correction, Final Cut Pro offers controls for adjusting exposure and contrast. Use the Exposure and Contrast sliders to fine-tune the overall brightness, contrast, and dynamic range of your footage.
- Applying Color Corrections: Final Cut Pro provides a variety of color correction tools and effects, including color curves, color masks, and color presets. Experiment with these tools to correct color imbalances, enhance skin tones, and achieve a consistent color palette throughout your project.
- Using Scopes for Precision: To ensure accurate color grading, Final Cut Pro offers a range of built-in scopes, including waveform monitors, vectorscopes, and histograms. Use these scopes to analyze the color and luminance levels of your footage and make precise adjustments based on visual data.
- Creating Masks and Keyframes (Advanced): For more advanced color grading techniques, Final Cut Pro allows you to create masks and keyframes to isolate specific areas of your footage and apply targeted color corrections. Use masks to selectively adjust colors, exposure, or saturation in specific regions of the frame.
- Working with LUTs and Presets: Final Cut Pro supports the use of LUTs (Look-Up Tables) and color grading presets to achieve specific looks and styles quickly. Import custom LUTs or browse the built-in library of presets to apply stylized color grades and cinematic effects to your footage.
- Fine-Tuning and Previewing: As you make adjustments to the color grading of your footage, continuously preview the results in real-time to assess the visual impact and quality of the color grade. Use the playback controls and viewer window in Final Cut Pro to preview your footage and make any necessary fine-tuning adjustments.
- Rendering and Exporting: Once you’re satisfied with the color grading of your footage, render the final project for export. Navigate to the File menu and select Share > Master File to export the project in your desired format and resolution.
Tips and Best Practices for Using the Color Grading Tools in Final Cut Pro:
- Shoot with Color Grading in Mind: When filming your footage, consider the desired color grading and visual style you want to achieve in post-production. Shoot with appropriate lighting, white balance, and camera settings to capture the best possible image quality for color grading.
- Use Reference Images and Samples: When color grading, refer to reference images, color swatches, or sample footage to guide your color correction and grading decisions. Compare your footage to professional references to ensure that your color grade meets industry standards and visual expectations.
- Work Non-Destructively: To maintain flexibility and versatility in your color grading workflow, use adjustment layers, adjustment clips, or non-destructive effects in Final Cut Pro. This allows you to make changes to the color grade at any stage of the editing process without altering the original footage.
- Experiment with Different Looks: Don’t be afraid to experiment with different color grading techniques, styles, and looks to find the most suitable aesthetic for your project. Try out different color combinations, contrast levels, and tonal adjustments to create unique and visually compelling results.
- Pay Attention to Skin Tones: When color grading, pay special attention to skin tones to ensure that they appear natural and flattering. Use the skin tone line on the vectorscope as a reference and adjust the color balance and saturation to achieve pleasing skin tones.
- Use Grading Nodes (if available): If your color grading workflow involves multiple layers or nodes, consider organizing your adjustments into grading nodes to maintain clarity and organization. Group related adjustments together in separate nodes to simplify the color grading process and facilitate revisions.
- Collaborate and Seek Feedback: Collaborate with colleagues, clients, or collaborators to gain fresh perspectives and feedback on your color grading work. Share your color graded footage with others and solicit feedback to identify areas for improvement and refinement.
- Stay Consistent Across Shots: When color grading multiple shots or scenes, strive for consistency in color balance, exposure, and tonal range to create a cohesive visual narrative. Match the color grading of different shots to maintain continuity and coherence throughout the project.
Conclusion: Color grading is a vital aspect of video production that allows editors to enhance the visual quality, mood, and storytelling of their projects. With the powerful color grading tools and features available in Final Cut Pro, you have the tools and capabilities you need to achieve professional-grade color grades and cinematic looks. By following the steps outlined in this comprehensive guide and embracing best practices, you’ll be well-equipped to master the art of color grading and elevate the visual quality of your projects. Whether you’re editing films, commercials, music videos, or promotional content, Final Cut Pro provides the flexibility and precision you need to create stunning color grades that captivate and engage your audience. So, dive in, experiment fearlessly, and let your creativity shine as you master the art of color grading in Final Cut Pro.


