Mastering AutoCAD: A Comprehensive Guide to Attaching and Overlaying Xrefs
In the world of computer-aided design (CAD), External References (Xrefs) in AutoCAD serve as invaluable tools for incorporating external drawings, blocks, or images into a master drawing, facilitating collaboration, version control, and modular design workflows. Mastering the techniques for attaching and overlaying Xrefs in AutoCAD is essential for enhancing productivity, maintaining consistency, and streamlining workflows in various design projects. Whether you’re an architect, engineer, designer, or drafting professional, understanding how to effectively attach and overlay Xrefs empowers you to efficiently manage complex designs, streamline collaboration, and maintain accuracy across multiple drawings. In this comprehensive guide, we’ll explore the tools and techniques for attaching and overlaying Xrefs in AutoCAD, discuss their applications and functionalities, and provide step-by-step instructions to help you refine your drafting skills and unlock new possibilities in your design projects.
Understanding Attaching and Overlaying Xrefs in AutoCAD:
Before delving into the specifics of attaching and overlaying Xrefs in AutoCAD, it’s essential to grasp the concepts and functionalities of Xrefs:
- Definition: External References (Xrefs) in AutoCAD allow users to attach external drawings, blocks, or images to a master drawing, creating a link between the master drawing and the external reference.
- Linking: When you attach an Xref to a master drawing, you create a link that enables AutoCAD to display the contents of the external reference within the master drawing. Any changes made to the external reference are automatically reflected in the master drawing when it is reloaded or updated.
- Modularity: Xrefs facilitate modularity in design workflows by allowing users to break down complex drawings into smaller, more manageable components. Each component can be edited and updated independently, simplifying collaboration and version control.
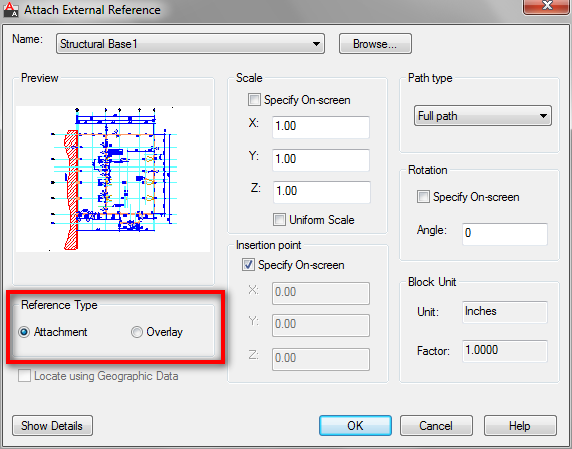
Attaching Xrefs in AutoCAD:
AutoCAD provides a straightforward process for attaching Xrefs to master drawings, allowing users to incorporate external references seamlessly. Here’s how to attach Xrefs in AutoCAD:
- Using the XREF Command:
- To attach an Xref to a master drawing, type “XREF” in the command line or select the External References option from the Insert tab on the Ribbon.
- In the External References palette, click the Attach button or right-click and choose Attach from the context menu.
- Navigate to the location of the external reference file (.dwg) and select it. Choose the desired attachment options, including insertion point, scale, and rotation, then click OK.
- The Xref is now attached to the master drawing, and its contents will be displayed within the master drawing.
- Managing Xref Attachments:
- Once attached, Xrefs can be managed using the XREF or XREFPALETTE command. Users can reload, detach, or modify Xrefs as needed to update or customize their appearance within the master drawing.
Overlaying Xrefs in AutoCAD:
In addition to attaching Xrefs, AutoCAD allows users to overlay Xrefs on top of existing content within a master drawing. Overlay Xrefs are useful for annotations, reference information, or additional context. Here’s how to overlay Xrefs in AutoCAD:
- Using the XREF Command:
- To overlay an Xref in a master drawing, follow the same steps as attaching an Xref, but choose the Overlay option instead of Attach.
- Overlay Xrefs will be displayed on top of existing content in the master drawing, allowing users to add annotations or reference information without obscuring underlying geometry.
- Managing Overlay Xrefs:
- Like attached Xrefs, overlay Xrefs can be managed using the XREF or XREFPALETTE command. Users can reload, detach, or modify overlay Xrefs as needed to update or customize their appearance within the master drawing.
Best Practices for Using Xrefs in AutoCAD:
To maximize efficiency and maintain consistency when using Xrefs in AutoCAD, consider implementing the following best practices:
- Organize Xref Files: Maintain a well-organized file structure for Xref files, keeping related drawings, blocks, or images in separate folders or directories to facilitate easy access and management.
- Use Relative Paths: Whenever possible, use relative paths when attaching Xrefs to master drawings. Relative paths ensure that the links between master drawings and Xref files remain intact, even if the drawing files are moved or copied to different locations.
- Coordinate with Team: Coordinate with team members or collaborators when using Xrefs in collaborative design projects. Establish naming conventions, layer standards, and file management protocols to ensure consistency and compatibility across multiple drawings.
- Regular Maintenance: Periodically review and update Xrefs in master drawings to ensure that they remain current and accurate. Remove obsolete or redundant Xrefs to optimize drawing performance and reduce file size.
Conclusion:
Mastering the techniques for attaching and overlaying Xrefs in AutoCAD is essential for enhancing productivity, maintaining consistency, and streamlining collaboration in various design projects. By understanding the concepts and functionalities of Xrefs, practicing their use in different design scenarios, and implementing best practices for efficiency and consistency, you can elevate your drafting skills and unlock new possibilities in your design projects. Whether you’re collaborating with team members, managing complex drawings, or organizing modular designs, knowing how to effectively attach and overlay Xrefs will enable you to create high-quality drawings with precision and efficiency. With dedication, practice, and a commitment to continuous learning, you’ll become proficient in using Xrefs in AutoCAD and excel in your CAD design endeavors.


