Capturing Joy: Infusing Smiles with Photoshop’s Liquify Filter
Introduction:
Adobe Photoshop, a digital canvas where creativity knows no bounds, offers a myriad of tools to transform ordinary moments into extraordinary visual narratives. Among these tools, the Liquify filter stands out as a versatile ally, capable of reshaping and enhancing elements within an image. In this comprehensive guide, we embark on a journey to explore how Photoshop’s Liquify filter can be harnessed to bring joy and smiles to portraits, transforming expressions with the touch of digital magic.
Understanding the Power of Photoshop’s Liquify Filter:
- Dynamic Image Manipulation: The Liquify filter in Photoshop provides a dynamic platform for image manipulation. It allows users to push, pull, and reshape elements within an image, offering unparalleled control over facial features, expressions, and overall composition.
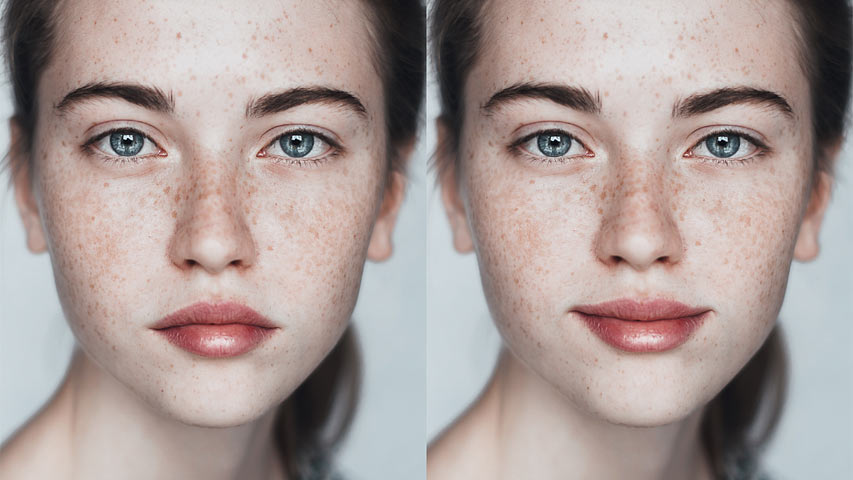
- Portrait Enhancement and Expression Refinement: While Liquify is a powerful tool for various applications, its prowess in portrait enhancement is particularly noteworthy. The filter enables users to refine facial expressions, correct imperfections, and, most importantly, evoke genuine smiles that can be the highlight of any photograph.
Step-by-Step Guide to Making Someone Smile with Liquify:
Note: Ensure you are working on a duplicate layer or a Smart Object to maintain the integrity of the original image.
- Open Your Image in Photoshop: Launch Photoshop and open the image you want to work on. Familiarize yourself with the subject’s facial features, paying attention to areas that may benefit from subtle adjustments.
- Access the Liquify Filter: Navigate to “Filter” > “Liquify” from the menu. The Liquify workspace will open, presenting a range of tools and options on the left.
- Select the Forward Warp Tool: The Forward Warp Tool (W) is the primary tool for reshaping and adjusting elements. Adjust the brush size to match the area you want to work on, ensuring it’s large enough for smooth adjustments.
- Gently Adjust Facial Features: Begin by gently adjusting the facial features to create a subtle and natural-looking smile. Use the Forward Warp Tool to lift the corners of the mouth, slightly curve the lips, and adjust the positioning of the eyes to enhance the overall expression.
- Refine with the Pucker and Bloat Tools: The Pucker Tool (S) and Bloat Tool (B) are valuable for fine-tuning details. Use the Pucker Tool to refine the shape of the lips and the Bloat Tool to add a touch of fullness to the cheeks, creating a more joyful appearance.
- Adjust Eye Expressions: Focus on the eyes to enhance the sincerity of the smile. Use the Forward Warp Tool to lift the outer corners of the eyes, creating a subtle “crow’s feet” effect that adds authenticity to the smile.
- Be Mindful of Proportions: Maintain a sense of proportionality to ensure that adjustments align with the subject’s unique features. Avoid excessive changes that may result in an unnatural appearance.
- Preview and Compare: Regularly toggle between the preview and original views to assess the changes. This helps in gauging the subtlety of adjustments and ensures that the final result appears genuine and harmonious.
Advanced Techniques for Natural-Looking Smiles:
- Adjust Lighting and Shadows: To enhance the realism of the smile, pay attention to lighting and shadows. Use the “Face-Aware Liquify” feature to independently adjust facial features while preserving the overall lighting conditions.
- Use the Freeze Mask Tool: The Freeze Mask Tool (F) allows you to protect specific areas from being altered. This is particularly useful for preserving elements like the eyes, ensuring that they remain authentic and untouched during the smile enhancement process.
- Combine with Other Adjustments: Experiment with combining Liquify adjustments with other Photoshop tools and adjustments. Fine-tune color balance, contrast, and overall tonality to complement the enhanced smile and create a cohesive final image.
Ethical Considerations:
- Maintain Respect for Authenticity: While the Liquify filter offers creative possibilities, it’s essential to maintain respect for the authenticity of the subject. Avoid excessive alterations that may compromise the natural essence of the individual.
- Communication and Consent: When working on portraits of others, communicate openly about any enhancements or adjustments you plan to make. Obtain consent to ensure that your creative choices align with the subject’s comfort level.
Conclusion:
Photoshop’s Liquify filter serves as a digital brush that paints smiles and joy onto photographic canvases. Through subtle adjustments and a nuanced approach, you can elevate the emotional resonance of portraits, capturing moments of genuine happiness that transcend pixels. As you delve into the art of reshaping expressions, remember that the true magic lies not just in the technical proficiency but in the ability to preserve the authenticity and soul of the captured moment. So, wield your digital brush with care, and let the smiles you create in Photoshop echo the beauty of real, unbridled joy.


