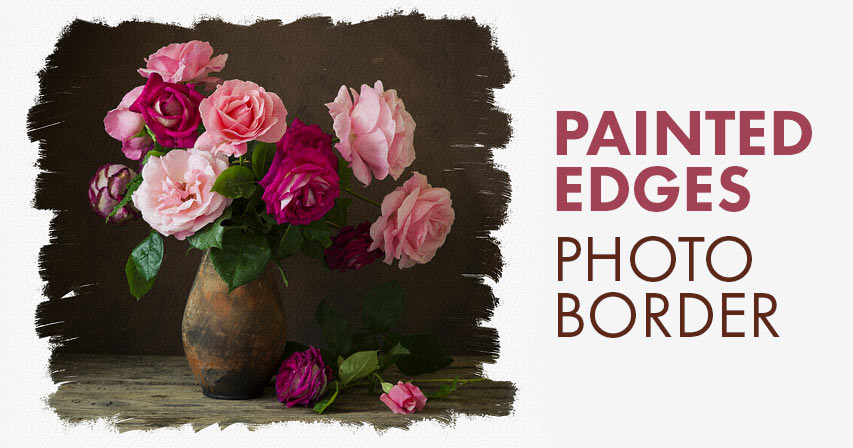
Brushing Elegance: A Comprehensive Guide to Creating a Painted Edges Photo Border in Photoshop
Introduction:
In the realm of digital artistry, the border that encases a photograph is more than a mere frame—it is a canvas for creative expression. Among the myriad ways to enhance your images, adding a painted edges photo border in Adobe Photoshop stands out as a timeless and artistic choice. This comprehensive guide will lead you through the intricate steps of crafting a painted edges border, transforming your photographs into elegant masterpieces that evoke the charm of traditional paintings. From choosing the right images to mastering brush techniques, this guide unveils the secrets to creating a sophisticated and painterly photo border.
I. Choosing the Right Image:
1.1 Image Selection:
- Begin by selecting an image that aligns with the theme or mood you wish to convey.
- Consider the subject matter, composition, and color palette of the photograph.
1.2 High-Resolution Importance:
- Opt for a high-resolution image to maintain clarity and detail in the final result.
- A high-quality image serves as a strong foundation for creating a polished and refined painted edges photo border.
II. Opening the Image in Photoshop:
2.1 Launching Adobe Photoshop:
- Open Adobe Photoshop on your computer and create a new document or open an existing one where you want to add the painted edges border.
- Ensure that the document resolution matches the quality of your selected image.
2.2 Importing the Image:
- Import the chosen image into Photoshop as a new layer.
- Position the image layer at the bottom of the layer stack, as the painted edges border will be added above it.
III. Setting Up the Brush:
3.1 Selecting a Soft Brush:
- Choose a soft, round brush from the brush presets in Photoshop.
- Adjust the brush size based on the size of your image and the desired thickness of the painted edges border.
3.2 Custom Brush Settings:
- Experiment with brush settings such as opacity and flow to achieve a subtle and painterly effect.
- Adjust the brush dynamics for pressure sensitivity if you are using a graphics tablet for more control.
IV. Creating the Painted Edges Border:
4.1 Brushing Along the Edges:
- Select a color for the painted edges that complements the overall tone of the image.
- Begin brushing along the edges of the image layer, gradually building up the painted border.
4.2 Varying Brush Strokes:
- Experiment with varying brush strokes to create an organic and hand-painted feel.
- Incorporate light strokes, dabs, and directional brush movements for a textured and dynamic border.
V. Introducing Colors and Textures:
5.1 Adding Color Variations:
- Infuse the painted edges border with subtle color variations to mimic the nuances found in traditional paintings.
- Use the color picker to select tones from the image itself or introduce complementary colors for added visual interest.
5.2 Applying Texture Effects:
- Enhance the painterly effect by adding textures to the painted edges.
- Experiment with layer styles such as “Texture” or overlaying textured images to introduce surface irregularities.
VI. Customizing with Layer Styles:
6.1 Inner and Outer Glow:
- Apply an inner and outer glow layer style to the painted edges for a luminous and ethereal effect.
- Experiment with the glow settings to achieve the desired intensity and color.
6.2 Drop Shadow for Depth:
- Introduce depth to the painted edges border by adding a subtle drop shadow.
- Adjust the shadow settings to create a soft, natural-looking shadow that enhances the separation between the image and the border.
VII. Layer Masking for Precision:
7.1 Layer Mask Introduction:
- Use layer masking to refine the edges of the painted border and create a seamless integration with the image.
- Apply a layer mask to the painted edges layer, allowing for precise adjustments without altering the underlying image.
7.2 Painting on Layer Masks:
- Use the Brush Tool (B) with a soft brush to paint on the layer mask.
- This technique enables you to reveal or conceal specific areas of the painted edges, ensuring a polished and cohesive result.
VIII. Final Touches and Refinements:
8.1 Iterative Review:
- Step back and review the entire composition, considering the balance and visual impact of the painted edges photo border.
- Make iterative adjustments to colors, textures, and brush strokes for a refined and elegant finish.
8.2 Saving Iterative Versions:
- Save iterative versions of your project to preserve different stages of the creative process.
- This practice allows for experimentation and easy backtracking if desired.
IX. Exporting the Painted Edges Photo Border:
9.1 Saving in Appropriate Formats:
- Save the final image with the painted edges photo border in the desired format, resolution, and color space.
- Consider the intended use, whether for digital display, print, or further digital manipulation.
9.2 Sharing and Showcasing:
- Share your painted edges masterpiece on social media platforms, personal portfolios, or within digital art communities.
- Engage with fellow artists, gather feedback, and celebrate the artistic refinement of your photo border.
X. Conclusion:
Creating a painted edges photo border in Adobe Photoshop is a journey into the realm of artistic refinement, where digital images transform into elegant and timeless compositions. By skillfully applying brush strokes, colors, and textures, artists can elevate their photographs into captivating pieces of visual art. As you embark on your journey of painterly expression, let your creativity guide you, experiment with different techniques, and witness the transformative power of Photoshop in bringing a touch of traditional artistry to your digital canvases.