What You Need to Know About Using Photoshop to Create 3D Pop-Out Effects for Portrait Photos
What You Need to Know About Using Photoshop to Create 3D Pop-Out Effects for Portrait Photos
If you have ever wanted to give your photographs a dramatic and eye-catching update, the 3D pop-out effect that is available in Photoshop is an excellent place to begin. Using this inventive technique, one may create the impression that a portion of the subject is exploding out of a frame, almost as if it were jumping off the screen completely. For the purpose of producing a contemporary and immersive picture, it is often used in digital posters, album art, and postings on social networking platforms.
What is the most enjoyable aspect? It is not necessary for you to be an expert in Photoshop. Anyone is capable of transforming a straightforward photograph into a visually arresting three-dimensional pop-out effect by using certain layering, masking, and positioning techniques. Let’s go through the procedure in little, step-by-step increments.
Beginning with the Appropriate Portrait Photograph
It is recommended that you choose a portrait in which the subject has a distinct contour and, ideally, some portion of the body or item (such as an arm, foot, or camera) that extends forward. The pop-out will have a more realistic appearance as a result of its forward motion. It is beneficial to have a strong contrast between the topic and the backdrop, therefore make sure that the background is not too crowded.
The picture should be opened in Photoshop, and the background layer should be duplicated. For the purpose of producing the cutout, this copied layer will be used.
Determine the Subject, and then Isolate It
For the purpose of making an automated selection around the person, you may use either the Object Selection Tool or the Select Subject command. If necessary, you may manually tidy up the selection by using the Lasso Tool or the Quick Selection Tool. Photoshop’s artificial intelligence (AI) program performs an excellent job most of the time.
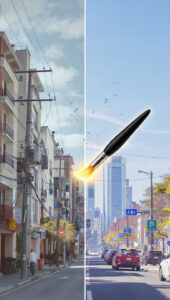
After you have determined that the selection is satisfactory, right-click on it and pick “Layer via Copy” to position your subject on a new layer that is distinct from the backdrop. At some point in the future, this cutout will give the impression of emerging from the frame.
Make the frame that the subject will emerge from, and then create it.
The next step is to create a new layer and then use the Rectangle Tool to draw a rectangle shape. This will serve as the “frame” or barrier that the topic will appear through. Place the frame in such a way that it intersects with a portion of the topic that you want to break through. For instance, you may wrap the frame around the body, but you could let one arm or the head to extend beyond the frame’s boundary.
In the event that it is required, rasterize the rectangle layer so that it may be masked and blended appropriately.
Organize and Layer Everything in Position Appropriately
Place the rectangle layer in the middle of the original backdrop and the subject cutout layer by dragging it to the appropriate position. At this point, you will notice that your subject is appearing above the frame; this is the first illusion of depth that you will perceive.
Applying a layer mask to the subject cutout layer will allow you to tweak it even more. Hide the sections of the subject that should still display behind the frame by using a soft dark brush, while ensuring that the “popping” element remains visible. Because of this, it seems as if just a portion of the subject is emerging from the frame, while the other portion is contained inside it.
Make use of shadows and depth.
It is the depth that gives this impression a sense of realism. To further convey the idea that the subject is separated from the background, add a gentle drop shadow behind them. The subject cutout may be duplicated, then filled with black, blurred, and the opacity can be decreased. This will allow you to get the desired result.
If you want to give the impression that the frame is thicker, you can also want to add a little shadow within the frame. If you want to do this, you may either manually make a shadow by using soft brushes or apply an Inner Shadow by double-clicking on the frame layer.
Add a Gradient or Background Blur to Enhance the Effect
It could be beneficial to slightly blur the original backdrop in order to better accentuate the three-dimensional impression. In order to get a soft depth-of-field effect, you may use the Gaussian Blur filter. In the event that you are looking for a more contemporary and clean appearance, you may easily change the backdrop with a gradient or an abstract design.
Applying the Final Touches
Lastly, make adjustments to the coloring and lighting of the whole scene. It is possible to get a polished and consistent appearance for your picture by using adjustment layers like as Brightness/Contrast, Levels, or Color Lookup. Experimenting with a tiny vignette around the borders of the frame is another way to bring more attention to the topic of the photograph.
As soon as you are satisfied with everything, you should organize your layers, give them names for easier reference, and save your project as a PSD as well as a JPEG or PNG file so that it can be shared.
Take a Bow
The 3D pop-out portrait effect is a very remarkable method for imparting a sense of depth, motion, and flair to your photographs. This transforms a static picture into something that is both interactive and daring. The procedure becomes rapid and natural once you have done it a few of times, and the end product always attracts attention no matter how many times you try it.
This method gives the impression that the image is moving and living, making it ideal for use in creative projects such as posters, profile photographs, event graphics, and other similar endeavors. See how your regular portraits may be transformed into something absolutely spectacular by giving it a go and seeing the results.