Using Photoshop’s New “Clarity and Dehaze” Adjustment Layers to Recover Detail in Foggy Drone Photos
Using Photoshop’s New “Clarity and Dehaze” Adjustment Layers to Recover Detail in Foggy Drone Photos
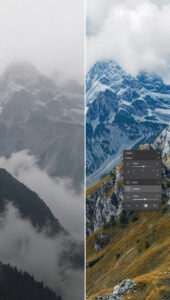
As a result of air haze dispersing light over the scene, fog drone photographs often have poor contrast, muted colors, and a general lack of detail compared to other types of photographs. Distant landscapes might seem flat and washed out, even when taken with high-end drone cameras. This makes it difficult to demonstrate depth and structure in the image. In order to solve these problems, the new “Clarity and Dehaze” adjustment layers in Photoshop have been developed. These layers are meant to intelligently restore contrast, enhance midtone detail, and cut through atmospheric fog. Through the use of these technologies, photographers are able to turn drab aerial photographs into compositions that are clear and visually captivating.
Realizing the Differences Between Clarity and Dehaze Adjustment Layers
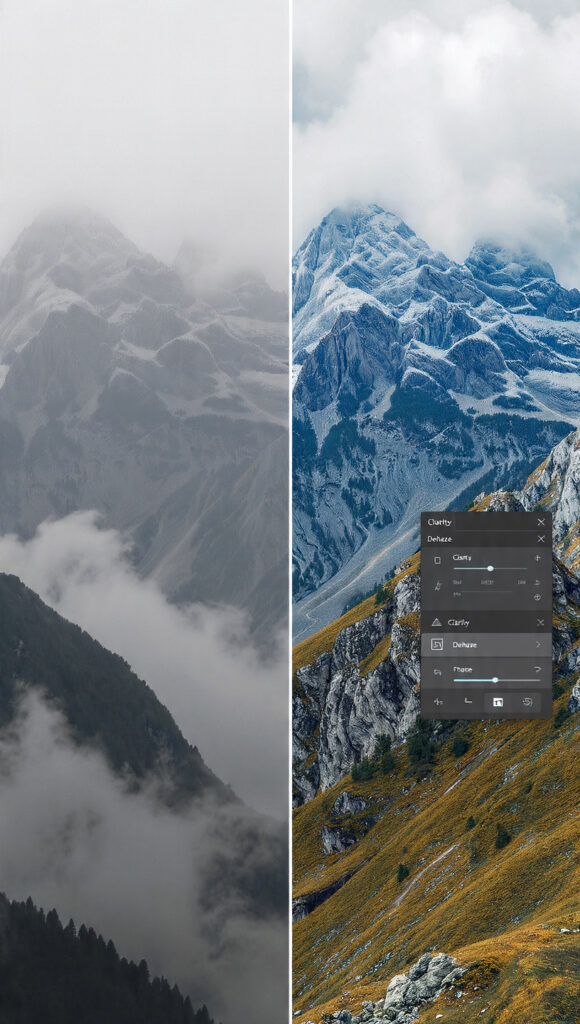
In order to function properly, the Clarity and Dehaze adjustment layers examine the ways in which brightness and contrast are distributed across a picture. Clarity largely improves the contrast between the midtones, which accentuates the surface detail and texture of the image without having a significant impact on the highlights and shadows. By rebalancing tonal ranges, dehaze works to reduce air scattering, which in turn makes distant objects more apparent and can be distinguished from one another. These tweaks, when combined, create the impact of better visibility, which results in photographs that seem foggy having a more three-dimensional and realistic aspect while yet retaining the benefits of natural lighting.
Images from the drone being prepared for recovery
Before making any modifications, it is essential to get the drone shot ready for editing in a way that does not cause significant damage. The transformation of the picture layer into a Smart Object guarantees that any modifications will continue to be editable and reversible to the user. In order to improve the accuracy of the Clarity and Dehaze tools, it is helpful to check the exposure levels and make any necessary adjustments to excessive highlights or shadows before using them. In addition, removing lens distortions and color casts at this step establishes a clean foundation, which enables the recovery process to concentrate only on restoring detail and contrast.
This is the Clarity Adjustment Layer being applied.
Applying a Clarity adjustment layer to the picture after it has been produced gives you the ability to improve the texture and surface definition of the image. By progressively increasing clarity, delicate details in the landscape, buildings, and natural elements are brought out without the introduction of sharp edges. owing to the fact that aerial viewpoints often lose micro-contrast owing to distance and atmospheric interference, this modification is especially useful for drone photographs. It is important to use caution while using the slider so that the textures seem natural, rather than unduly sharpened or artificially boosted.
Cutting Through Fog with the Help of Dehaze
When it comes to protecting against atmospheric fog, the Dehaze adjustment layer is the most important instrument. Photoshop redistributes tonal data in order to increase depth and eliminate haze. This is accomplished by raising the dehaze value’s value. Mountains in the distance, beaches, and metropolitan buildings are all increased in visibility and clarity as a result of this. Using an algorithm that is controlled by artificial intelligence, color balance is maintained while clarity is restored. This eliminates the usual issue of achieving results that are too dark or unnatural when using manual contrast changes.
Bringing Color and Contrast into Balance
An increase in contrast and color intensity is a natural consequence of the application of clarity and dehaze. In the event that this is not addressed, it may result in sky that are too saturated or shadows that are darkened. The ability to rebalance these aspects is made possible by the use of complimentary adjustment layers, such as curves or selective color. The process of fine-tuning contrast guarantees that details are preserved without obliterating shadows or blowing out highlights, so preserving a final product that is both realistic and aesthetically acceptable.
Bringing Back the Lost Depth and Atmosphere
Making use of these new adjustment layers allows for the restoration of depth without entirely eliminating the atmospheric sense, which is one of the most significant benefits of employing these layers. Not only can dehazing increase sight, but it also helps maintain realism and atmosphere by allowing some natural mist to remain. Controlling the amount of fog that is eliminated from a picture may be accomplished by adjusting the blending modes and opacity. This ensures that the image seems improved rather than falsely altered. The importance of this balance cannot be overstated when it comes to landscape or cinematic photography.
Utilization of Masks for the Purpose of Selective Enhancement
Layer masks provide for exact control over the areas of the image where clarity and dehaze are performed. For instance, you could wish to apply a more intense dehazing effect on long-distance backdrops while maintaining a more mild effect on things in the foreground. Masking enables various parts of the picture to get individualized changes, which enhances the image’s realism and prevents it from being processed in a uniform manner. Using this focused method guarantees that the augmentation will have a natural feel and will respect the lighting conditions that were there initially.
Confirming the Results at the Highest Resolution
Immediately after the application of all modifications, it is necessary to examine the picture in its full resolution. Artifacts, noise amplification, and unnatural edges that may have been generated during processing may be identified with the use of this methodology. In order to demonstrate how successful the recovery was, it is necessary to compare the corrected version with the original. This comparison also ensures that the essential features are preserved. Adjustments of a finer nature made at this step contribute to the achievement of a product of professional quality that is acceptable for both print and digital display.
It is possible to save and export the final image.
Make sure to save the project as a layered file after you are pleased with the recovered detail and overall appearance. This will ensure that any adjustment layers are preserved for any future adjustments. It is important to export high-resolution copies in the right formats in order to keep the picture quality consistent across platform types. In order to maintain efficient workflows and simple reuse for portfolios, presentations, or client projects, it is important to organize recovered drone photographs with uniform naming and version control. This last phase brings the shift from a hazy shot to a clear and powerful aerial picture to a successful conclusion.