The Step-by-Step Guide to Using the New “Color and Vibrance” Adjustment Layer to Fix White Balance Instantly

The Step-by-Step Guide to Using the New “Color and Vibrance” Adjustment Layer to Fix White Balance Instantly
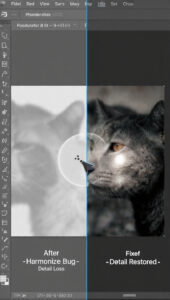
A new adjustment layer called “Color and Vibrance” has been added to Photoshop 2026. This layer makes it easier to determine the ideal white balance for any picture. Through the use of this tool, photographers and designers are able to rapidly harmonize colors, restore natural tones, and boost brightness without having to manually modify various sliders. Because it provides exact control over overall color temperature, saturation, and vibrance, the new adjustment layer is a crucial tool for both rapid repairs and extensive image restoration procedures. This is true regardless of whether you are dealing with RAW photographs, JPEGs, or composites.
Gaining an Understanding of the Adjustment Layer Labeled “Color and Vibrance”
A number of color-correction parameters are consolidated into a single interface by the “Color and Vibrance” layer, which makes the conventional process more straightforward. This layer allows you to harmonize tones while simultaneously improving brightness and reducing color clipping, in contrast to prior tools that needed separate changes to be made for temperature and tint. In order to identify color imbalances, the component that is powered by artificial intelligence examines the picture and makes suggestions for alterations that are designed to preserve natural skin tones, environmental colors, and minor color adjustments. Users are able to work more effectively without surrendering control over the final outcomes when they have a thorough understanding of these capabilities.
Making Preparations for Adjustment to Your Image
Before applying the adjustment layer, it is essential to make certain that your picture is rendered in a format that maintains the highest possible level of detail. The original data is safeguarded when layers are converted to Smart Objects, which also enables non-destructive editing abilities. Additionally, checking the exposure and highlights in advance enables the artificial intelligence to perform more accurate color modifications. It is possible to further improve the modifications by isolating issue regions via the use of masks or selects. This will ensure that certain sections of the picture get targeted white balance correction without unduly influencing the composition as a whole.
To apply the Adjustment Layer to the image
Your first step is to create a new adjustment layer called “Color and Vibrance” and place it above your picture layer. The user interface provides a selection of sliders that may be used to adjust the temperature, color, vividness, and saturation. You may use the temperature slider to warm or cool the picture as a whole, and you can use the tint slider to correct color casts, such as shifts in green or magenta. Using the vibrance slider, muted colors may be selectively enhanced, resulting in delicate tones that are enhanced without oversaturating regions that are already brilliant. The combination of these two elements guarantees that the skin tones, sky, and foliage all maintain their natural look while simultaneously improving the overall color balance.
Adapting the White Balance to Meet the Needs of Natural Skin Tone
In the process of correcting white balance, skin tones are often the most sensitive component. If it is required to separate subjects, you may do it by using the layer mask, which enables you to have exact control over color alterations. Maintaining minor differences in skin without making them look flat or unnatural is made easier with the use of artificial intelligence-assisted vibrance control. It is better to make small incremental modifications rather than abrupt alterations since they allow the texture and complexity of face features to be preserved while also ensuring that the picture seems visually balanced and has been edited for professional purposes.
The Correction of Colors in the Environment
It is frequently necessary to pay particular attention to environmental colors, such as the sky, the greenery, and the lighting within the building. Make adjustments to the scene’s lighting by adjusting the temperature and tint sliders. This is necessary regardless of whether the scene is lighted by natural sunshine, fluorescent light, or sources of mixed light. The artificial intelligence that is included inside the adjustment layer offers direction by indicating regions in which color alterations are most noticeable. Making modifications that are layer-specific and thorough guarantees that all of the elements in the scene are in harmony with one another and reflect colors that are correct and lifelike.
Improving Vibrance Without Excessive Saturation on the Whole
The vibrance function of this adjustment layer carefully increases the color intensity in sections that are already muted, while preventing the oversaturation of portions that are already bright. It is especially helpful when one is attempting to fix photographs that have dull backgrounds or highlights that have been washed away. Through the judicious use of vibrance, pictures may be made to look energetic and dynamic without the introduction of colors that are both artificial and obnoxious. When the vibrance is finely controlled, the finished picture is certain to be well-balanced, rich, and visually attractive, all while preserving the natural appearance that was intended for the scene in the first place.
Using Layer Masks to Make Adjustments That Are More Specific
It is essential to have layer masks in order to manage the manner in which the adjustment layer operates on various components of a picture. You are able to separate regions that need more accurate color correction by applying masks. Some examples of these areas are shadows, reflections, or objects that are under mixed illumination. You are able to keep the consistency in crucial locations by painting modifications selectively, while at the same time letting the AI-enhanced adjustment layer to optimize other portions of the picture. You will be able to solve white balance concerns across complicated scenarios with this strategy, which provides you with both efficiency and accuracy.
Checking the Results and Making Comparisons Between Before and After
To ensure that your edits are accurate in terms of color and general balance, you should always evaluate them at full resolution. Photoshop gives users the ability to toggle the visibility of the adjustment layer, which enables them to see at the corrected picture alongside the original. By seeing the picture in its context, across several devices or screens if at all feasible, it is possible to guarantee that the skin tones, lighting, and ambient colors stay consistent and natural within the image. The iterative verification process ensures that the white balance is correctly adjusted without causing any unexpected changes in other sections of the image.
The process of saving and exporting final files
The project should be saved as a layered PSD once the white balance and vibrance modifications have been finalized. This will ensure that the project may be edited even in the future. When high-resolution photographs are exported in TIFF or PNG formats, the colors that have been adjusted are then preserved for usage in digital or printed media. When working on several projects or making similar changes over a series of photographs, it is possible to maintain efficient workflows by keeping files organized and using clear naming standards. The outcomes of any photography or design job may be guaranteed to be professional and repeatable if proper saving and documenting are performed.