Spatial Mastery: Exploring AutoCAD’s 3D Orbit and View Commands
Introduction:
AutoCAD, a cornerstone in the world of Computer-Aided Design (CAD), empowers designers to bring their visions to life in three-dimensional space. Two integral tools, “3D Orbit” and “View Commands,” play a pivotal role in spatial mastery within AutoCAD. In this comprehensive guide, we will embark on a journey to explore the intricate functionalities of 3D Orbit and View Commands, unraveling their potential applications, and providing a roadmap to elevate your proficiency in navigating the spatial dimensions of your CAD designs.
Section 1: The Essence of 3D Orbit and View Commands
Understanding 3D Orbit:
At the core of spatial exploration in AutoCAD lies the 3D Orbit tool. This dynamic feature allows users to manipulate the viewpoint, providing a fluid and interactive way to navigate around, above, and through their 3D models. With 3D Orbit, designers can gain an immersive understanding of the spatial relationships within their creations.
Embracing View Commands:
Complementing 3D Orbit, AutoCAD’s View Commands offer a suite of tools designed to control and manipulate the visual representation of 3D models. From adjusting perspective views to fine-tuning visual styles, View Commands provide users with the tools needed to tailor the display of their designs in a three-dimensional space.
Section 2: Activating 3D Orbit
Step 1: Accessing 3D Orbit
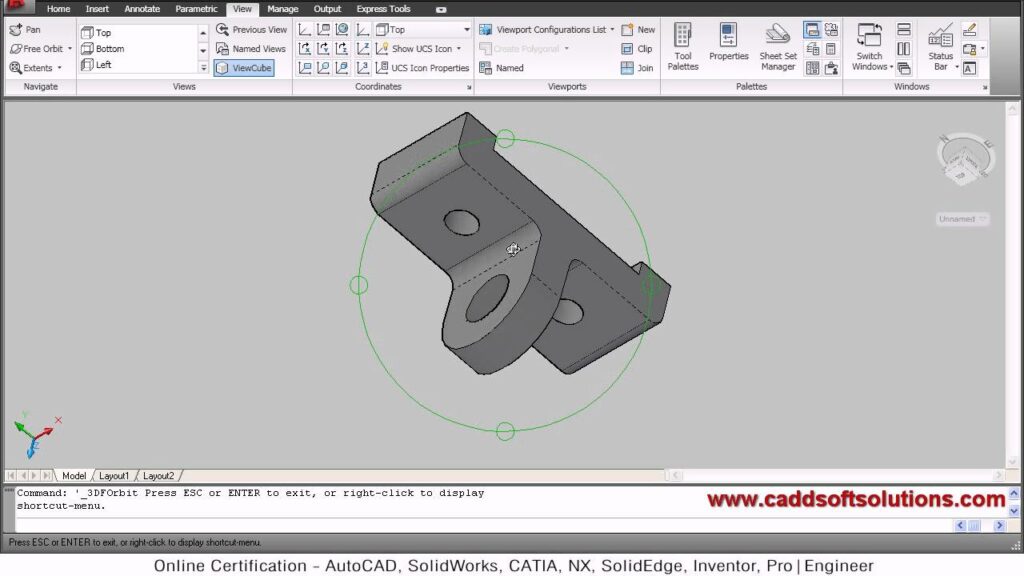
To activate 3D Orbit, users can either click on the “View” tab and select “3D Orbit” from the toolbar or type the command “3DORBIT” in the command line. Once activated, users enter a dynamic mode where they can interactively adjust their viewpoint.
Step 2: Navigating the 3D Orbit Interface
The 3D Orbit interface presents users with a triad representing the X, Y, and Z axes. By clicking and dragging on these axes, users can intuitively rotate their view, providing a real-time exploration of the 3D model.
Section 3: Mastering 3D Orbit Functionality
Step 1: Freeform Rotation
With 3D Orbit, users can engage in freeform rotation, allowing for unrestricted movement around the model. This feature is ideal for gaining a comprehensive understanding of the spatial layout and relationships within a 3D design.
Step 2: Constrained Rotation
For precision in viewpoint adjustments, users can employ constrained rotation by holding the Shift key. This ensures that the rotation occurs along a single axis, allowing for controlled exploration of specific details in the model.
Section 4: Advanced Techniques with 3D Orbit
Technique 1: Targeting Specific Points
By activating the “Target” option in 3D Orbit, users can specify a point in the model as their focal point. This allows for precise exploration around a specific area, aiding in detailed examination and refinement.
Technique 2: Adjusting Field of View
The “3DORBIT” command offers the option to adjust the field of view interactively. Users can dynamically alter the perspective, zooming in or out to focus on specific elements or gain a broader overview of the entire design.
Section 5: Activating View Commands
Step 1: Accessing View Commands
The View Commands in AutoCAD can be accessed through the “View” tab on the ribbon. This tab provides a comprehensive array of tools for manipulating the visual representation of 3D models, enhancing the overall spatial experience.
Step 2: Exploring View Command Options
Within the View Commands, users can explore various options such as “Views” for selecting predefined views, “Visual Styles” for adjusting the display style, and “Viewport Controls” for fine-tuning the view within a specific viewport.
Section 6: Predefined Views with View Commands
Step 1: Utilizing Standard Views
AutoCAD’s View Commands offer a range of standard views, including top, bottom, front, back, left, and right. These predefined views provide a quick and efficient way to orient the model, facilitating precise design adjustments.
Step 2: Isometric Views
View Commands empower users to switch to isometric views with ease. This functionality is invaluable for presenting 3D models in a visually appealing and easily comprehensible manner, especially in architectural and engineering contexts.
Section 7: Visual Styles for Enhanced Visualization
Step 1: Accessing Visual Styles
The “Visual Styles” option in View Commands allows users to choose from various rendering styles, such as Wireframe, Hidden, Conceptual, Realistic, and more. Each style imparts a distinct visual representation to the 3D model, enhancing the overall viewing experience.
Step 2: Realistic Rendering
Selecting the “Realistic” visual style provides users with a rendered representation of their 3D model, complete with shading, lighting, and material textures. This realistic rendering option aids in visualizing designs in a lifelike manner.
Section 8: Customizing Perspective Views
Step 1: Adjusting Perspective
View Commands enable users to toggle between perspective and orthographic views. Activating the “PERSPECTIVE” command introduces depth and realism to the model, enhancing the spatial understanding of the design.
Step 2: Fine-Tuning Perspective Settings
Users can further refine perspective views by adjusting settings such as the focal length and lens length. These parameters allow for the customization of the perspective effect, tailoring it to the specific requirements of the design.
Section 9: Dynamic Sectioning with View Commands
Step 1: Activating Section Planes
For a closer examination of internal components or complex assemblies, users can activate section planes through View Commands. Section planes provide a dynamic cut-through view, revealing the internal details of the 3D model.
Step 2: Manipulating Section Planes
AutoCAD’s View Commands empower users to interactively manipulate section planes in real-time. By adjusting the orientation and position of these planes, designers can explore cross-sectional views and gain insights into the internal structure of their designs.
Section 10: Utilizing 3D Navigation Tools
Step 1: Navigating 3D Models
Beyond 3D Orbit and View Commands, AutoCAD offers additional navigation tools such as “WALK” and “FLY” for immersive exploration within 3D space. These tools simulate a first-person perspective, allowing users to traverse their designs as if navigating a virtual environment.
Step 2: Enhancing Navigation Efficiency
By combining 3D Orbit, View Commands, and 3D navigation tools, users can enhance their efficiency in spatial exploration. These tools collectively provide a versatile toolkit for traversing, analyzing, and refining 3D models with precision.
Section 11: Tips for Optimal Spatial Mastery
Tip 1: Save and Restore Views
AutoCAD allows users to save and restore custom views. Take advantage of this feature to store and revisit specific viewpoints, streamlining the design process and ensuring consistency in spatial exploration.
Tip 2: Combine Tools Strategically
To maximize spatial mastery, strategically combine the use of 3D Orbit, View Commands, and navigation tools. Each tool serves a unique purpose, and their collective utilization enhances the overall experience of working in 3D space.
Section 12: Troubleshooting Spatial Navigation Issues
Issue 1: Inconsistent Display
If the display appears inconsistent during 3D navigation, verify the visual style settings. Ensure that the chosen visual style aligns with the intended representation of the 3D model.
Issue 2: Performance Concerns
For larger and more complex models, performance issues may arise during 3D navigation. Consider adjusting the level of detail, utilizing hardware acceleration, or employing simplified representations for smoother interactions.
Section 13: Saving Time and Boosting Productivity
Step 1: Streamlining Design Exploration
By mastering 3D Orbit and View Commands, designers can streamline their exploration of spatial relationships within their models. This efficiency translates to time savings and a more intuitive design process.
Step 2: Spatial Mastery Unleashed
As users become adept at leveraging 3D Orbit and View Commands, they unlock a realm where spatial mastery is not just a skill but a constant companion throughout the design journey. From intricate details to broad overviews, these tools empower designers to navigate and refine their creations with precision.
Conclusion:
Spatial exploration in AutoCAD transcends the traditional boundaries of design, offering a dynamic and immersive experience through tools like 3D Orbit and View Commands. This comprehensive guide has navigated the intricate landscape of these tools, from activation and customization to their applications in various design scenarios. As you embark on your journey to master the art of spatial navigation, let 3D Orbit and View Commands be your guiding companions, ushering in a new era of efficiency, accuracy, and unparalleled control over your CAD designs. Embrace the spatial mastery, embrace the journey – let AutoCAD’s 3D Orbit and View Commands redefine the way you interact with and visualize your 3D creations.