Nurturing Digital Independence: A Comprehensive Guide on How to Add a User (Child or Adult) in Windows 10
Introduction
In the ever-evolving digital landscape, Windows 10 empowers users to create personalized computing environments by allowing the addition of multiple users. This comprehensive guide walks you through the step-by-step process of adding users in Windows 10, catering to both children and adults. Whether you’re sharing a family computer, setting up accounts for colleagues, or creating a child-friendly space, this guide covers the diverse aspects of user creation in Windows 10.
Section 1: Understanding User Accounts in Windows 10
1.1 Overview
User accounts in Windows 10 serve as personalized spaces, allowing individuals to customize settings, access files, and manage their computing experience independently.
1.2 Types of User Accounts
- Local User Account: Tied to a specific device, local user accounts are ideal for individual users who primarily use one computer.
- Microsoft Account: Connected to a Microsoft email address, Microsoft accounts sync settings across multiple devices and provide access to Microsoft services.
Section 2: Adding an Adult User Account
2.1 Adding a Local Adult User Account
- Open Settings: Click on the Start menu, select “Settings” (gear icon), or press
Windows key + Ito open Settings directly. - Navigate to Accounts: In the Settings menu, select “Accounts.”
- Access Family & Other Users: Click on “Family & other users” in the left pane.
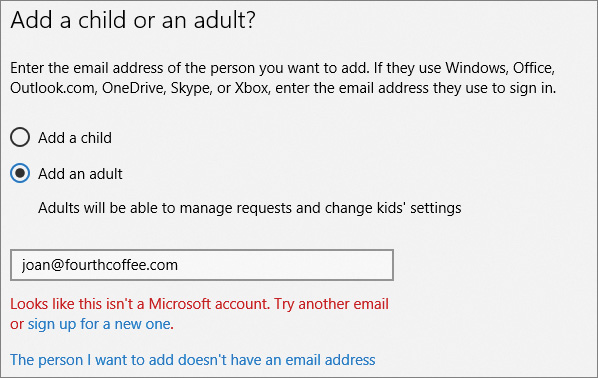
- Add an Adult: Under “Other users,” click on “Add an adult.”
- Microsoft Account: If the user has a Microsoft account, enter the email address associated with it. If not, click on “The person I want to add doesn’t have an email address” and follow the on-screen instructions to create a new account.
- Configure Account: Follow the prompts to configure account settings, including setting up a password and security questions.
- Verification: If adding an existing Microsoft account, the user may need to verify their identity using a security code sent to their email or phone.
2.2 Adding a Local Adult User Account Using Control Panel
- Open Control Panel: Press
Windows key + Xand choose “Control Panel.” - Navigate to User Accounts: In the Control Panel, select “User Accounts” and then “User Accounts” again.
- Manage Another Account: Click on “Manage another account” and then “Add a user account.”
- Create a New Account: Choose “Sign up for a new email address” to create a Microsoft account or “Add a user without a Microsoft account” for a local account.
- Configure Account: Follow the prompts to set up the new account, including choosing an account type and setting up a password.
Section 3: Adding a Child User Account
3.1 Setting Up a Child Account with Microsoft Family Safety
- Open Settings: Follow steps 2.1 to 2.2 in Section 2.1 to access Family & other users.
- Add a Family Member: Click on “Add a family member” and then “Add a child.”
- Sign in with Microsoft Account: Sign in with your Microsoft account and follow the prompts to add the child’s account.
- Verification: Confirm the child’s identity through the Microsoft Family Safety website or app.
- Parental Controls: Configure parental controls and set age-appropriate restrictions for the child’s account.
3.2 Adding a Child Account Using Control Panel
- Open Control Panel: Follow steps 2.2 in Section 2.2 to open Control Panel.
- Navigate to User Accounts: Choose “User Accounts” and then “User Accounts” again.
- Manage Another Account: Click on “Manage another account” and then “Add a user account.”
- Create a New Account: Choose “Sign up for a new email address” to create a Microsoft account for the child.
- Configure Account: Follow the prompts to set up the child’s Microsoft account, including parental controls.
Section 4: Configuring User Account Settings
4.1 Overview
Once a user account is added, there are various settings and configurations that can be personalized to enhance the user’s experience.
4.2 Accessing User Account Settings
- Open Settings: Click on the Start menu, select “Settings” (gear icon), or press
Windows key + Ito open Settings directly. - Navigate to Accounts: In the Settings menu, select “Accounts.”
- Select User Account: Under “Your info” or “Family & other users,” select the user account you want to configure.
Section 5: Managing Microsoft Account Settings
5.1 Overview
For Microsoft accounts, additional settings can be managed online through the Microsoft Account website.
5.2 Accessing Microsoft Account Settings
- Visit Microsoft Account Website: Open a web browser and go to the Microsoft Account website.
- Sign In: Sign in with the Microsoft account credentials associated with the user account.
- Navigate to Family: If managing a child account, navigate to the “Family” section to configure parental controls, screen time, and content restrictions.
Section 6: Switching Between User Accounts
6.1 Overview
Windows 10 allows users to switch between different accounts without logging out, providing a seamless multi-user experience.
6.2 Switching User Accounts
- Start Menu: Click on the Start menu and select the account name at the top. Choose the desired user account from the dropdown menu.
- Lock Screen: On the lock screen, click on the username and select the account you want to switch to.
Section 7: Removing User Accounts
7.1 Overview
If a user account is no longer needed, it can be removed from the system.
7.2 Removing User Accounts via Settings
- Open Settings: Follow steps 2.1 to 2.2 in Section 2.1 to access Family & other users.
- Select User Account: Under “Other users,” click on the user account you want to remove.
- Remove: Click on “Remove” and confirm the removal when prompted.
7.3 Removing User Accounts via Control Panel
- Open Control Panel: Follow steps 2.2 in Section 2.2 to open Control Panel.
- Navigate to User Accounts: Choose “User Accounts” and then “User Accounts” again.
- Manage Another Account: Click on “Manage another account.”
- Select User Account: Click on the user account you want to remove.
- Delete the Account: Choose “Delete the account” and follow the prompts to confirm the removal.
Section 8: Troubleshooting User Account Issues
8.1 Overview
Common issues with user accounts in Windows 10 can often be resolved with simple troubleshooting steps.
8.2 Common Issues and Solutions
- Forgotten Password: For a forgotten password, use the “I forgot my password” option during the login screen or reset it online through the Microsoft Account website.
- Account Lockout: If an account is locked, wait for the specified duration or contact Microsoft support for assistance.
- Microsoft Account Issues: For problems with Microsoft accounts, visit the Microsoft Account support page or contact Microsoft support.
Section 9: Conclusion
Adding users in Windows 10 is a versatile feature that caters to various scenarios, from family computing to collaborative work environments. Whether you’re creating accounts for children with specific parental controls or setting up additional adult users, this comprehensive guide has covered the entire process. Experiment with the settings, configure accounts based on individual preferences, and embrace the multi-user capabilities of Windows 10 to create a personalized and efficient computing experience for everyone.