Mastering the Art of Background Blur in Photoshop: A Comprehensive Guide
Introduction
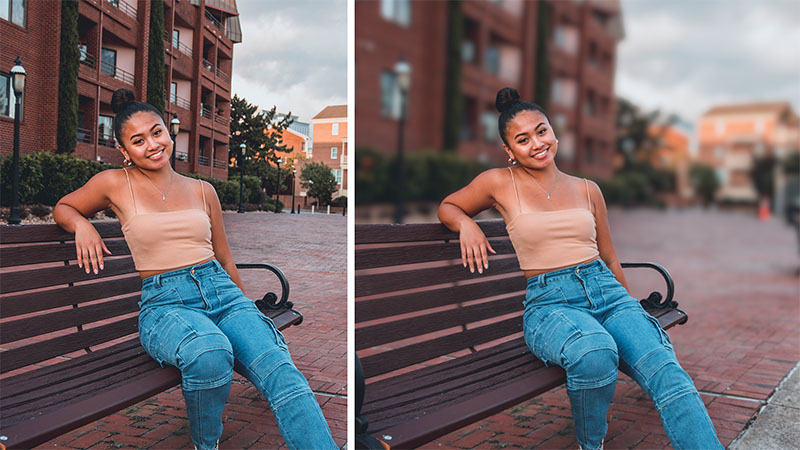
In the world of digital photography and graphic design, achieving a beautiful background blur, often referred to as the bokeh effect, is a coveted skill. A blurred background not only emphasizes the subject but also adds a touch of professionalism and aesthetic appeal to the overall composition. Adobe Photoshop, a powerhouse in the realm of image editing, provides a plethora of tools and techniques to help you achieve that perfect background blur. In this comprehensive guide, we will delve into various methods, tips, and tricks to master the art of blurring backgrounds in Photoshop.
Understanding the Importance of Background Blur
Before we dive into the technicalities, it’s crucial to understand why background blur is considered essential in photography and design. A blurred background helps in isolating the main subject, drawing the viewer’s attention to it while creating a sense of depth and dimension in the image. Whether you’re a photographer looking to enhance portraits or a graphic designer working on promotional material, the ability to create an appealing background blur is a valuable asset.
Method 1: Using the Gaussian Blur Filter
The Gaussian Blur filter is a fundamental tool for achieving background blur in Photoshop. Follow these steps:
- Open Your Image: Start by opening your image in Adobe Photoshop. If you haven’t already, make sure to duplicate the background layer to preserve the original image.
- Select the Background Layer: Choose the background layer by clicking on it in the Layers panel.
- Apply Gaussian Blur: Go to the “Filter” menu, navigate to “Blur,” and select “Gaussian Blur.” A dialog box will appear, allowing you to adjust the blur radius. Experiment with different values to find the desired level of background blur.
- Fine-Tune and Mask: After applying the blur, fine-tune the effect by adjusting the opacity of the blurred layer or using layer masks to selectively apply the blur to specific areas.
Method 2: Creating a Depth Map with the Lens Blur Filter
The Lens Blur filter in Photoshop allows for more advanced control over background blur, simulating the way a camera lens interacts with light. Here’s how to use the Lens Blur filter:
- Create a Depth Map: Before applying the Lens Blur filter, you need to create a depth map that defines the areas of focus. This can be achieved by painting a grayscale image where white represents in-focus areas and black represents out-of-focus areas.
- Convert to Smart Object: Convert your image layer into a Smart Object by right-clicking on the layer and selecting “Convert to Smart Object.” This allows non-destructive editing and easier adjustments later.
- Apply Lens Blur: Go to the “Filter” menu, choose “Blur,” and then select “Lens Blur.” In the Lens Blur dialog box, choose the source for your depth map and adjust the settings to control the intensity and shape of the blur.
Method 3: Using the Field Blur Filter
The Field Blur filter in Photoshop provides a convenient way to create a natural-looking depth of field. Follow these steps:
- Convert to Smart Object: Similar to the Lens Blur method, convert your image layer into a Smart Object to maintain flexibility in your edits.
- Apply Field Blur: Navigate to the “Filter” menu, select “Blur Gallery,” and choose “Field Blur.” A blur overlay will appear on your image, allowing you to add pins to different areas and control the blur individually.
- Adjust Blur Settings: With the pins in place, adjust the blur settings for each area. The Field Blur filter provides a user-friendly interface, making it easy to customize the blur effect according to your preferences.
Tips and Tricks for Perfect Background Blur:
- Consider the Composition: Before applying any blur, analyze the composition of your image. Identify the key elements you want to emphasize, such as the main subject, and plan your background blur accordingly.
- Use Layer Masks for Precision: When applying blur, leverage layer masks to selectively apply the effect. This allows you to maintain sharpness in certain areas while blurring others, contributing to a more realistic and professional result.
- Experiment with Blend Modes: Depending on the nature of your image, try experimenting with different blend modes for the blurred layer. Overlay and Soft Light are commonly used for a subtle blending of the background blur.
- Combine Multiple Techniques: Don’t limit yourself to a single method. Combining Gaussian Blur, Lens Blur, and Field Blur can yield unique and visually appealing results. Experiment with different combinations to discover what works best for your specific image.
Conclusion
Mastering the art of blurring backgrounds in Photoshop is a skill that requires practice, experimentation, and a keen eye for composition. Whether you’re a photographer looking to enhance your portraits or a graphic designer working on promotional materials, understanding the various techniques available in Photoshop will empower you to create stunning and professional-looking images. Remember to experiment with different methods, customize settings, and most importantly, let your creativity guide you in achieving the perfect background blur for your unique projects.