Mastering Skin Retouching: A Comprehensive Photoshop Tutorial on Emphasizing or Concealing Skin Flaws with a Single Layer
Introduction:
In the realm of digital photography and image retouching, achieving flawless skin is a common objective. However, the approach to skin retouching can vary based on creative intent, personal preferences, and ethical considerations. In this extensive Photoshop tutorial, we will explore a comprehensive technique that utilizes a single layer to emphasize or hide skin flaws, providing photographers and retouchers with a versatile and nuanced tool for enhancing portraits.
Section 1: Understanding the Creative Choices in Skin Retouching
Before diving into the tutorial, it’s essential to understand the diverse creative choices involved in skin retouching. Some photographers aim for a natural look that retains the authenticity of skin texture, while others may opt for a more polished and airbrushed appearance. The technique presented in this tutorial allows for a flexible approach, accommodating various preferences and intentions.
Section 2: Importing the Image into Adobe Photoshop
Begin the retouching process by importing the image into Adobe Photoshop. Ensure that the image is in a suitable resolution for detailed retouching, and create a duplicate layer to work non-destructively.
Section 3: Introduction to the Emphasis or Concealment Layer
In this tutorial, a single layer will serve as the primary tool for emphasizing or concealing skin flaws. This layer will be used strategically with various blending modes and adjustment options to achieve the desired effect.
Subsection 3.1: Creating a New Layer
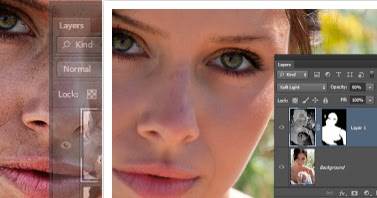
Generate a new layer above the duplicated background layer. This layer will be referred to as the “Emphasis/Concealment Layer.” Set the blending mode of this layer to Soft Light, which provides a balanced effect for both emphasis and concealment.
Subsection 3.2: Choosing a Neutral Gray Color
Fill the Emphasis/Concealment Layer with a neutral gray color. This gray base allows for subtle adjustments without introducing color shifts to the image.
Section 4: Emphasizing Skin Texture and Details
For photographers aiming to emphasize skin texture and details, this section provides steps to enhance the natural features of the skin.
Subsection 4.1: Using the High Pass Filter
Apply the High Pass filter to the Emphasis/Concealment Layer. Navigate to Filter > Other > High Pass and adjust the radius to highlight fine details in the skin. Set the blending mode to Soft Light to integrate the enhanced details with the original image.
Subsection 4.2: Adjusting Opacity
Fine-tune the emphasis effect by adjusting the opacity of the Emphasis/Concealment Layer. This allows for control over the intensity of the skin details. Aim for a subtle enhancement that adds depth without overpowering the overall composition.
Subsection 4.3: Refining with Layer Masks
Create a layer mask on the Emphasis/Concealment Layer to selectively apply the emphasis effect. Use a soft brush to paint on the layer mask, focusing on areas where accentuated skin texture is desired. This step ensures that the effect is targeted and harmoniously blends with the original image.
Section 5: Concealing Skin Flaws and Blemishes
For those seeking to conceal skin flaws and blemishes, this section outlines steps to achieve a smoother and more polished skin appearance.
Subsection 5.1: Applying Gaussian Blur
To conceal minor imperfections, apply the Gaussian Blur filter to the Emphasis/Concealment Layer. Access Filter > Blur > Gaussian Blur and adjust the radius to create a softening effect on the skin. Set the blending mode to Soft Light for seamless integration.
Subsection 5.2: Modulating Opacity
Control the concealment effect by adjusting the opacity of the Emphasis/Concealment Layer. Find the balance that conceals blemishes while maintaining a natural skin appearance. Gradually increase opacity for subtle enhancements or higher opacity for more pronounced smoothing.
Subsection 5.3: Fine-Tuning with Layer Masks
Refine the concealment effect with layer masks. Use a soft brush to paint on the layer mask, concentrating on areas with visible blemishes or uneven skin texture. This step ensures that the concealing adjustments are precisely applied where needed, preserving the untouched areas.
Section 6: Experimenting with Adjustment Layers
The versatility of this technique lies in its compatibility with adjustment layers. Experimenting with adjustment layers on top of the Emphasis/Concealment Layer allows for additional control over color tones, contrast, and luminosity.
Subsection 6.1: Adding a Color Balance Adjustment Layer
Insert a Color Balance adjustment layer above the Emphasis/Concealment Layer. Adjust the sliders to refine the color tones in the skin. This step is particularly useful for achieving a natural and balanced skin complexion.
Subsection 6.2: Introducing a Curves Adjustment Layer
Apply a Curves adjustment layer to fine-tune overall contrast. Adjust the curve to enhance midtones, highlights, and shadows selectively. This step contributes to the overall polished look of the skin while maintaining a realistic appearance.
Subsection 6.3: Enhancing Contrast with Levels Adjustment Layer
Incorporate a Levels adjustment layer to further refine contrast. Adjust the sliders for Shadows, Midtones, and Highlights to achieve optimal luminosity. This step adds depth to the image and contributes to the final polished result.
Section 7: Checking for Consistency and Natural Appearance
Regularly zoom out and review the entire image to ensure a consistent and natural appearance. Pay attention to the interplay of emphasized details or concealed flaws with the overall composition. Adjust opacity levels and layer masks as needed to achieve a cohesive and balanced result.
Section 8: Exporting the Enhanced Image
Once satisfied with the emphasis or concealment of skin flaws, save your Photoshop project file (.PSD) to retain all layers for future edits. Export the final enhanced image in a suitable format, such as JPEG or PNG, for sharing, printing, or client delivery. Pay attention to file size and resolution based on your intended use.
Section 9: Ethical Considerations in Skin Retouching
While skin retouching is a valuable skill, it’s crucial to approach it ethically. Be transparent with clients or subjects about the extent of retouching, and seek their input on the desired level of enhancement. Respect individual features and preferences, and avoid perpetuating unrealistic beauty standards.
Section 10: Showcasing Your Skin Retouching Skills
Celebrate your mastery of skin retouching by showcasing your before-and-after images. Share your work on photography platforms, social media, or incorporate it into your portfolio. Engage with the photography community, seek constructive feedback, and let your skin-retouched images stand as a testament to your creative vision and technical skill.
Conclusion:
Mastering the art of skin retouching in Photoshop involves a delicate balance between emphasizing natural details and concealing minor flaws. By following the comprehensive steps outlined in this tutorial, you can confidently approach skin retouching with a versatile technique that adapts to diverse creative intentions. May your retouched images reflect the authenticity and beauty of your subjects, celebrating individual features while achieving a polished and refined appearance.


