Mastering Precision Editing: A Comprehensive Guide to Using the Razor Tool in DaVinci Resolve
Introduction: The razor tool is a fundamental feature in any video editing software, enabling editors to make precise cuts and trim footage with ease. In DaVinci Resolve, the razor tool is a versatile tool that offers a range of functionalities for editing and refining video clips. Whether you’re trimming clips, splitting segments, or creating intricate edits, the razor tool in DaVinci Resolve empowers editors to achieve their creative vision with precision and finesse. In this extensive guide, we delve into the intricacies of using the razor tool in DaVinci Resolve, providing step-by-step tutorials, expert tips, and real-world examples to help you master this essential editing technique.
Section 1: Understanding the Razor Tool Before diving into the specifics of using the razor tool in DaVinci Resolve, it’s essential to understand the concept and functionality of this tool. This section provides an overview of the razor tool, including its definition, purpose, and creative applications in video editing.
- Defining the razor tool: Explore the concept of the razor tool, which allows editors to make precise cuts and trim footage in their timeline. Understand how the razor tool enables editors to split clips, trim segments, and create seamless transitions between shots.
- Analyzing the creative potential of the razor tool: Delve into the creative applications of the razor tool in video editing and filmmaking. Discover how the razor tool can be used to create dynamic edits, manipulate pacing and rhythm, and refine the timing and flow of your footage.
Section 2: Basic Functions of the Razor Tool The razor tool in DaVinci Resolve offers a range of basic functions for editing and refining video clips. This section provides step-by-step tutorials and demonstrations for using the razor tool to perform essential editing tasks.
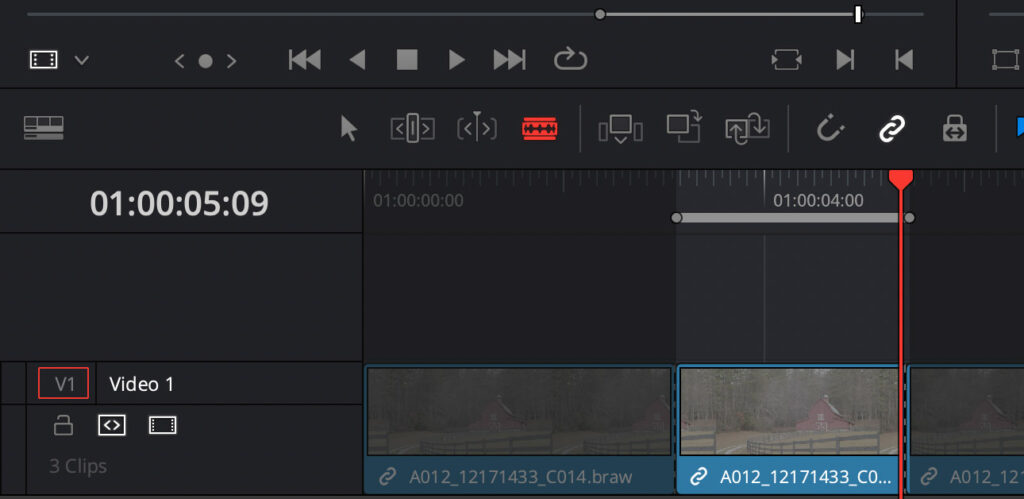
- Making cuts in the timeline: Learn how to use the razor tool to make cuts in your timeline, allowing you to split clips into segments and trim footage with precision. Explore techniques for positioning the razor tool, making cuts at specific points in your timeline, and navigating between segments.
- Trimming clips: Discover how to use the razor tool to trim clips in your timeline, allowing you to remove unwanted sections and refine the timing of your edits. Learn how to select and delete segments of footage, adjust clip boundaries, and create seamless transitions between shots.
- Creating split edits: Explore techniques for using the razor tool to create split edits, also known as L-cuts and J-cuts, where audio and video transitions occur at different points in the timeline. Learn how to position audio and video tracks, make cuts at specific points, and adjust clip timing to create smooth and seamless transitions.
Section 3: Advanced Functions and Techniques Beyond basic editing tasks, the razor tool in DaVinci Resolve offers advanced functions and techniques for creating intricate edits and refining your footage. This section delves into advanced functions and techniques of the razor tool.
- Ripple editing: Master the art of ripple editing with the razor tool, allowing you to trim clips and adjust timing while automatically maintaining the continuity and synchronization of your edits. Learn how to enable ripple editing mode, make adjustments to clip boundaries, and fine-tune the timing of your edits with precision.
- Creating complex edits: Discover techniques for using the razor tool to create complex edits, such as split screens, picture-in-picture effects, and multi-layered compositions. Learn how to make cuts at precise points, manipulate clip placement and timing, and create visually dynamic compositions that captivate and engage viewers.
- Refining transitions: Explore techniques for using the razor tool to refine transitions between clips, allowing you to create smooth and seamless transitions that enhance the flow and continuity of your edits. Learn how to trim clip boundaries, adjust timing and duration, and fine-tune transition effects to achieve the desired visual impact.
Section 4: Real-World Applications and Case Studies Gain inspiration and insight from real-world examples and case studies that demonstrate the creative potential and practical applications of the razor tool in DaVinci Resolve. This section showcases innovative editing techniques employed in diverse contexts, from narrative films and documentaries to commercials and music videos.
- Narrative filmmaking: Explore how filmmakers use the razor tool in DaVinci Resolve to create dynamic edits and refine the pacing and rhythm of their films. Discover techniques for creating seamless transitions, manipulating clip timing, and crafting intricate edits that enhance storytelling impact and captivate audiences.
- Documentaries: Experience the versatility of the razor tool in documentary filmmaking, where it allows editors to create compelling narratives and convey information with clarity and precision. Learn how to use the razor tool to trim interviews, edit B-roll footage, and craft engaging sequences that inform and entertain viewers.
- Music videos: Discover how the razor tool can be used to create dynamic and visually captivating edits in music videos. Explore techniques for syncing footage to music beats, creating seamless transitions between shots, and crafting visually stunning compositions that complement the rhythm and mood of the music.
Section 5: Conclusion The razor tool in DaVinci Resolve represents a versatile and indispensable tool for video editors, enabling them to make precise cuts, trim footage, and create intricate edits with ease and precision. By mastering the techniques and principles outlined in this guide, you can unlock a world of creative possibilities and elevate your editing prowess to new heights of excellence. Embrace the creative potential of the razor tool, and let DaVinci Resolve be your canvas for bringing your vision to life with precision, finesse, and impact.