Mastering Multitasking: A Deep Dive into Viewing Two Windows Side-by-Side Using Smart Window
In the dynamic landscape of digital productivity, the ability to efficiently multitask is paramount. Whether you’re working on a project, researching, or simply managing your workflow, the capability to view two windows side-by-side is a game-changer. Smart Window, a feature available on various operating systems, empowers users to seamlessly split their screen real estate and optimize their multitasking experience. In this comprehensive guide, we explore the intricacies of Smart Window functionality, providing step-by-step instructions for users across different platforms.
**1. Understanding Smart Window: A Multitasking Marvel
a. Definition:
- Smart Window is a feature designed to enhance multitasking capabilities by allowing users to split their screen and view two separate windows simultaneously.
- Available on various operating systems, Smart Window is often integrated into the system’s user interface, providing an intuitive way to manage multiple applications.
b. Key Benefits:
- Boosts productivity by eliminating the need to switch between open windows.
- Facilitates a more efficient workflow for tasks that require information from multiple sources.
- Maximizes screen real estate, especially on larger displays.
c. Supported Platforms:
- Smart Window functionality is available on Windows, macOS, and certain Linux distributions.
- Each platform may implement Smart Window features differently, with unique gestures, shortcuts, or interface elements.
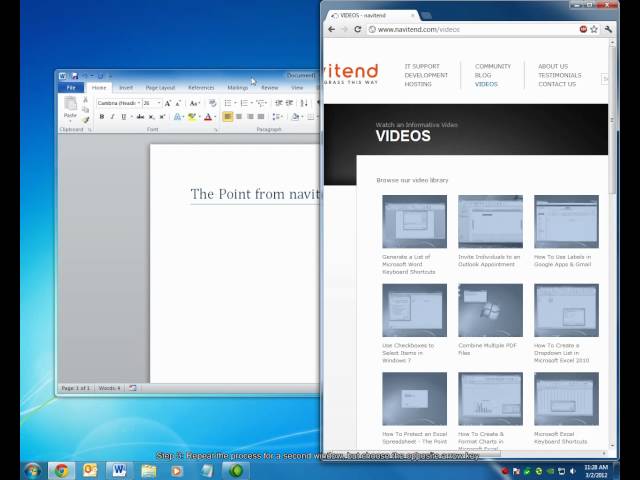
**2. Windows OS: Mastering Snap Assist for Dual Window Bliss
a. Snap Assist Basics:
- On Windows 10 and later versions, Snap Assist is the embodiment of Smart Window functionality.
- To snap a window to the left or right, drag it to the edge of the screen until a translucent outline appears, then release.
b. Creating Dual Windows:
- Open the first application you want to use.
- Drag the window to the left or right until it snaps into place.
- Select the second application you want to use, and it will automatically fill the remaining space.
c. Keyboard Shortcuts:
- Press
Windows key + Left Arrowto snap a window to the left. - Press
Windows key + Right Arrowto snap a window to the right.
d. Managing Dual Windows:
- Adjust the divider between the windows by clicking and dragging.
- Maximize or minimize each window independently for flexible multitasking.
e. Exiting Smart Window:
- To exit Smart Window mode, simply drag the window to the top or bottom of the screen.
**3. macOS: Split View for Seamless Dual Window Action
a. Activating Split View:
- On macOS, the Split View feature brings Smart Window capabilities to life.
- Click and hold the green maximize button in the top-left corner of an application window.
b. Dual Window Setup:
- Drag the window to the left or right half of the screen until it occupies that side.
- Release the mouse or trackpad, and macOS will suggest additional windows to occupy the remaining space.
c. Adjusting Window Size:
- Move the divider between the windows to customize the size of each application.
- macOS provides a smooth interface for flexible adjustments.
d. Exiting Split View:
- To exit Split View, move the cursor to the top of the screen to reveal the menu bar.
- Click the green maximize button again or drag the window out of the Split View space.
**4. Linux: Tiling Window Managers for Efficient Multitasking
a. Tiling Window Managers:
- Many Linux distributions offer tiling window managers that facilitate Smart Window functionality.
- Examples include i3, Awesome, and Xmonad, each with its unique set of features and configurations.
b. Configuring Tiling Windows:
- Consult the documentation of your chosen tiling window manager for specific instructions on setting up and configuring dual windows.
- Commands or keybindings will vary based on the manager in use.
c. Dynamic Tiling:
- Some tiling window managers provide dynamic tiling, allowing users to automatically organize windows based on predefined rules.
- This ensures an optimized layout for efficient multitasking.
**5. Universal Tips for Smart Window Mastery
a. Learn Keyboard Shortcuts:
- Familiarize yourself with keyboard shortcuts for your specific operating system.
- This enhances speed and efficiency when managing dual windows.
b. Experiment with Snap Zones:
- Some operating systems, like Windows, offer snap zones that divide the screen into predefined sections.
- Experiment with these zones to quickly snap windows into specific areas.
c. Utilize Virtual Desktops:
- Combine Smart Window features with virtual desktops for an even more expansive multitasking experience.
- Switch between different desktops to organize applications based on tasks.
d. Explore Third-Party Tools:
- Depending on your preference and operating system, explore third-party tools that enhance Smart Window capabilities.
- Some tools provide advanced features like custom layouts and gestures.
Conclusion: Elevate Your Multitasking Prowess with Smart Window
In the ever-evolving landscape of digital productivity, mastering the art of multitasking is essential. Smart Window functionalities, whether through Snap Assist on Windows, Split View on macOS, or tiling window managers on Linux, empower users to efficiently manage dual windows with ease.
By understanding the nuances of Smart Window on your specific operating system, experimenting with customization options, and incorporating universal tips, you can elevate your multitasking prowess. Whether you’re a professional navigating complex projects or a casual user juggling various interests, Smart Window is your key to a seamless and organized digital workspace. So, embark on the journey of Smart Window mastery, and let the efficiency of dual windows transform the way you navigate the digital realm.


