Immersive Illusions: A Comprehensive Photoshop Tutorial on Transforming a Photo into a View from a Rainy, Foggy Window
Introduction:
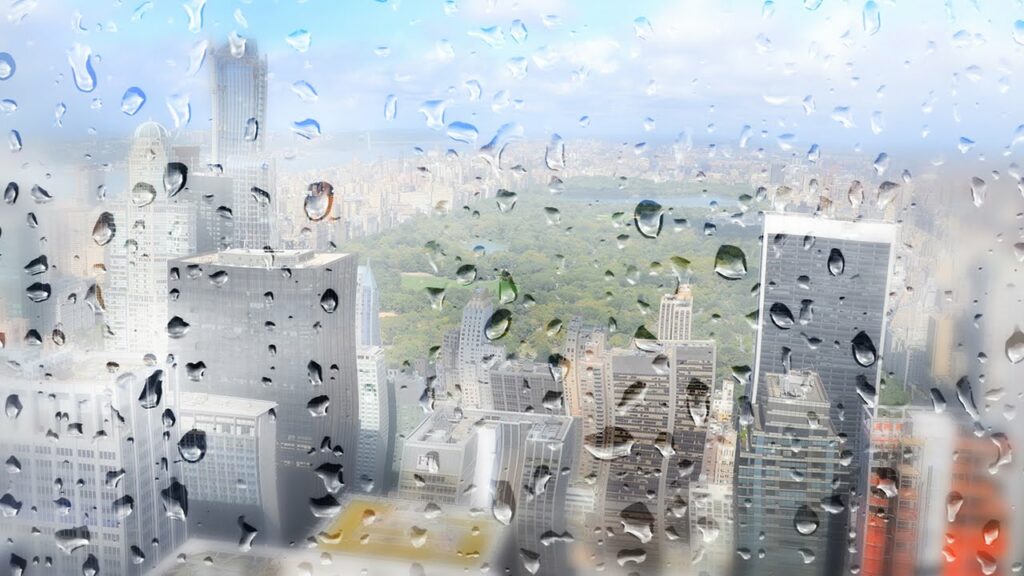
Embark on a creative journey as we delve into the intricacies of transforming a photo into a mesmerizing scene reminiscent of a view from a rainy, foggy window. In this comprehensive Photoshop tutorial, we will explore step-by-step techniques to simulate the atmospheric elements of raindrops, fog, and window condensation, creating a compelling and immersive visual narrative. Whether you’re an aspiring digital artist or a seasoned Photoshop enthusiast, this tutorial will guide you through the process of infusing depth and emotion into your photographs.
I. Conceptualizing the Rainy, Foggy Window Effect:
Before we dive into the tutorial, let’s understand the key elements that define the desired effect:
A. Atmospheric Raindrops:
- Envision realistic raindrops cascading down a window pane.
- Consider the angle, size, and distribution of raindrops to simulate the authentic appearance of rainfall.
B. Mystical Fog:
- Visualize a layer of fog that adds an ethereal and mysterious quality to the scene.
- Plan for variations in fog density, emphasizing depth and distance within the composition.
C. Condensation and Distorted Reflections:
- Imagine subtle condensation forming on the window, distorting the view outside.
- Consider the interaction between condensation and exterior elements, such as buildings or landscapes.
II. Selecting the Base Photograph:
Choose a photograph that serves as the foundation for your rainy, foggy window scene:
A. Scenic or Urban Settings:
- Select an image that features an interesting outdoor scene, whether it’s a cityscape, landscape, or any setting with a clear view.
- Ensure the photo has sufficient details to showcase the impact of raindrops, fog, and window condensation.
B. High-Quality Resolution:
- Opt for a high-resolution image to preserve details and allow for a more refined editing process.
- Consider the overall composition and framing, keeping in mind the placement of the window in the scene.
III. Simulating Raindrops on the Window:
Add a realistic touch of raindrops to your photo:
A. Raindrop Brushes:
- Source or create raindrop brushes with transparency.
- Adjust the brush size and opacity to mimic the varying sizes and intensities of raindrops.
B. Random Distribution:
- Use the brush tool to randomly distribute raindrops across the image.
- Pay attention to perspective and gravity, ensuring that raindrops appear larger and more concentrated towards the bottom of the window.
C. Layer Styles for Realism:
- Apply layer styles such as Inner Shadow or Outer Glow to add depth and dimension to the raindrops.
- Experiment with blending modes to seamlessly integrate the raindrops with the window and background.
IV. Creating an Illusive Fog Effect:
Infuse an atmospheric layer of fog into the scene:
A. Gradient Layers:
- Create gradient layers to simulate the gradual transition of fog.
- Experiment with varying opacities and color tones to achieve a natural and immersive fog effect.
B. Fog Brushes:
- Source or create fog brushes with soft edges.
- Use these brushes to selectively enhance areas with additional fog, emphasizing depth and distance.
C. Blurring Techniques:
- Apply Gaussian Blur or Lens Blur to certain areas to enhance the softness and depth of the fog.
- Adjust the blur intensity based on the perceived distance from the viewer.
V. Distorting Reflections with Condensation:
Simulate window condensation and distorted reflections:
A. Texture Overlays:
- Source or create condensation texture overlays with transparency.
- Apply these overlays strategically, focusing on areas where condensation would naturally form, such as the lower part of the window.
B. Distortion Filters:
- Use distortion filters like Ripple or Wave to simulate the impact of condensation on the view.
- Experiment with filter settings to achieve a subtle and realistic distortion effect.
C. Layer Masking for Precision:
- Use layer masks to refine the appearance of condensation, ensuring a natural and non-uniform distribution.
- Blend the condensation seamlessly with the window and adjust opacities as needed.
VI. Adjusting Lighting and Color Grading:
Fine-tune the overall lighting and color palette for a cohesive look:
A. Adjustment Layers:
- Apply adjustment layers such as Curves, Levels, or Color Balance to refine the overall lighting and contrast.
- Adjust the color tones to match the mood of the rainy, foggy atmosphere.
B. Shadow and Highlight Emphasis:
- Enhance shadows and highlights to simulate the dynamic lighting conditions caused by the rainy and foggy ambiance.
- Consider the direction of light sources and their impact on the scene.
C. Selective Color Adjustments:
- Use selective color adjustments to emphasize or mute specific colors within the composition.
- Pay attention to the interplay of colors in both the interior and exterior elements.
VII. Real-World Applications: Sharing the Rainy, Foggy Window Experience:
Share your transformed photograph with the world through various platforms and formats:
A. Digital Art Platforms:
- Showcase your artwork on digital art platforms such as DeviantArt, ArtStation, or Behance.
- Engage with the online art community to receive feedback and exposure.
B. Printed Artwork:
- Print your rainy, foggy window creation as posters or art prints for physical exhibitions or personal collections.
- Explore online platforms for selling prints to reach a broader audience.
C. Digital Photography Enhancements:
- Apply the rainy, foggy window effect to your own photography, creating evocative and atmospheric images.
- Experiment with different scenes and lighting conditions to expand the versatility of this transformative technique.
VIII. Tips for Achieving Realism in Rainy, Foggy Window Effects:
Optimize your creative process with these tips for achieving realism in your rainy, foggy window scene:
A. Consistent Perspective:
- Maintain consistent perspective throughout the scene to enhance realism.
- Ensure that raindrops, fog, and condensation adhere to the same spatial dynamics.
B. Varying Intensity:
- Vary the intensity of raindrops, fog, and condensation based on their proximity to the viewer.
- Elements closer to the window should exhibit more detail and prominence.
C. Depth and Distance:
- Enhance depth by adjusting the opacity and blurriness of raindrops and fog.
- Simulate the atmospheric perspective to convey distance and dimensionality.
D. Experiment with Brushes and Overlays:
- Experiment with different raindrop, fog, and condensation brushes to find the most suitable for your scene.
- Adjust brush settings such as flow, spacing, and shape dynamics for added versatility.
IX. Conclusion:
Transforming a photo into a view from a rainy, foggy window is an artful endeavor that invites viewers into a world of sensory immersion. As you navigate the process of simulating raindrops, infusing fog, and distorting reflections with condensation, remember that each brushstroke and adjustment contributes to the atmospheric illusion. May your creation captivate viewers with the evocative charm of rainy days and foggy windows, offering a glimpse into the delicate dance between nature and human spaces. Embrace the subtleties of condensation, the soft embrace of fog, and the rhythmic patter of raindrops on the windowpane. Let your creativity flow like rain, and may your artwork stand as a testament to the transformative power of digital artistry. May your rainy, foggy window scene transport viewers to a world where the boundaries between reality and imagination blur, leaving an indelible impression of atmospheric wonder.