How to use the audio ducking feature in PowerDirector
Using the audio ducking feature in CyberLink PowerDirector enhances your video editing capabilities by automating the process of adjusting audio levels between different tracks or clips. This feature is particularly useful for ensuring clear and balanced audio in your videos, where background music or sound effects need to dynamically lower in volume when dialogue or narration is present. Understanding how to use the audio ducking feature in PowerDirector empowers you to achieve professional-level audio mixing without manual adjustments, making your videos more engaging and polished. This comprehensive guide will walk you through everything you need to know about using the audio ducking feature in PowerDirector, from accessing and applying it to your projects to advanced techniques and troubleshooting tips.
1. Introduction to Audio Ducking in PowerDirector
Audio ducking in PowerDirector allows you to automatically lower the volume of background music, sound effects, or other audio tracks when there is dialogue, narration, or other primary audio present. This technique helps maintain clarity and focus on important audio elements, enhancing overall audio quality in your videos.
a. Benefits of Using Audio Ducking
- Clear Dialogue: Ensure dialogue or narration remains prominent and audible without being overshadowed by background audio.
- Professional Sound: Achieve smooth transitions between audio tracks for a polished and engaging viewing experience.
- Time Efficiency: Automate audio adjustments, saving time compared to manual volume adjustments.
b. Applications of Audio Ducking
- Interviews: Lower background music or noise when interviewees are speaking for clearer communication.
- Narrative Videos: Enhance storytelling by emphasizing dialogue or narration over background soundscapes.
- Educational Content: Maintain clear audio instructions or explanations in tutorial videos by reducing background music during speaking segments.
2. Accessing the Audio Ducking Feature in PowerDirector
PowerDirector integrates the audio ducking feature into its interface, providing intuitive access and controls for automating audio level adjustments in your editing projects.
a. Interface Navigation
- Timeline View: Access the audio ducking feature directly within PowerDirector’s timeline view, where audio tracks and clips are arranged and edited.
- Tool Activation: Activate the audio ducking tool to apply volume adjustments between designated audio tracks or clips.
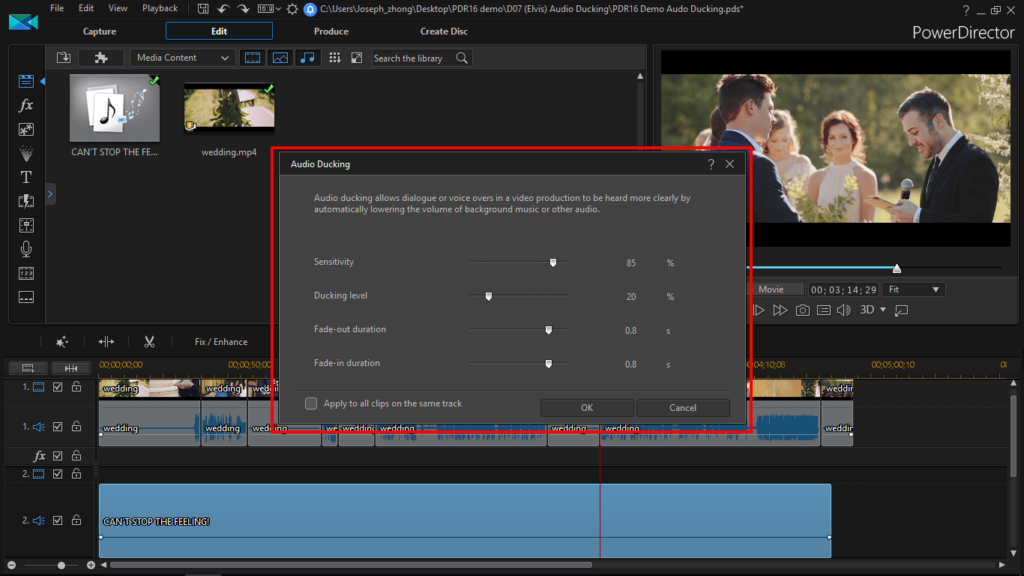
b. Setting Up Ducking Parameters
- Primary and Secondary Tracks: Identify primary (dialogue/narration) and secondary (background music/effects) audio tracks for ducking adjustments.
- Ducking Threshold: Adjust ducking threshold settings to determine when background audio should lower in volume based on the level of primary audio.
3. Using the Audio Ducking Feature in PowerDirector
Mastering the audio ducking feature in PowerDirector involves understanding its functionalities and applying them effectively to achieve balanced audio levels in your editing projects.
a. Applying Ducking Effects
- Track Selection: Select the primary and secondary audio tracks or clips involved in the ducking process within PowerDirector’s timeline.
- Ducking Adjustment: Apply ducking effects to automatically adjust the volume levels of secondary audio tracks in response to changes in primary audio levels.
b. Preview and Fine-Tuning
- Real-Time Monitoring: Monitor ducking effects in real-time through PowerDirector’s playback and preview controls to ensure smooth transitions and balanced audio levels.
- Fine-Tuning Controls: Use adjustment sliders or parameters to refine ducking settings based on the specific audio dynamics of your video project.
4. Customizing Audio Ducking Effects in PowerDirector
PowerDirector offers customization options to further refine and tailor audio ducking effects to achieve optimal results for your video editing projects.
a. Transition Settings
- Fade Duration: Adjust fade-in and fade-out durations to control the speed and smoothness of volume transitions between primary and secondary audio tracks.
- Curve Adjustments: Use curve adjustments to fine-tune volume changes over time, ensuring natural and seamless audio ducking effects.
b. Advanced Controls
- Volume Thresholds: Set precise volume thresholds and sensitivity levels to trigger ducking adjustments based on audio amplitude and intensity.
- Overlap Management: Manage overlapping audio segments to prevent abrupt volume changes or audio clipping during ducking transitions.
5. Advanced Techniques with Audio Ducking in PowerDirector
Explore advanced techniques and features within the audio ducking tool in PowerDirector to maximize the effectiveness of automated audio level adjustments for professional-grade video editing.
a. Multi-Track Ducking
- Layered Editing: Apply ducking effects across multiple audio tracks or layers within PowerDirector’s timeline to achieve comprehensive volume management and audio balance.
- Dynamic Adjustments: Utilize keyframing or automation tools to dynamically adjust ducking parameters over time, accommodating changes in audio intensity or scene dynamics.
b. Custom Presets and Profiles
- Saved Settings: Save customized ducking settings as presets or profiles within PowerDirector for quick access and consistent application across multiple editing projects.
- Adaptive Ducking: Implement adaptive ducking techniques or algorithms to automatically adjust volume levels based on real-time audio fluctuations and changes.
6. Tips and Best Practices for Using Audio Ducking
Optimize your workflow and achieve professional results when using the audio ducking feature in PowerDirector with these practical tips and best practices.
a. Audio Analysis
- Audio Segmentation: Segment audio tracks based on dialogue or narration segments to apply targeted ducking adjustments efficiently.
- Noise Considerations: Factor in background noise levels and audio clarity when setting ducking thresholds to maintain optimal dialogue or narration prominence.
b. Workflow Efficiency
- Real-Time Evaluation: Monitor and adjust ducking effects in real-time during playback to ensure seamless audio transitions and balanced volume levels.
- Collaborative Feedback: Seek feedback from collaborators or clients to validate ducking adjustments and ensure audio quality meets project requirements.
7. Troubleshooting Common Issues
Address common challenges encountered when using the audio ducking feature in PowerDirector to optimize workflow efficiency and achieve desired audio balance outcomes.
a. Performance Optimization
- System Resources: Allocate sufficient system resources and optimize storage management to prevent performance lag or delays during audio ducking processing and playback.
- Playback Quality: Use preview options to review ducking effects in real-time and ensure consistent audio balance and clarity before finalizing edits or exports.
b. Quality Control and Assurance
- Export Settings: Configure export settings to preserve ducking adjustments and maintain balanced audio levels across different playback platforms and devices.
- Audio Testing: Conduct thorough audio testing and quality checks to identify any inconsistencies or issues with ducking effects before finalizing video projects.
8. Exporting Projects with Balanced Audio Levels
Once you’ve applied and customized ducking effects to audio tracks in PowerDirector, it’s essential to export your edited projects while preserving the integrity and balanced audio levels achieved through automated volume adjustments.
a. Final Integration
- Timeline Integration: Ensure seamless integration of ducked audio tracks with video elements within PowerDirector’s timeline for synchronized playback and narrative cohesion.
- Audio-Visual Sync: Verify audio-visual synchronization and overall playback quality of edited video projects with balanced audio levels before exporting.
b. Export Settings
- Format Selection: Choose export formats that support high-definition audio output and maintain balanced volume levels across various playback platforms and devices.
- Compression Optimization: Optimize compression settings to balance file size and audio quality, ensuring efficient distribution and playback of edited video content without compromising audio integrity.
Conclusion
Mastering the audio ducking feature in CyberLink PowerDirector enhances your video editing capabilities by automating audio level adjustments for clear and balanced sound. By following this comprehensive guide, you’ll gain the skills and knowledge to leverage PowerDirector’s audio ducking capabilities effectively, whether you’re editing for personal projects, professional productions, or creative content creation. Experiment with ducking settings, explore customization options, and apply best practices to achieve polished audio mixing and elevate the overall impact of your video projects. Happy editing!