How to Install BricsCAD
Installing BricsCAD is a straightforward process that involves downloading the software, running the installer, and configuring settings according to your preferences and system requirements. BricsCAD is a powerful CAD (Computer-Aided Design) software that offers comprehensive tools for 2D drafting, 3D modeling, mechanical design, and BIM (Building Information Modeling). This guide will walk you through the detailed steps to install BricsCAD on your computer, ensuring a smooth setup and optimal performance.
Table of Contents
- Introduction to BricsCAD Installation
- System Requirements for BricsCAD
- Downloading BricsCAD Software
- Installing BricsCAD on Windows
- Installing BricsCAD on macOS
- Installing BricsCAD on Linux
- Configuring BricsCAD Settings
- Licensing BricsCAD
- Updating and Upgrading BricsCAD
- Uninstalling BricsCAD
- Troubleshooting Installation Issues
- Conclusion
1. Introduction to BricsCAD Installation
Installing BricsCAD is the first step towards utilizing its powerful CAD capabilities for your design and drafting needs. Whether you’re an architect, engineer, or designer, BricsCAD offers a user-friendly interface and robust features that streamline the design process and enhance productivity.
2. System Requirements for BricsCAD
Before installing BricsCAD, ensure that your computer meets the minimum system requirements:
- Operating System: Windows 7/8/10 (32-bit or 64-bit), macOS 10.13 and above, or a supported Linux distribution.
- Processor: Multi-core processor (recommended Intel Core i5 or higher).
- RAM: Minimum 8 GB RAM (recommended 16 GB or more).
- Disk Space: Minimum 1 GB free disk space for installation.
- Graphics Card: OpenGL 1.4 compatible graphics card with 512 MB or more VRAM.
- Display: 1920×1080 resolution (recommended).
3. Downloading BricsCAD Software
To download BricsCAD:
- Visit the official BricsCAD website or authorized reseller.
- Navigate to the download section and select the appropriate version (Windows, macOS, or Linux).
- Choose the edition (BricsCAD Classic, Pro, or Platinum) and language preference.
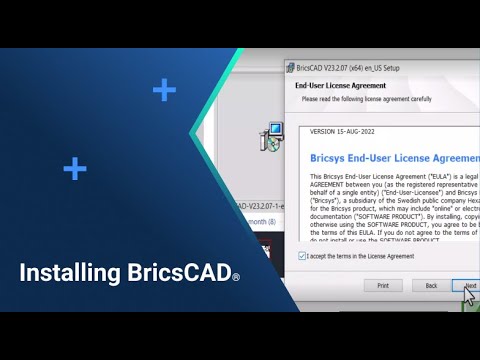
4. Installing BricsCAD on Windows
Steps to install BricsCAD on Windows:
- Download: Double-click the downloaded installer file (typically a .exe file).
- Setup Wizard: Follow the on-screen instructions in the setup wizard.
- Accept License Agreement: Review and accept the license agreement.
- Choose Installation Type: Select the installation type (Typical, Custom, or Network).
- Destination Folder: Specify the installation directory or use the default location.
- Install: Click “Install” to start the installation process.
- Finish: Once installation completes, click “Finish” to exit the setup wizard.
5. Installing BricsCAD on macOS
Steps to install BricsCAD on macOS:
- Download: Open the downloaded .dmg disk image file.
- Drag and Drop: Drag the BricsCAD icon into the Applications folder.
- Open BricsCAD: Navigate to the Applications folder and double-click BricsCAD icon to launch.
6. Installing BricsCAD on Linux
Steps to install BricsCAD on Linux:
- Download: Download the .tar.gz archive for Linux.
- Extract: Extract the archive to a directory of your choice.
- Terminal: Open a terminal and navigate to the extracted directory.
- Run Installer: Run the installer script using the command:
sudo ./installer.sh - Follow Instructions: Follow the on-screen instructions to complete the installation.
7. Configuring BricsCAD Settings
After installation, configure BricsCAD settings according to your workflow preferences:
- Customize user interface, toolbars, and menus.
- Set drawing units, grid settings, and snap options.
- Configure keyboard shortcuts and command aliases for efficiency.
8. Licensing BricsCAD
Activate BricsCAD using a valid license key:
- Launch BricsCAD and navigate to the License Manager.
- Enter your license key or activate using a network license server.
- Follow prompts to complete the activation process.
9. Updating and Upgrading BricsCAD
Regularly update BricsCAD to access new features, improvements, and bug fixes:
- Check for updates within BricsCAD or through the official website.
- Follow prompts to download and install the latest updates.
10. Uninstalling BricsCAD
To uninstall BricsCAD:
- Navigate to Control Panel (Windows) or Applications folder (macOS).
- Locate BricsCAD in the list of installed programs or applications.
- Select “Uninstall” or “Move to Trash” and follow prompts to remove BricsCAD from your system.
11. Troubleshooting Installation Issues
If you encounter installation issues:
- Check system requirements and ensure compatibility.
- Verify downloaded files for integrity and completeness.
- Disable antivirus software temporarily during installation.
- Contact BricsCAD support or consult online resources for assistance.
12. Conclusion
Installing BricsCAD is a fundamental step towards harnessing its powerful CAD capabilities for design, drafting, and modeling tasks. By following the steps outlined in this guide, you can set up BricsCAD on your preferred operating system, configure settings, activate licenses, and ensure smooth operation. Whether you’re a beginner or an experienced CAD user, BricsCAD offers intuitive tools and features to streamline your design workflows and enhance productivity in various industries and applications.