How to install an optical drive
Installing an optical drive into your computer allows you to read and write data to CDs, DVDs, and sometimes Blu-ray discs. This guide will provide detailed instructions on how to install an optical drive, covering preparation, tools needed, installation steps for both internal and external drives, and troubleshooting tips.
Table of Contents
- Introduction to Installing an Optical Drive
- Importance of Optical Drives
- Types of Optical Drives
- Preparation
- Choose the Right Optical Drive
- Gather Tools and Materials
- Installing an Internal Optical Drive
- Step-by-Step Instructions
- Connecting Cables and Mounting
- Installing an External Optical Drive
- Connecting via USB
- Driver Installation (if applicable)
- Testing the Optical Drive
- Verifying Installation
- Checking Functionality
- Maintenance Tips
- Cleaning the Optical Drive
- Handling Discs Properly
- Troubleshooting
- Common Issues
- Solutions
- Conclusion
1. Introduction to Installing an Optical Drive
Importance of Optical Drives
Optical drives are essential for reading and writing data to optical discs such as CDs, DVDs, and Blu-ray discs. They are used for installing software, playing media, backing up data, and creating disc-based content.
Types of Optical Drives
- Internal Drives: Installed directly into the computer case, connected via SATA cables.
- External Drives: Connected to the computer via USB, providing flexibility and portability.
2. Preparation
Choose the Right Optical Drive
- Compatibility: Ensure the optical drive is compatible with your computer’s interface (SATA for internal, USB for external).
- Type of Discs: Choose a drive that supports the types of discs you plan to use (CD, DVD, Blu-ray).
Gather Tools and Materials
- Phillips Screwdriver: For opening the computer case and securing the drive.
- SATA Data Cable: Required for internal drives to connect to the motherboard.
- SATA Power Cable: Provides power to internal drives from the power supply unit (PSU).
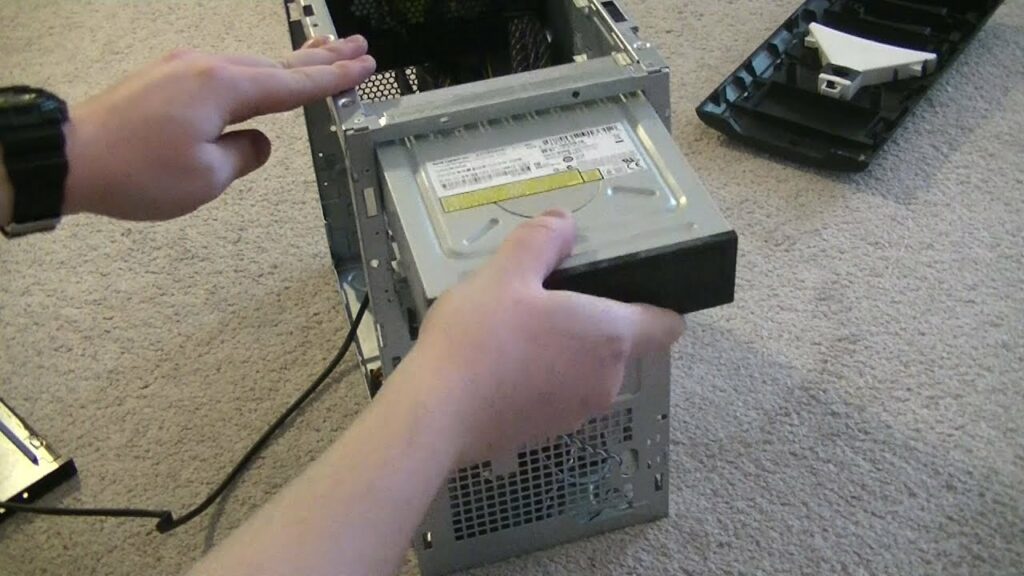
3. Installing an Internal Optical Drive
Step-by-Step Instructions
- Power Off and Open the Case:
- Shut down your computer completely and disconnect all cables.
- Remove the side panel of your computer case to access the internal components.
- Locate the Drive Bay:
- Identify an available 5.25-inch or 3.5-inch drive bay in your computer case where the optical drive will fit.
- Prepare the Drive:
- If necessary, remove any covers or panels from the front of the drive bay.
- Remove the mounting bracket or faceplate from the optical drive.
- Mount the Optical Drive:
- Slide the optical drive into the drive bay carefully, ensuring it aligns with the screw holes on the side of the bay.
- Use screws to secure the drive to the bay from the sides, aligning with the holes on the drive and case.
- Connect Cables:
- Connect one end of the SATA data cable to the back of the optical drive.
- Connect the other end to an available SATA port on the motherboard.
- Power Connection:
- Connect one end of the SATA power cable to the back of the optical drive.
- Connect the other end to an available SATA power connector from the PSU.
- Close the Case:
- Ensure all cables are securely connected and not blocking any airflow.
- Close the computer case and secure the side panel with screws.
4. Installing an External Optical Drive
Connecting via USB
- Prepare the External Drive:
- Remove any protective covers or packaging from the external optical drive.
- Connect USB Cable:
- Plug one end of the USB cable into the USB port on the external optical drive.
- Connect to Computer:
- Plug the other end of the USB cable into an available USB port on your computer.
Driver Installation (if applicable)
- Automatic Installation: Most modern operating systems automatically detect and install necessary drivers for external optical drives.
- Manual Installation: If drivers are required, follow on-screen prompts or download drivers from the manufacturer’s website.
5. Testing the Optical Drive
Verifying Installation
- Power On: Turn on your computer and ensure the optical drive powers up (for internal) or is detected (for external).
- BIOS Detection: Enter BIOS/UEFI setup to confirm the optical drive is recognized under connected devices.
Checking Functionality
- Insert Disc: Insert a disc (CD, DVD, Blu-ray) into the optical drive.
- Playback: Use media player software to play a disc or navigate its contents.
- Write Test: If applicable, use disc burning software to write data onto a blank disc to verify write functionality.
6. Maintenance Tips
Cleaning the Optical Drive
- Cleaning Disc: Use a commercially available optical drive cleaning disc to remove dust and debris from the drive lens.
- Compressed Air: Use compressed air to blow out any dust from the drive bay and around the optical drive.
Handling Discs Properly
- Avoid Scratches: Handle discs by the edges and avoid touching the shiny underside (data side) to prevent scratches.
- Storage: Store discs in their cases or sleeves to protect them from dust and damage.
7. Troubleshooting
Common Issues
- Drive Not Recognized: Check cable connections and ensure drivers are installed (for external drives).
- Read/Write Errors: Clean the optical drive lens and ensure discs are clean and undamaged.
- Power Issues: Ensure the optical drive is receiving adequate power from the PSU (for internal drives).
Solutions
- Check Connections: Ensure all cables are securely connected.
- Update Drivers: Install or update drivers as necessary.
- Test with Different Discs: Test the optical drive with different discs to identify if the issue is with a specific disc or the drive itself.
8. Conclusion
Installing an optical drive into your computer system is a straightforward process that enhances functionality by enabling CD, DVD, and Blu-ray disc operations. By following the steps outlined in this guide—preparing for installation, choosing the right drive, connecting cables, testing functionality, and performing maintenance—you can successfully install and maintain an optical drive. Whether you opt for an internal or external drive, regular maintenance and careful handling of discs will ensure reliable performance and longevity. If you encounter any issues during installation or operation, refer to troubleshooting tips or consult manufacturer support for assistance.