How to install a CPU water block

Installing a CPU water block is a crucial step in setting up a custom water cooling loop for your computer’s processor. This guide will provide detailed instructions on how to safely and effectively install a CPU water block, covering preparation, tools needed, installation steps, testing, and maintenance tips.
Table of Contents
- Introduction to CPU Water Blocks
- What is a CPU Water Block?
- Benefits of Using a CPU Water Block
- Preparation
- Choosing the Right CPU Water Block
- Tools and Materials Needed
- Preparing Your Work Area
- Installing the CPU Water Block
- Step 1: Power Off and Disassemble
- Step 2: Applying Thermal Paste
- Step 3: Mounting the CPU Water Block
- Step 4: Securing the Water Block
- Connecting and Testing
- Step 5: Connecting Tubes and Fittings
- Step 6: Leak Testing
- Step 7: Checking System Functionality
- Maintenance and Troubleshooting
- Maintaining Your CPU Water Block
- Troubleshooting Common Issues
- Conclusion
1. Introduction to CPU Water Blocks
What is a CPU Water Block?
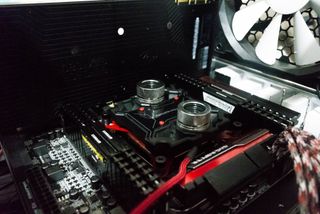
A CPU water block is a component in a custom liquid cooling loop designed to transfer heat away from the processor (CPU). It typically consists of a metal base, often copper or nickel-plated copper, with a microfin structure or a smooth surface to maximize contact with the CPU heat spreader. Water blocks have inlet and outlet ports for coolant flow and are integral to dissipating heat efficiently.
Benefits of Using a CPU Water Block
- Improved Cooling Performance: Water blocks offer superior thermal conductivity compared to air coolers, enabling more efficient heat dissipation from the CPU.
- Quiet Operation: Liquid cooling systems are generally quieter than air cooling solutions, as they don’t rely on noisy fans for heat dissipation.
- Aesthetics and Customization: Water blocks come in various designs and materials, allowing for customization and aesthetic enhancement of your computer build.
2. Preparation
Choosing the Right CPU Water Block
- Compatibility: Ensure the water block is compatible with your CPU socket type (e.g., LGA 115x, AM4) and motherboard.
- Performance Considerations: Consider factors such as cooling performance, material quality (e.g., copper, nickel-plated copper), and aesthetic preferences.
Tools and Materials Needed
- CPU Water Block: Selected based on CPU socket compatibility and personal preference.
- Thermal Paste: High-quality thermal compound for efficient heat transfer between the CPU and water block.
- Screwdriver: Typically Phillips-head screwdrivers for disassembly and installation.
- Isopropyl Alcohol and Lint-Free Cloth: For cleaning the CPU surface before applying thermal paste.
- Antistatic Wrist Strap (Optional): Prevents electrostatic discharge that can damage sensitive components.
- Work Area Preparation: Clean, well-lit workspace with adequate ventilation.
3. Installing the CPU Water Block
Step 1: Power Off and Disassemble
- Power Down the System: Shut down your computer and disconnect all power cables from the power supply unit (PSU).
- Remove Side Panel: Open the computer case by removing the side panel to access the CPU socket area.
Step 2: Applying Thermal Paste
- Clean CPU Surface: Use isopropyl alcohol and a lint-free cloth to carefully clean any residual thermal paste from the CPU heat spreader.
- Apply Thermal Paste: Apply a small, pea-sized amount of thermal paste to the center of the CPU heat spreader. Avoid spreading the paste; the pressure from the water block will evenly distribute it.
Step 3: Mounting the CPU Water Block
- Prepare Water Block: If applicable, assemble any mounting brackets or backplates included with the water block according to manufacturer instructions.
- Align Water Block: Gently lower the CPU water block onto the CPU, aligning it with the mounting holes around the CPU socket.
- Secure Mounting Screws: Insert and tighten mounting screws in a diagonal pattern to ensure even pressure and secure attachment. Follow manufacturer-recommended torque specifications to avoid damaging the CPU or water block.
Step 4: Securing the Water Block
- Check Contact: Verify that the water block makes full contact with the CPU heat spreader, ensuring the thermal paste spreads evenly.
- Tighten Brackets (if applicable): Secure any additional brackets or retention mechanisms provided with the water block to firmly hold it in place on the motherboard.
4. Connecting and Testing
Step 5: Connecting Tubes and Fittings
- Plan Tube Routing: Plan the routing of tubing from the water block to other components in your liquid cooling loop, such as radiators and reservoirs.
- Attach Tubing: Connect the tubing to the inlet and outlet ports on the CPU water block using appropriate fittings (compression fittings, barbs, etc.). Ensure connections are tight and leak-free.
Step 6: Leak Testing
- Fill Reservoir: Fill the liquid cooling reservoir with coolant suitable for your system (distilled water or specialized coolant).
- Run Pump: Turn on the pump to circulate coolant through the system, checking for leaks at tubing connections and water block seals.
- Monitor System: Monitor the system for several hours to ensure there are no leaks or drops in coolant level.
Step 7: Checking System Functionality
- Boot System: Power on your computer and enter BIOS/UEFI setup to monitor CPU temperatures and ensure the water block is functioning correctly.
- Run Stress Tests: Use stress testing software (e.g., Prime95, AIDA64) to load the CPU and monitor temperature performance. Ensure temperatures remain within safe limits.
5. Maintenance and Troubleshooting
Maintaining Your CPU Water Block
- Regular Inspections: Periodically inspect tubing connections, fittings, and the water block itself for signs of leaks, corrosion, or blockages.
- Coolant Replacement: Replace coolant according to manufacturer recommendations to maintain optimal thermal performance and prevent buildup of algae or sediment.
- Cleaning: Clean dust or debris from radiator fins and fan blades regularly to maintain airflow and cooling efficiency.
Troubleshooting Common Issues
- Leaks: Check tubing connections and fittings for tightness. Replace damaged or worn-out O-rings or seals.
- High Temperatures: Ensure the water block is securely mounted with adequate thermal paste coverage. Consider adjusting fan speeds or radiator placement for improved cooling.
6. Conclusion
Installing a CPU water block is a rewarding endeavor that enhances cooling efficiency and aesthetics in your computer build. By following the steps outlined in this guide, you can confidently install a CPU water block, ensuring proper thermal management for your processor and contributing to a quieter and more efficient computing experience. Whether for gaming, content creation, or overclocking purposes, a well-installed CPU water block is key to achieving optimal performance and longevity for your CPU and overall system.


