How to create a slideshow in PowerDirector
Creating a slideshow in PowerDirector allows you to compile photos or video clips into a cohesive presentation with dynamic transitions, effects, and audio accompaniment. Whether for personal memories, professional presentations, or creative projects, PowerDirector provides versatile tools and features to customize slideshows to match your vision. This comprehensive guide will walk you through everything you need to know about creating a slideshow in PowerDirector, covering basic techniques, advanced customization options, creative examples, troubleshooting tips, and more.
Understanding Slideshows in PowerDirector
A slideshow in PowerDirector is a sequence of images or video clips arranged in a sequential order, often accompanied by transitions, effects, and audio. Key aspects of creating a slideshow include:
- Media Compilation: Compile photos or video clips into a sequential order within the timeline.
- Transition Effects: Apply transitions between slides to create smooth visual transitions.
- Audio Integration: Add background music or narration to enhance the slideshow experience.
Mastering slideshow creation in PowerDirector enables you to tell stories, share memories, and deliver engaging presentations with visual flair and professional polish.
Getting Started with Slideshows in PowerDirector
Importing Media
- Open PowerDirector: Launch PowerDirector and create a new project or open an existing one.
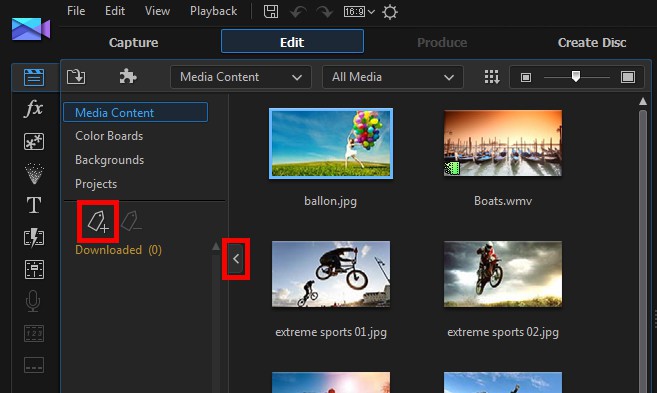
- Import Media Files: Import photos or video clips into the Media Room by clicking on “Import Media Files.”
Organizing Media Assets
- Media Management: Organize imported media assets into folders or categories within the Media Room for easy access.
- Storyboard Preparation: Plan the sequence and order of photos or video clips for the slideshow.
Basic Slideshow Creation Techniques
Adding Media to Timeline
- Drag and Drop: Drag photos or video clips from the Media Room to the timeline in the desired sequence.
- Timeline Adjustment: Arrange media assets on the timeline to determine the slideshow sequence and duration.
Applying Transitions
- Transition Effects: Click on the “Transition Room” tab to access a variety of transition effects.
- Transition Application: Drag and drop transition effects between slides on the timeline to create smooth visual transitions.
Setting Slide Duration
- Duration Adjustment: Click and drag the edges of media clips on the timeline to adjust slide duration.
- Timeline Scrubbing: Use the timeline scrubber to preview slide transitions and duration adjustments in real-time.
Adding Audio
- Audio Import: Import background music or audio files into the Media Room.
- Audio Placement: Drag audio files from the Media Room to the timeline and adjust placement to synchronize with slideshow timing.
Previewing and Playback
- Playback Controls: Use playback controls to preview the slideshow in the preview window.
- Real-Time Editing: Make adjustments to slideshow elements in real-time and preview changes immediately.
Advanced Slideshow Customization Options
Creative Effects and Filters
- Effect Application: Apply visual effects and filters to individual slides or across the entire slideshow for stylistic enhancements.
- Filter Adjustment: Customize filter settings such as brightness, contrast, and saturation to achieve desired visual effects.
Text and Title Integration
- Title Addition: Insert text or titles between slides to provide context, information, or storytelling elements.
- Text Animation: Animate text elements to appear and disappear with transitions or effects for dynamic visual presentations.
Audio Enhancement
- Audio Editing: Adjust audio levels, fade-in, fade-out effects, and synchronization with slideshow timing for seamless audio integration.
- Voiceover Addition: Record and add voiceovers to slides to provide narration, commentary, or additional context to the slideshow.
Motion and Pan Effects
- Motion Effects: Apply motion effects to photos or video clips to create dynamic movement within slides.
- Pan and Zoom: Add pan and zoom effects to highlight specific details within photos or video clips for enhanced visual engagement.
Creative Applications of Slideshows
Personal Memories and Events
- Celebratory Occasions: Create slideshows for birthdays, weddings, anniversaries, and other special events to preserve and share memories.
- Family History: Compile photos and videos to document family history, milestones, and memorable moments for future generations.
Professional Presentations
- Business Presentations: Develop slideshows for business meetings, pitches, or client presentations to convey ideas, products, or services effectively.
- Educational Use: Create educational slideshows for lectures, workshops, or training sessions to enhance learning and engagement.
Creative Projects and Artistic Expression
- Artistic Expression: Use slideshows as a canvas for artistic expression, visual storytelling, or creative projects.
- Portfolio Showcases: Showcase creative work, photography portfolios, or artistic projects with visually compelling slideshows.
Tips for Effective Slideshow Creation
Visual Cohesion and Flow
- Slide Sequence: Arrange slides in a logical sequence to maintain storytelling coherence and visual flow.
- Transition Consistency: Use consistent transition effects and timing to ensure smooth visual transitions between slides.
Audio Quality and Timing
- Audio Selection: Choose background music or audio that complements the mood, tone, or theme of the slideshow.
- Audio Editing: Edit audio tracks for optimal volume levels, clarity, and synchronization with slideshow timing.
Audience Engagement
- Visual Engagement: Incorporate dynamic elements, animations, and effects to captivate audience attention and maintain engagement.
- Feedback Solicitation: Gather feedback from viewers or peers to evaluate slideshow impact, clarity, and overall effectiveness.
Troubleshooting Slideshow Issues
Visual and Audio Quality
- Quality Check: Review slideshow elements, transitions, and effects for visual artifacts, audio synchronization issues, or playback concerns.
- Render Settings: Adjust render settings and export configurations to optimize slideshow quality and performance.
Timing and Duration
- Slide Duration: Ensure slides are adequately timed to display content effectively without rushing or extending beyond viewer attention spans.
- Timeline Management: Organize timeline elements and adjust slide durations to maintain pacing and narrative coherence.
Playback Compatibility
- Device Compatibility: Test slideshow playback on different devices and platforms to ensure compatibility and visual fidelity.
- Format Adjustments: Adjust export settings or format options to optimize slideshow playback across various devices and media players.
Conclusion
Mastering slideshow creation in PowerDirector enables you to craft visually compelling presentations, preserve cherished memories, and deliver professional-quality projects with ease. By following the tools and techniques outlined in this guide, you can effectively utilize PowerDirector’s versatile slideshow creation features to customize transitions, effects, and audio elements, enhancing storytelling and engaging your audience. Whether for personal milestones, business presentations, or creative projects, PowerDirector empowers you to showcase your creativity, express your ideas, and produce captivating slideshows that resonate with viewers. Experiment with different effects, transitions, and customization options, leverage advanced editing capabilities, and embrace the versatility of PowerDirector to create memorable slideshows that captivate, inspire, and leave a lasting impression.