How to configure a NAS
Configuring a Network Attached Storage (NAS) device is essential for creating a centralized storage solution that provides data access and backup capabilities across your home or business network. NAS devices are versatile, offering various features such as file sharing, media streaming, remote access, and data redundancy through RAID configurations. This comprehensive guide will walk you through the steps to set up and configure a NAS, covering hardware selection, initial setup, network integration, data protection, and advanced configurations to maximize the functionality of your NAS device.
Understanding Network Attached Storage (NAS)
What is NAS?
- Definition: NAS is a specialized file storage device connected to a network, allowing multiple users and devices to access data simultaneously.
- Features: Centralized storage, data redundancy, remote access, media streaming, and backup capabilities.
Benefits of Using NAS
- Centralized Storage: Store and access files, documents, photos, and media from a single location.
- Data Redundancy: Protect data against drive failures using RAID configurations.
- Remote Access: Access files from anywhere via the internet using cloud-like services.
- Media Streaming: Stream multimedia content to smart TVs, media players, and mobile devices.
- Backup Solution: Automate backups of critical data from computers and devices on the network.
How to Configure a NAS: Step-by-Step Guide
Step 1: Choose the Right NAS Device
- Considerations: Storage capacity, number of drive bays, CPU and RAM specifications, RAID support, connectivity (Ethernet, Wi-Fi), and compatibility with your operating system.
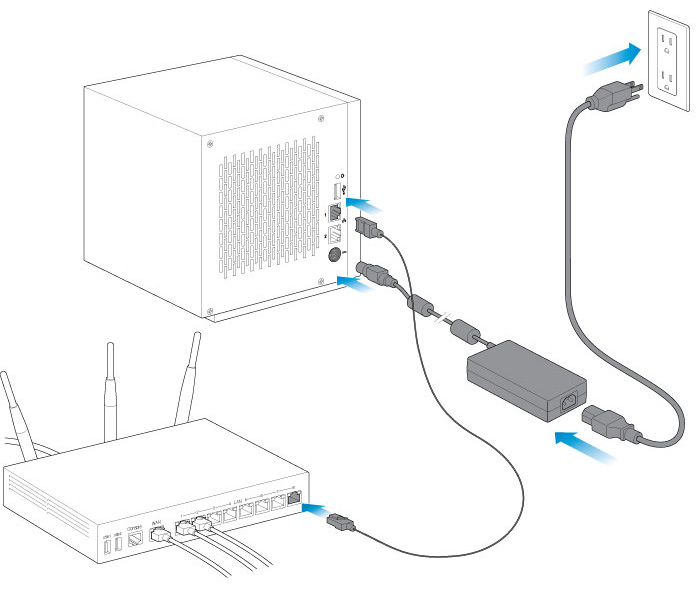
Step 2: Initial Setup of NAS Hardware
- Unbox and Assemble: Install hard drives into drive bays following manufacturer instructions (if not pre-assembled).
- Connect to Power and Network: Plug NAS device into power outlet and connect Ethernet cable to router or switch for network access.
Step 3: Access NAS Dashboard
- Find NAS IP Address:
- Use router admin panel or network scanning tools to find IP address assigned to NAS device.
- Access NAS Interface:
- Open web browser and enter NAS IP address to access device management interface (e.g., http://NAS_IP).
Step 4: Initialize and Configure NAS Settings
- Create Admin Account:
- Follow on-screen prompts to create administrator account with secure password.
- Set Device Name and Description:
- Assign a unique name and description for easy identification on the network.
- Network Configuration:
- Configure network settings such as DHCP or static IP address, gateway, and DNS servers.
Step 5: Configure Storage
- Create Storage Volumes:
- Set up storage volumes using RAID (Redundant Array of Independent Disks) for data redundancy and performance.
- Choose RAID level based on requirements (e.g., RAID 1 for mirroring, RAID 5 for striping with parity).
- File System Formatting:
- Format storage volumes with compatible file systems (e.g., ext4, NTFS, APFS) for optimal performance and compatibility with client devices.
Step 6: Set Up User Accounts and Permissions
- Create User Accounts:
- Create individual user accounts with secure passwords for accessing NAS resources.
- Assign Permissions:
- Define access permissions (read, write, execute) for users or groups to specific folders and files.
Step 7: Enable Services and Applications
- File Sharing:
- Enable protocols such as SMB/CIFS (Windows), AFP (Apple), NFS (Unix/Linux) for cross-platform file sharing.
- Media Streaming:
- Install and configure media server applications (e.g., Plex, Emby) to stream multimedia content to devices on the network.
- Backup and Sync:
- Set up backup jobs to automatically back up critical data from computers and devices to NAS storage.
Step 8: Configure Remote Access (Optional)
- Remote Access Services:
- Set up remote access using NAS vendor-provided services or VPN (Virtual Private Network) for secure access over the internet.
- Cloud Integration:
- Integrate NAS with cloud storage services (e.g., Dropbox, Google Drive) for hybrid cloud solutions.
Step 9: Monitor and Maintain NAS
- Monitoring Tools:
- Use built-in monitoring tools or third-party applications to monitor NAS health, storage usage, and performance metrics.
- Firmware Updates:
- Regularly update NAS firmware and software to ensure security patches, bug fixes, and new features.
Step 10: Backup and Disaster Recovery
- Backup Strategy:
- Implement backup strategies including off-site backups or cloud backups to protect against data loss.
- Disaster Recovery Plan:
- Develop and test disaster recovery plans to restore data and functionality in case of hardware failure or data corruption.
Best Practices for NAS Configuration
- Security: Enable firewall, use strong passwords, and keep firmware/software up to date to protect against unauthorized access and cyber threats.
- Redundancy: Implement RAID configurations for data redundancy and fault tolerance to prevent data loss in case of drive failure.
- Regular Maintenance: Monitor NAS health regularly, perform routine backups, and maintain adequate storage capacity to ensure optimal performance.
- Scalability: Choose a NAS device with scalability options to accommodate future storage needs and expansion.
Conclusion
Configuring a NAS device involves careful planning, setup, and customization to create a reliable and efficient centralized storage solution for your home or business network. By following the steps outlined in this guide, you can successfully set up and configure a NAS device to meet your specific storage, backup, and data sharing requirements. Regular maintenance, security practices, and adherence to best practices will ensure that your NAS operates smoothly, providing reliable access to data and enhancing productivity across your network environment. If unsure about any configuration steps or encountering technical issues, consult manufacturer documentation or seek assistance from professional IT support.