How to capture video from a webcam in PowerDirector
Capturing video from a webcam in PowerDirector enables you to record live footage directly into your video projects, ideal for vlogs, tutorials, presentations, or any content that requires real-time recording. PowerDirector offers intuitive tools and features for webcam capture, allowing you to seamlessly integrate webcam footage with other media elements, apply effects, edit in real-time, and produce professional-quality videos. This comprehensive guide will walk you through everything you need to know about capturing video from a webcam in PowerDirector, covering setup, recording techniques, editing options, creative applications, troubleshooting tips, and more.
Understanding Webcam Capture in PowerDirector
Webcam capture in PowerDirector involves recording video footage from an external or built-in webcam directly into your video editing project. Key aspects of webcam capture include:
- Real-Time Recording: Capture live video footage from a webcam for immediate integration into video projects.
- Integration: Seamlessly integrate webcam recordings with other media assets within PowerDirector’s editing interface.
- Editing Flexibility: Edit, enhance, and customize webcam footage with PowerDirector’s comprehensive editing tools and features.
Mastering webcam capture in PowerDirector empowers you to create dynamic and engaging video content with personalized presentations, demonstrations, or interactive video communication.
Getting Started with Webcam Capture in PowerDirector
Setting Up for Webcam Capture
- Open PowerDirector: Launch PowerDirector and create a new video project or open an existing one where you want to capture webcam footage.
- Connect Webcam: Ensure your webcam is connected to your computer and recognized by PowerDirector. Install any necessary drivers or updates if prompted.
Basic Webcam Capture Techniques
Accessing Webcam Tools
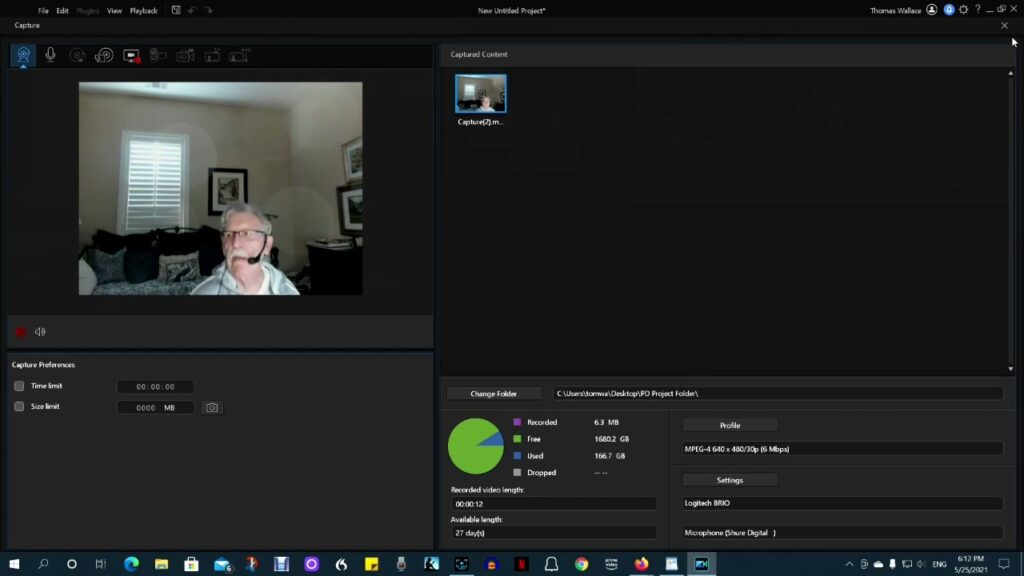
- Webcam Capture Interface: Navigate to the webcam capture interface within PowerDirector to access recording controls and settings.
- Camera Selection: Choose the desired webcam device if multiple cameras are connected to your computer.
Recording Process
- Start Recording: Click the “Record” button in the webcam capture interface to begin recording live video footage.
- Pause and Resume: Use controls to pause and resume recording as needed during the capture session.
Editing and Enhancing Webcam Footage
Timeline Integration
- Drag and Drop: Drag recorded webcam clips from the media library or capture interface directly onto the timeline for editing and integration.
- Timeline Adjustments: Trim, cut, or extend webcam clips on the timeline to refine content and synchronize with other media elements.
Visual and Audio Adjustments
- Visual Enhancements: Apply filters, effects, or adjustments to webcam footage for improved clarity, color correction, or visual aesthetics.
- Audio Management: Adjust audio levels, apply filters, or synchronize audio with video for balanced and clear sound quality in webcam recordings.
Export and Sharing Options
- Export Settings: Choose export settings and formats to finalize webcam recordings for sharing or playback on different devices and platforms.
- Sharing Options: Share webcam capture projects directly from PowerDirector to social media platforms, cloud services, or other digital channels.
Creative Applications of Webcam Capture
Personalized Presentations
- Video Blogging (Vlogging): Record and share personal updates, insights, or experiences through webcam vlogs with direct audience interaction.
- Educational Content: Create instructional videos, tutorials, or lectures with webcam capture to engage learners and enhance educational content delivery.
Professional Communication
- Business Presentations: Record professional presentations, pitches, or corporate announcements using webcam capture for direct communication and engagement.
- Remote Meetings: Conduct virtual meetings, interviews, or consultations with webcam capture to maintain visual and verbal communication clarity.
Interactive Demonstrations
- Product Demonstrations: Showcase product features, demonstrations, or reviews through live webcam capture to engage potential customers or clients.
- Software Tutorials: Record software demonstrations, walkthroughs, or troubleshooting guides using webcam capture for interactive learning experiences.
Tips for Effective Webcam Capture
Lighting and Environment
- Lighting Setup: Ensure adequate lighting to enhance video clarity and visibility during webcam capture sessions.
- Background Considerations: Choose a clean, uncluttered background or use virtual backgrounds to maintain visual focus on the subject.
Camera Positioning and Framing
- Camera Angle: Position the webcam at eye level or adjust angles for optimal framing and perspective in webcam recordings.
- Framing Guidelines: Apply the rule of thirds or framing guidelines to achieve balanced and visually appealing compositions in webcam footage.
Audio Quality Check
- Microphone Quality: Use a quality microphone or ensure the webcam’s built-in microphone captures clear and balanced audio during recording.
- Audio Monitoring: Monitor audio levels and quality in real-time to identify and address any issues or background noise during webcam capture.
Troubleshooting Webcam Capture Issues
Connectivity and Compatibility
- Driver Updates: Install latest webcam drivers or software updates to ensure compatibility and optimal performance with PowerDirector.
- Device Recognition: Troubleshoot device recognition issues or connectivity problems if the webcam is not detected or fails to connect.
Recording and Playback Quality
- Resolution Settings: Adjust webcam resolution settings within PowerDirector to match project requirements and ensure high-quality video capture.
- Frame Rate Adjustments: Modify frame rate settings to achieve smooth playback and visual consistency in webcam recordings.
Export and Playback Considerations
- Export Settings: Verify export settings and configurations to maintain video quality and compatibility for seamless playback on different devices.
- Playback Testing: Test webcam recordings on various devices and media players to ensure consistent playback quality and performance.
Conclusion
Webcam capture in PowerDirector empowers you to record, edit, and integrate live video footage directly into your video projects with ease and flexibility. By following the tools, techniques, and creative applications outlined in this guide, you can effectively utilize PowerDirector’s webcam capture features to enhance presentations, create engaging educational content, conduct professional communication, or deliver interactive demonstrations. Whether for personal vlogs, instructional videos, business presentations, or remote meetings, PowerDirector enables you to leverage webcam capture for dynamic storytelling, direct engagement, and impactful video communication. Experiment with lighting setups, camera angles, editing options, and export settings to produce polished webcam recordings that captivate, inform, and resonate with your audience.