Guiding the Reader: A Comprehensive Guide to Adding Line Numbers in Microsoft Word

In the expansive realm of document formatting, clarity and organization are paramount to ensure readability and comprehension. Whether you’re writing academic papers, legal documents, or literary works, line numbers serve as invaluable aids for reference, citation, and navigation within the text. In this extensive guide, we’ll explore the intricacies of adding line numbers in Microsoft Word, empowering you to enhance the usability and accessibility of your documents with precision and ease.
Understanding the Significance of Line Numbers:
Before delving into the practical aspects of adding line numbers, it’s crucial to grasp the significance of this feature in document navigation and referencing. Line numbers serve multiple purposes, including:
- Facilitating citation: Line numbers provide a standardized method for referencing specific locations within a document, enabling accurate citation and attribution in academic or legal contexts.
- Enhancing navigation: Line numbers help readers locate and navigate to specific sections or passages within a document, facilitating comprehension and information retrieval.
- Improving collaboration: Line numbers facilitate communication and collaboration among authors, editors, and reviewers by providing clear reference points for discussing and revising the text.
By incorporating line numbers into your document workflow, you can create documents that are not only well-structured and organized but also user-friendly and accessible.
Basic Line Number Insertion:
Adding line numbers in Microsoft Word is a straightforward process that can be accomplished using built-in tools and features. Here’s how to do it:
- Access Page Layout Options:
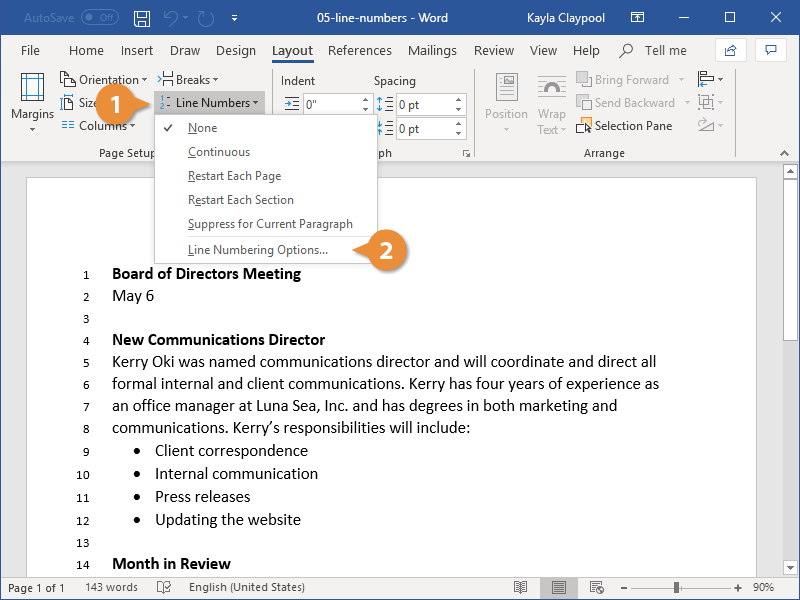
- Open Microsoft Word and navigate to the “Layout” tab located in the top menu bar.
- In the “Page Setup” group, you’ll find the “Line Numbers” button. Click on this button to access line numbering options.
- Choose Line Numbering Style:
- In the line numbering options menu, you’ll see various styles for line numbering, including continuous, restart at each page, and restart at each section. Choose the style that best suits your document’s formatting requirements.
- Select Placement and Interval:
- After choosing the line numbering style, select the placement and interval options. You can choose to place line numbers on the left or right side of the page and specify the interval between line numbers.
- Apply Line Numbers:
- Once you’ve configured the line numbering options, click “OK” to apply the line numbers to your document. The line numbers will be added to the specified location on each page according to the selected style and interval.
Advanced Line Number Options:
While basic line numbering functionality suffices for most scenarios, Microsoft Word offers advanced features and customization options to further enhance the functionality and appearance of line numbers. Here are some additional features you may explore:
- Customizing Line Numbering Format:
- Word allows users to customize the format and appearance of line numbers, including font, size, color, and alignment. To customize line numbering format, access the line numbering options menu and click on “Line Numbering Options.”
- Excluding Specific Sections:
- In cases where you need to exclude certain sections or pages from line numbering, Word offers options for excluding specific sections or applying line numbering selectively. Use section breaks or page breaks to control line numbering settings for different parts of the document.
- Restarting Line Numbering:
- Word enables users to restart line numbering at specific points within the document, such as at the beginning of each section or chapter. Use section breaks or formatting options to restart line numbering as needed.
Best Practices for Line Number Usage:
While line numbers offer invaluable assistance in document navigation and referencing, it’s essential to use them judiciously and in accordance with best practices. Here are some tips to consider:
- Use Consistent Formatting:
- Maintain consistency in line numbering format, style, and placement throughout the document to enhance readability and usability. Consistent formatting improves the document’s visual coherence and professionalism.
- Consider Document Purpose:
- When adding line numbers, consider the purpose and audience of the document. Choose line numbering options that align with the document’s formatting requirements and the expectations of the readers.
- Test Navigation Functionality:
- Before finalizing your document, test the navigation functionality of line numbers to verify that readers can easily locate and reference specific passages or sections. Ensure that line numbers are accurate and correspond to the text.
- Provide Context:
- When citing or referencing specific lines or passages, provide context or additional information to aid understanding. Use line numbers as reference points in conjunction with descriptive text or annotations to provide clarity.
Conclusion:
Adding line numbers in Microsoft Word is a fundamental skill for enhancing document navigation, referencing, and collaboration. By mastering the basic insertion process, exploring advanced options, and adhering to best practices for usage, you can create documents that are not only well-organized and structured but also user-friendly and accessible. Whether you’re writing academic papers, legal documents, or literary works, line numbers offer a versatile and powerful means of guiding readers through the text with precision and ease. So, the next time you embark on a document creation journey in Word, remember to leverage the power of line numbers to enhance document usability, accessibility, and professionalism, and make your content more navigable and comprehensible to your audience.


