Fixing the “Harmonize” Resolution Bug: How to Restore Detail After Using AI Layer Blending in Photoshop
Fixing the “Harmonize” Resolution Bug: How to Restore Detail After Using AI Layer Blending in Photoshop
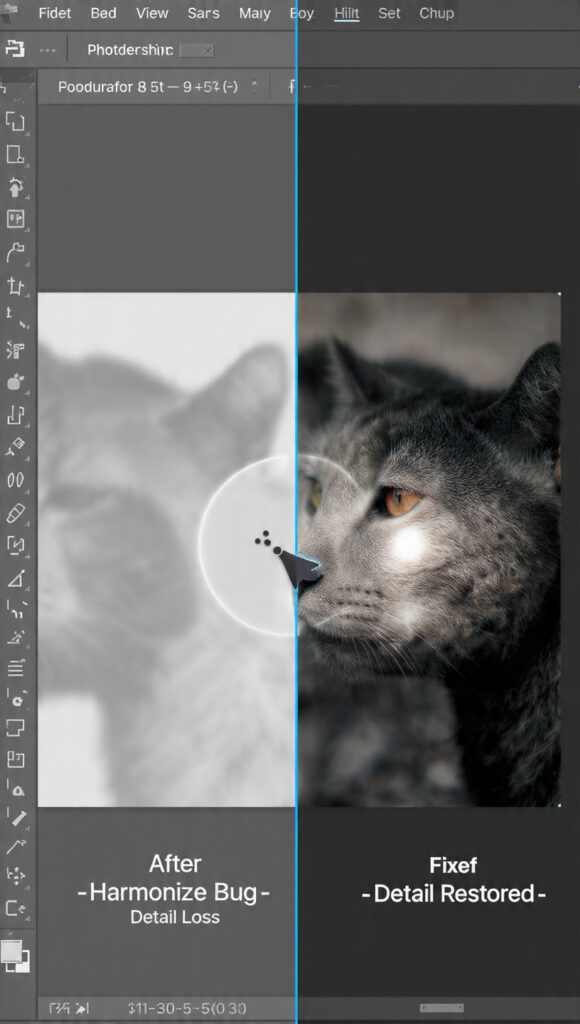
Harmonize is a sophisticated artificial intelligence tool that is included in Photoshop. Its purpose is to automatically match colors, tones, and lighting across layers, therefore making compositions look more coherent. Even while it works very well for blending different photos or layers, many users report that after applying the effect, there is a little reduction in the amount of detail that is present. It is possible for this resolution problem to have an effect on textures, fine lines, and delicate details, resulting in some sections of the picture seeming slightly blurry. In order for designers to achieve visual harmony and sharpness in their work, it is essential for them to have a solid understanding of why this occurs and how to restore the original clarity on their projects.
Why Harmonize Can Diminish the Detail of an Image
It is the way that Harmonize analyzes visual information that is responsible for the softening effect. The artificial intelligence does an analysis of the tonal values and makes an effort to harmonize the layers, often using smoothing to reduce the contrast between them. This mistakenly limits the amount of micro-details and sharp edges, especially in high-frequency regions such as hair, fabric textures, or tiny writing. Because the algorithm places a higher priority on overall visual consistency, it may cause a picture to seem more subdued than it was meant to. An effective solution may be found by first recognizing this behavior, which is the first stage in the process.
An Overview of Layer Preparation for Non-Destructive Editing
Protecting your original layers is an important step to do before applying their Harmonize effect. When layers are converted to Smart Objects, any artificial intelligence processing that is performed is guaranteed to be non-destructive. This enables you to go back to the original pixel information if it becomes required. It is also a good idea to have backups of the original layers, particularly when dealing with logos, graphics, or imagery that is very detailed. It is important to properly prepare the picture since it not only protects the image but also provides you with more options when it comes to fixing detail loss after blending.
Sharpness may be restored by the use of layer duplication.
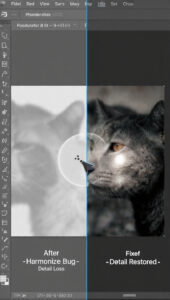
In order to restore lost detail, one of the most successful ways is replicating the original layer and putting it on top of the result that has been harmonized. In order to reinsert small details without effecting the tonal modifications, it is possible to apply a high-pass filter to this duplicate layer and then set the blending mode to either Overlay or Soft Light. By carefully adjusting the filter radius, you can guarantee that the enhancement is subtle and natural, therefore strengthening edges and textures without causing any artifacts that might be considered undesirable.
Using Selective Layer Masks When Applying
By using selective layer masks, one is able to exercise fine control over the areas in which sharpness is rebuilt. By masking sections that were badly impacted by Harmonize, you may bring back information just where it is required, while keeping the remainder of the blended layer untouched. This allows you to save time and effort. When working with photographs that have a variety of textures, this method is very helpful since it allows some parts to maintain their softness while others keep their sharpness. In order to get a balanced outcome that maintains both clarity and visual cohesiveness, the combination of masking and high-pass sharpening is used.
Modifying Intelligent Filters to Achieve Perfect Control
When it comes to dealing with Harmonize artifacts, Smart Filters in Photoshop provide an extra degree of freedom. As a result of the fact that your layers are Smart Objects, you have the ability to apply sharpening or other corrective modifications as filters, which may be modified at any moment. This makes it possible to improve the effect in an iterative manner, allowing you to adjust the strength and breadth of the effect until the picture that has been upscaled or blended seems realistic. Additionally, filters may be layered, which allows for numerous levels of detail improvement to be achieved without causing any damage to the original pixels.
Bringing Back the Texture Without Excessive Sharp Focusing
Over-sharpening, which may result in the introduction of halos or noise, is a typical mistake that can occur while attempting to repair Harmonize-induced softness. It is essential to slightly improve the texture, with the emphasis being placed on the minute details rather than on boosting the overall contrast. It is possible to guarantee that the elements that have been restored seem to be blended with the rest of the picture by making limited use of low-opacity high-pass layers or blending changes. In order to produce clarity that is not artificially boosted but rather seems natural, the objective is to maintain the smoothness that is gained via the use of AI mixing while simultaneously restoring accuracy.
Testing the Results at a Zoom Level of 100%
In order to guarantee that the details have been successfully restored, you should always examine your adjustments at full resolution. It is possible that Harmonize may leave certain places softer than others; thus, examining at 100% zoom will enable you to detect and correct any irregularities that may still be present. When the corrected picture is compared to the original layer, it is possible to determine whether or not the modifications are successful without leading to excessive compensation. The thorough examination guarantees that the result will be of a professional standard and will be acceptable for both print and digital applications.
It is possible to save and export the final image.
After the details have been brought back to life and the composition seems to be coherent, you should save your file in a format that is of good quality and maintains the modifications. Maintaining Smart Objects and layered PSDs gives you the ability to return for more modifications if they are required, while exporting to PNG or TIFF gives you a clean final picture that can be sent to the client or published. The work must be saved in the appropriate manner in order to guarantee that the equilibrium between AI harmonization and restored clarity is maintained across all applications.
Workflows that are Harmonized with Best Practices for the Future
Always begin an upcoming project with high-resolution layers and convert them to Smart Objects before applying Harmonize. This will help reduce the number of resolution difficulties that arise in subsequent projects. For the purpose of protecting small details and avoiding excessive scaling of low-resolution materials prior to blending, you should include masks and filters into your normal process. Maintaining the clarity and integrity of your photographs while taking use of AI-driven harmonization may be accomplished by evaluating the results on a regular basis at full resolution and making small modifications to rectify them.