Empowering System Resilience: A Comprehensive Guide to Creating a System Repair Disc in Windows 7
In the intricate realm of computing, system failures and unforeseen issues can disrupt productivity and compromise data integrity. However, Windows 7 offers a built-in solution to mitigate these challenges: the System Repair Disc. This invaluable tool empowers users to troubleshoot and repair system-related problems, restore functionality, and recover data in the event of a system failure. In this exhaustive guide, we will embark on a journey to demystify the process of creating a System Repair Disc in Windows 7, exploring its functionalities and providing step-by-step instructions for safeguarding system resilience.
Understanding the System Repair Disc in Windows 7:
Before delving into the intricacies of creating a System Repair Disc, let’s first grasp the concept and significance of this indispensable tool:
- Definition: A System Repair Disc is a bootable disc that contains diagnostic and repair tools for troubleshooting system-related issues in Windows 7. It provides access to various recovery options, including system restore, startup repair, system image recovery, and command prompt.
- Resilience: The System Repair Disc serves as a crucial lifeline in times of system failure or instability, enabling users to recover from critical errors, restore system functionality, and troubleshoot common issues without the need for advanced technical expertise.
- Preventive Measure: Creating a System Repair Disc is a proactive measure that empowers users to prepare for potential system failures and data loss scenarios. By having a System Repair Disc on hand, users can expedite the recovery process and minimize downtime in the event of a system-related emergency.
Creating a System Repair Disc in Windows 7:
Now, let’s explore the step-by-step process of creating a System Repair Disc in Windows 7:
- Accessing System Repair Disc Utility:
- Insert a blank CD or DVD into your computer’s optical drive.
- Click on the Start button in the taskbar.
- Navigate to “All Programs” > “Maintenance” > “Create a System Repair Disc.”
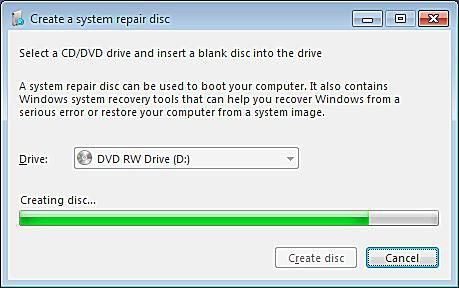
- Selecting Optical Drive:
- In the Create a System Repair Disc window, select the optical drive containing the blank disc.
- Click on the “Create disc” button to begin the disc creation process.
- Creating System Repair Disc:
- Windows 7 will proceed to create the System Repair Disc, copying necessary files and tools to the blank disc.
- This process may take several minutes, depending on the speed of your optical drive and the size of the files being copied.
- Completing Disc Creation:
- Once the disc creation process is complete, Windows 7 will prompt you to label the disc for easy identification.
- Enter a descriptive label for the disc (e.g., “Windows 7 System Repair Disc”) and click on the “Close” button to finish.
- Verifying Disc Integrity:
- After creating the System Repair Disc, it’s advisable to verify the integrity of the disc to ensure that it was created successfully.
- Insert the newly created System Repair Disc into your computer’s optical drive and verify that it can be read and accessed without errors.
Advanced Features and Tips:
To make the most of the System Repair Disc utility and optimize system resilience in Windows 7, consider the following advanced features and tips:
- Updating System Repair Disc: Regularly update the System Repair Disc to ensure that it contains the latest diagnostic and repair tools for troubleshooting system-related issues. Create a new System Repair Disc whenever significant system changes or updates are made.
- Customizing Recovery Options: Customize the recovery options available on the System Repair Disc to suit your specific needs and preferences. Use the Advanced Options menu to add or remove recovery tools and utilities based on your requirements.
- Storing System Repair Disc Securely: Store the System Repair Disc in a safe and accessible location, preferably alongside other important system recovery tools and backup media. Keep multiple copies of the System Repair Disc in different locations for redundancy and disaster recovery purposes.
- Testing System Repair Disc: Periodically test the functionality of the System Repair Disc by booting your computer from the disc and verifying that all recovery options are accessible and operational. This ensures that the System Repair Disc is ready for use in case of an emergency.
Conclusion:
The System Repair Disc is an invaluable tool for troubleshooting and recovering from system-related issues in Windows 7. By following the comprehensive guide outlined above, users can create a System Repair Disc with ease, empowering themselves to address critical errors, restore system functionality, and recover data in times of need. Whether it’s restoring system files, repairing startup issues, or accessing advanced recovery options, the System Repair Disc provides users with the tools and capabilities needed to maintain system resilience and mitigate the impact of system failures. So take charge of your system’s health today, create a System Repair Disc, and ensure that you’re prepared to handle any unforeseen challenges that may arise in Windows 7.


