Effortless Delight: A Comprehensive Guide to Creating a Fun and Easy Gel Text Effect with Layer Styles in Photoshop
Introduction:
In the diverse realm of graphic design, the pursuit of playful and visually engaging text effects is a thrilling adventure. One particularly delightful technique is the creation of a fun and easy gel text effect using layer styles in Adobe Photoshop. This approach transforms ordinary text into a vibrant and translucent masterpiece, infusing designs with a sense of joy and creativity. This comprehensive guide will lead you through a step-by-step journey, unveiling the secrets of crafting a gel text effect effortlessly. With insights into various methods, customization options, and creative applications, this guide caters to both seasoned designers aiming to expand their skill set and beginners eager to explore the world of Photoshop layer styles.
Understanding the Significance of Gel Text:
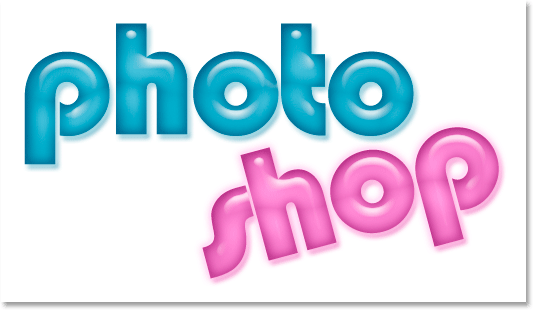
The gel text effect introduces a playful and lively dimension to typography. By mimicking the appearance of gel or jelly, designers can create text that appears soft, translucent, and visually appealing. This technique is perfect for projects where a touch of whimsy, fun, or a vibrant aesthetic is desired. Whether used in web banners, social media graphics, or personal artwork, the gel text effect brings a sense of charm and creativity to typographic compositions.
Step-by-Step Guide to Creating a Fun and Easy Gel Text Effect in Photoshop:
- Open Photoshop and Create a New Document: Launch Adobe Photoshop on your computer and create a new document by selecting File > New. Choose the dimensions and resolution that suit your design requirements. Click “OK” to create the new canvas.
- Set Background Color or Image (Optional): Decide whether you want a solid color background or an image for your composition. You can set the background color by selecting the Paint Bucket tool (G) and choosing a color, or you can import an image using the “Place” command (File > Place).
- Create the Text Layer: Select the Text tool (T) from the toolbar and click on the canvas to create a text layer. Type the desired text, choose the font, size, and color from the options in the toolbar or Character panel. Position the text at the desired location on the canvas.
- Select a Bold and Rounded Font: For a playful and gel-like appearance, choose a bold and rounded font. Fonts with smooth curves and a whimsical vibe work well for this effect. Experiment with different fonts to find the one that suits your design vision.
- Apply Gradient Overlay: Double-click on the text layer to open the Layer Style dialog. In the Layer Style options, select “Gradient Overlay.” Choose a gradient that transitions from a light color at the top to a slightly darker color at the bottom. Adjust the angle and scale to create a subtle shading effect.
- Add Inner Shadow: Still in the Layer Style options, select “Inner Shadow.” Adjust the settings, including distance, size, and opacity, to create a soft shadow within the text. This step adds depth and enhances the gel-like appearance.
- Apply Bevel and Emboss: Select “Bevel and Emboss” in the Layer Style options. Adjust the settings to add a three-dimensional quality to the text. Experiment with the depth, size, and contour options to achieve a rounded and gel-like effect.
- Fine-Tune Layer Styles: Experiment with additional layer styles such as Satin and Stroke to enhance the realism of the gel text effect. Tweak the settings until you achieve a balance between smoothness, shine, and vibrancy.
- Create a New Layer for Highlights: Create a new layer above the text layer and set the blending mode to Overlay. Use a soft, round brush to paint highlights on the top edges and curves of the text. This step adds a touch of brilliance and emphasizes the gel-like nature.
- Add Color to the Background (Optional): If you opted for a solid color background, consider adding additional color accents to complement the gel text. Create a new layer below the text layer and use the Brush tool (B) to paint soft shapes or patterns.
- Fine-Tune the Composition: Use the Move tool (V) to fine-tune the positioning of both the text and highlight layers. Experiment with the arrangement to achieve a balanced and visually appealing composition. Ensure that the gel text stands out against the background.
- Experiment with Color Adjustments: Fine-tune the overall color and tone of the composition by adding adjustment layers. For example, you can use a Hue/Saturation adjustment layer to tweak the color scheme or a Curves adjustment layer to enhance the contrast.
- Fine-Tune and Preview: Regularly toggle the visibility of layers, experiment with different effects, and fine-tune settings to achieve the desired appearance of gel text. Preview the design in different contexts to ensure it remains visually impactful.
- Save and Export: Once satisfied with the design, save your work in the desired format. For web or print use, consider exporting the image in common formats like JPEG or PNG. Preserve the layered Photoshop file (PSD) to retain the flexibility for future edits.
Examples of Creative Applications for Gel Text:
- Children’s Book Covers and Illustrations: Create whimsical and inviting children’s book covers or illustrations by incorporating gel text. The soft and playful nature of the effect adds a delightful touch to storytelling visuals.
- Candy and Sweet Shop Branding: Design eye-catching branding materials for candy or sweet shops by featuring gel text. The vibrant and translucent appearance complements the theme and evokes a sense of sugary delight.
- Event Invitations and Party Decorations: Craft lively event invitations or party decorations with gel text. This technique is perfect for birthdays, celebrations, or any event where a fun and vibrant aesthetic is desired.
- Social Media Graphics and Stickers: Capture attention on social media platforms by using gel text in graphics and stickers. The playful and colorful effect is likely to engage viewers and convey a lighthearted message.
- Product Labels for Fun and Youthful Brands: Enhance the packaging of products for fun and youthful brands by incorporating gel text. The effect adds a touch of playfulness and makes the brand visually appealing to a younger audience.
Conclusion:
The creation of a fun and easy gel text effect in Photoshop is a delightful and accessible technique that brings a sense of playfulness to typography. By following the comprehensive steps outlined in this guide, you gain valuable insights into the process of crafting designs that exude joy and creativity. Whether you’re working on children’s illustrations, event materials, social media graphics, or personal projects, the art of gel text provides a whimsical approach to typographic design.
As you embark on the journey of transforming text into a gel-like wonder, let your creativity flow. Experiment with different fonts, gradients, layer styles, and additional elements to tailor the composition to the unique requirements of each project. The fusion of typography and the gel text effect offers a versatile and enjoyable result, making your designs stand out in the dynamic world of graphic design. So, dive into the world of gel text in Photoshop, and let your designs radiate with the effervescent charm of fun and easy creativity.
