Building RESTful APIs with Flask: A Comprehensive Guide
Flask is a lightweight web framework for Python that makes it easy to create web applications and APIs. In this article, we’ll go through the steps to create a REST API with Flask, covering everything from setup to deployment. We’ll also cover best practices and advanced features.
Table of Contents
- Introduction to REST APIs
- Setting Up Flask
- Creating Your First Endpoint
- Handling Different HTTP Methods
- Using Flask Blueprints
- Implementing Authentication
- Error Handling and Validation
- Testing Your API
- Documentation with Swagger
- Deployment
- Conclusion
1. Introduction to REST APIs
REST (Representational State Transfer) is an architectural style for designing networked applications. It relies on a stateless, client-server, cacheable communication protocol — the HTTP. RESTful applications use HTTP requests to perform CRUD (Create, Read, Update, Delete) operations on resources, which can be represented in formats like JSON or XML.
Key Concepts
- Resource: Any object that can be accessed via a URI.
- URI (Uniform Resource Identifier): A unique identifier for a resource.
- HTTP Methods: Common methods include GET, POST, PUT, DELETE.
2. Setting Up Flask
Install Flask
First, you need to install Flask. You can do this using pip:
pip install Flask
Create a Basic Flask Application
Create a new file, app.py, and add the following code:
from flask import Flaskapp = Flask(__name__)
def home():
return "Welcome to the Flask API!"
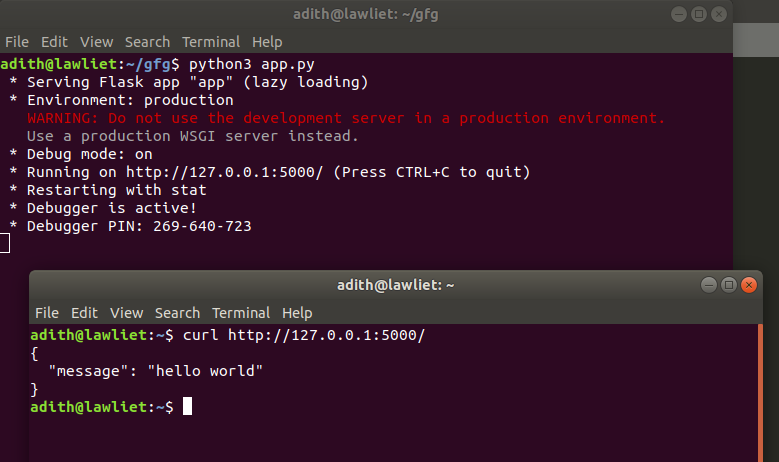
if __name__ == '__main__':
app.run(debug=True)
Run the application with:
python app.py
You should see the message “Welcome to the Flask API!” when you navigate to http://127.0.0.1:5000/ in your web browser.
3. Creating Your First Endpoint
Defining Routes
In Flask, you define routes using the @app.route decorator. Let’s create an endpoint for retrieving all items:
from flask import jsonify
def get_items():
items = [
{"id": 1, "name": "Item 1"},
{"id": 2, "name": "Item 2"}
]
return jsonify(items)
Navigate to http://127.0.0.1:5000/items to see the JSON response.
4. Handling Different HTTP Methods
Adding a New Item (POST)
To handle POST requests, you can define a route that accepts data:
from flask import request
def add_item():
new_item = request.json
# Normally, you would save this to a database
return jsonify(new_item), 201
Updating an Item (PUT)
For updating an item, you can use the PUT method:
def update_item(item_id):
updated_item = request.json
# Normally, you would update the item in the database
return jsonify(updated_item)
Deleting an Item (DELETE)
To delete an item, use the DELETE method:
def delete_item(item_id):
# Normally, you would delete the item from the database
return '', 204
5. Using Flask Blueprints
Blueprints help organize your application into modules. This is especially useful for larger applications.
Creating a Blueprint
Create a new file, items.py, for the blueprint:
from flask import Blueprint, jsonify, requestitems_bp = Blueprint('items', __name__)
def get_items():
items = [
{"id": 1, "name": "Item 1"},
{"id": 2, "name": "Item 2"}
]
return jsonify(items)
def add_item():
new_item = request.json
return jsonify(new_item), 201
def update_item(item_id):
updated_item = request.json
return jsonify(updated_item)
def delete_item(item_id):
return '', 204
Registering the Blueprint
In app.py, register the blueprint:
from flask import Flask
from items import items_bpapp = Flask(__name__)
app.register_blueprint(items_bp)
if __name__ == '__main__':
app.run(debug=True)
6. Implementing Authentication
Basic Authentication
You can implement basic authentication using the flask_httpauth library:
pip install Flask-HTTPAuth
Add authentication to your blueprint:
from flask_httpauth import HTTPBasicAuthauth = HTTPBasicAuth()
users = {
"user1": "password1",
"user2": "password2"
}
def verify_password(username, password):
if username in users and users[username] == password:
return username
def get_items():
items = [
{"id": 1, "name": "Item 1"},
{"id": 2, "name": "Item 2"}
]
return jsonify(items)
Now, accessing /items requires authentication.
7. Error Handling and Validation
Error Handling
To handle errors gracefully, you can use Flask’s error handlers:
def not_found(error):
return jsonify({"error": "Not found"}), 404
def internal_error(error):
return jsonify({"error": "Internal server error"}), 500
Input Validation
For input validation, you can use the marshmallow library:
pip install marshmallow
Define a schema for validation:
from marshmallow import Schema, fields, ValidationErrorclass ItemSchema(Schema):
id = fields.Int(required=True)
name = fields.Str(required=True)
item_schema = ItemSchema()
def add_item():
try:
new_item = item_schema.load(request.json)
except ValidationError as err:
return jsonify(err.messages), 400
return jsonify(new_item), 201
8. Testing Your API
Unit Tests
Use the unittest library to write tests for your API:
import unittestclass APITestCase(unittest.TestCase):
def setUp(self):
self.app = app.test_client()
self.app.testing = True
def test_get_items(self):
response = self.app.get('/items')
self.assertEqual(response.status_code, 200)
if __name__ == '__main__':
unittest.main()
Testing with Postman
Postman is a popular tool for testing APIs. You can create requests and organize them into collections. This allows you to test all the endpoints of your API interactively.
9. Documentation with Swagger
Setting Up Swagger
Swagger is a tool for documenting APIs. You can use the flask-swagger-ui library:
pip install flask-swagger-ui
Create a swagger.json file with your API documentation and add it to your Flask app:
from flask_swagger_ui import get_swaggerui_blueprintSWAGGER_URL = '/swagger'
API_URL = '/static/swagger.json'
swaggerui_blueprint = get_swaggerui_blueprint(SWAGGER_URL, API_URL, config={'app_name': "Flask API"})
app.register_blueprint(swaggerui_blueprint, url_prefix=SWAGGER_URL)
Generating Swagger JSON
You can generate the swagger.json file manually or use a library like flasgger to auto-generate it:
pip install flasgger
Add Flasgger to your app:
from flasgger import Swaggerswagger = Swagger(app)
def get_items():
"""
Get all items
---
responses:
200:
description: A list of items
"""
items = [
{"id": 1, "name": "Item 1"},
{"id": 2, "name": "Item 2"}
]
return jsonify(items)
10. Deployment
Using Gunicorn
Gunicorn is a Python WSGI HTTP Server for UNIX. It is a pre-fork worker model, which means it forks multiple worker processes to handle requests.
Install Gunicorn:
pip install gunicorn
Run your Flask app with Gunicorn:
gunicorn -w 4 app:app
Deploying to Heroku
Heroku is a cloud platform that lets you deploy, manage, and scale apps.
- Install the Heroku CLI.
- Create a
Procfilewith the following content:Procfileweb: gunicorn app:app
- Deploy your app:bash
heroku create
 git add .
 git commit -m "Initial commit"
 git push heroku master
11. Conclusion
Creating a REST API with Flask is a straightforward process thanks to Flask’s simplicity and flexibility. By following best practices and utilizing Flask’s extensive ecosystem, you can build robust and scalable APIs. Whether you’re creating a small project or a large-scale application, Flask provides the tools you need to succeed.
This article has covered the basics of setting up a Flask application, creating endpoints, handling HTTP methods, using blueprints, implementing authentication, error handling, testing, documentation, and deployment. With this knowledge, you can start building your own REST APIs with Flask.