A Comprehensive Guide: Adding a Printer in Windows 10 for Seamless Printing
Introduction:
The process of adding a printer to your Windows 10 system is a fundamental step in optimizing your printing experience. Whether you’re connecting a local printer directly to your computer or setting up a network printer that multiple devices can access, Windows 10 provides a user-friendly interface for these configurations. This comprehensive guide explores the intricate details of adding a printer in Windows 10, covering various scenarios, troubleshooting tips, and optimizing settings for a seamless printing experience.
1. Understanding Printer Connectivity Options: Local, Network, and Wireless
Before delving into the process of adding a printer, it’s essential to understand the different connectivity options available in Windows 10:
- Local Printers: Directly connected to your computer via USB or parallel ports.
- Network Printers: Connected to your local network, allowing multiple devices to print to the same printer.
- Wireless Printers: Combine the convenience of network printers with wireless connectivity, eliminating the need for physical cables.
Understanding your printer’s connectivity type is crucial for a successful setup.
2. Adding a Local Printer in Windows 10: USB or Parallel Connection
If you have a printer connected directly to your computer, follow these steps to add it to Windows 10:
- Connect the Printer: Use a USB or parallel cable to connect the printer to an available port on your computer.
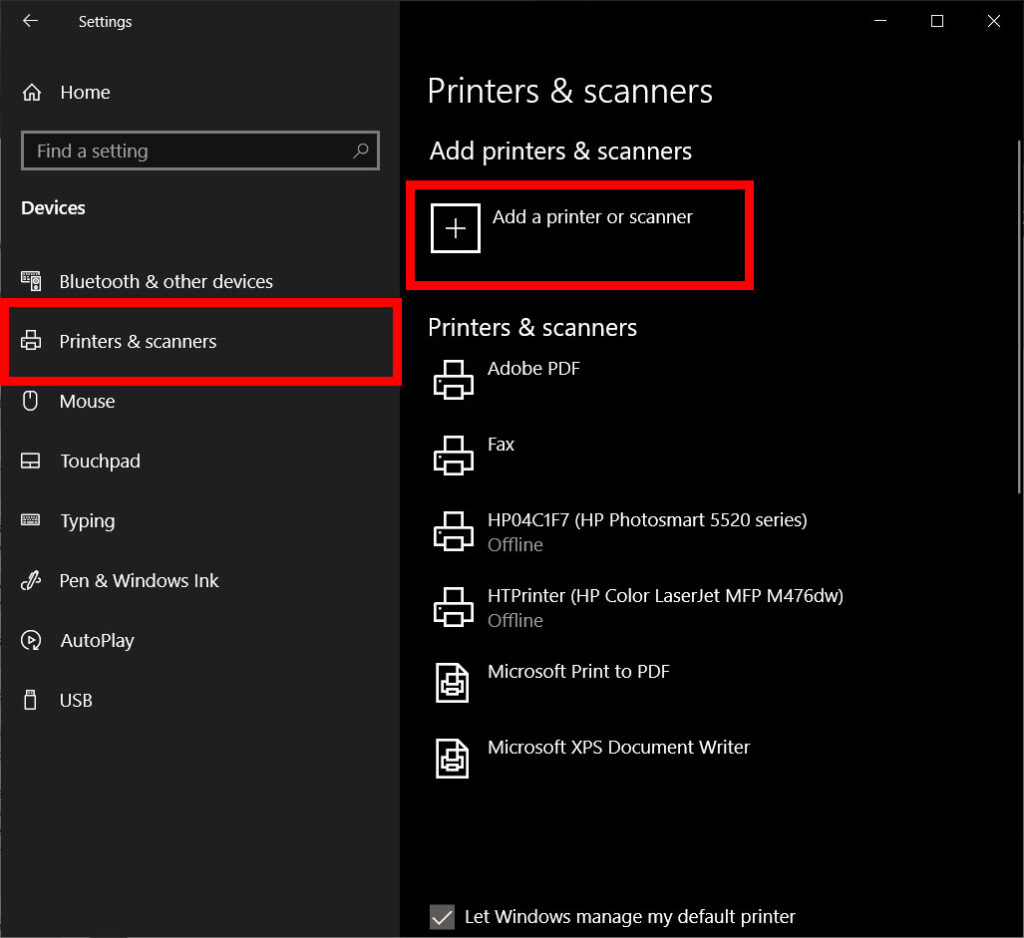
- Open Settings: Click on the Start menu, go to “Settings,” and select “Devices.”
- Select Printers & Scanners: In the Devices settings, click on “Printers & scanners.”
- Click on Add a Printer or Scanner: Windows 10 will automatically detect the connected printer. Click on the “Add a printer or scanner” option.
- Choose the Printer: Select your printer from the list of available devices and click “Add device.”
Windows 10 will install the necessary drivers and add the local printer to your system.
3. Adding a Network Printer in Windows 10: Shared Printer on Local Network
If you have a printer connected to a different computer on your local network and shared, follow these steps to add it to Windows 10:
- Ensure Printer Sharing is Enabled: On the computer to which the printer is connected, ensure that printer sharing is enabled. This is typically found in the printer settings or control panel.
- Open Settings: On your Windows 10 computer, open the Start menu, go to “Settings,” and select “Devices.”
- Select Printers & Scanners: In the Devices settings, click on “Printers & scanners.”
- Click on Add a Printer or Scanner: Choose the “Add a printer or scanner” option.
- Wait for Detection: Windows 10 will automatically search for available printers on the network. Once the shared printer is detected, click on it and select “Add device.”
Windows 10 will install the necessary drivers and add the network printer to your system.
4. Adding a Wireless Printer in Windows 10: Seamless Wireless Connectivity
Wireless printers provide the flexibility of printing from multiple devices without the need for physical connections. To add a wireless printer to Windows 10:
- Ensure Printer is on the Same Network: Confirm that your wireless printer and Windows 10 computer are connected to the same Wi-Fi network.
- Open Settings: Click on the Start menu, go to “Settings,” and select “Devices.”
- Select Printers & Scanners: In the Devices settings, click on “Printers & scanners.”
- Click on Add a Printer or Scanner: Choose the “Add a printer or scanner” option.
- Wait for Detection: Windows 10 will search for available printers. Once the wireless printer is detected, click on it and select “Add device.”
Windows 10 will automatically configure the wireless settings and add the printer to your system.
5. Installing Printer Drivers: Ensuring Compatibility and Functionality
Printer drivers are crucial software that facilitates communication between your operating system and the printer. Windows 10 often automatically installs the necessary drivers during the printer setup process. However, if you encounter issues or want to manually install specific drivers, follow these steps:
- Visit Manufacturer’s Website: Go to the website of your printer’s manufacturer and navigate to the “Support” or “Downloads” section.
- Download Drivers: Locate the drivers for your printer model and download them to your computer.
- Install Drivers: Run the downloaded driver installation file and follow the on-screen instructions to install the drivers.
Manually installing drivers ensures that your printer functions optimally with all its features supported.
6. Troubleshooting Printer Issues: Common Challenges and Solutions
While adding a printer is generally straightforward, users may encounter common challenges. Here are some troubleshooting tips:
- Check Connections: Ensure that the printer is correctly connected, powered on, and, in the case of wireless printers, connected to the same Wi-Fi network as your computer.
- Restart Devices: Sometimes, a simple restart of both your computer and the printer can resolve connectivity issues.
- Update Drivers: Ensure that your printer drivers are up to date. Visit the manufacturer’s website to download the latest drivers.
- Check for Windows Updates: Running Windows Update can address compatibility issues and provide updates that may resolve printer-related problems.
- Firewall and Antivirus Settings: Confirm that your firewall or antivirus software is not blocking printer communication. Adjust settings if necessary.
7. Managing Printers in Windows 10: Customization and Optimization
Windows 10 offers various customization options for managing printers and enhancing your printing experience:
- Set Default Printer: In the “Printers & scanners” settings, choose your preferred printer and click “Manage.” Select the “Set as default” option for quicker printing.
- Printer Preferences: Right-click on your printer and choose “Printing preferences” to access advanced settings, such as paper type, quality, and color options.
- Manage Print Queue: Use the “See what’s printing” option to access the print queue. Here, you can pause, resume, or cancel print jobs.
- Printer Properties: Explore the properties of your printer to configure additional settings, such as sharing options, security, and maintenance tasks.
8. Mobile Printing with Windows 10: Printing from Smartphones and Tablets
Windows 10 facilitates mobile printing, allowing users to print documents, photos, and more directly from their smartphones or tablets. To set up mobile printing:
- Ensure Printer Compatibility: Confirm that your printer supports mobile printing technologies like Wi-Fi Direct or cloud printing.
- Connect Devices to the Same Network: Ensure that your smartphone or tablet is connected to the same Wi-Fi network as your Windows 10 computer.
- Install Printer Apps: Some printer manufacturers offer dedicated mobile apps that enable printing from smartphones or tablets. Install the relevant app for your printer model.
- Use Built-in Features: Windows 10 includes features like Print to PDF and Microsoft Print to PDF, allowing users to save documents as PDFs for easy mobile access.
9. Updating and Removing Printers in Windows 10: Maintenance and Clean-Up
Regular maintenance includes updating drivers and occasionally removing old or unused printers. Follow these steps:
- Update Printer Drivers: Periodically check for updated drivers on the manufacturer’s website and install them to ensure optimal performance.
- Remove Unused Printers: In the “Printers & scanners” settings, select any printers you no longer use and click “Remove device” to declutter your system.
10. Windows 10 Printer Troubleshooter: Streamlining Problem Resolution
Windows 10 includes a built-in troubleshooter specifically designed to address printer-related issues. To use the Printer Troubleshooter:
- Open Settings: Go to “Settings,” select “Update & Security,” and choose “Troubleshoot.”
- Run the Printer Troubleshooter: Locate the “Printer” troubleshooter and run it. Follow the on-screen instructions to identify and resolve common printer problems.
Conclusion: Mastering the Art of Adding Printers in Windows 10
In conclusion, adding a printer in Windows 10 is an essential skill for users seeking a seamless and efficient printing experience. Whether connecting a local printer, a network printer, or a wireless printer, Windows 10 offers a user-friendly interface with robust customization options. By understanding the connectivity options, troubleshooting common issues, and exploring advanced settings, users can optimize their printing environment. As technology continues to evolve, Windows 10 ensures that users have the tools and features needed to stay connected with their printers and effortlessly bring digital content to life on paper. Mastering the art of adding printers in Windows 10 empowers users to navigate the diverse landscape of printing devices and configurations, making the process both accessible and enjoyable.


